According to research, seniors who use the internet are at high risk of falling prey to cyber-attacks. Alarmingly, research shows that older adults (over 60 years old) lose almost $650 million a year from being victims of cybercrime. Unfortunately, attackers are preying on the senior’s lack of cybersecurity knowledge and overall vulnerability in hopes of getting a score that has proven to be successful over the years. In fact, 5 times increase in cyber-attacks on older adults have been recorded since 2014.
How do we go about this dilemma? The internet is enjoyed by many and usage is only expected to grow in all age groups; however, there are a few scams that specifically target seniors. Knowing this is important for seniors who want to enjoy the internet with a peace of mind so that you can be more careful alert and careful when browsing the web.
Here’s a list of internet scams targeting seniors that will shock you:
Phishing
Phishing is the most common type of internet scam where hackers use fake information to bait unsuspecting seniors. Phishing scams exist in the form of spam emails that contain fraudulent information to bait seniors into clicking on them or even give up personal information. Without thinking twice, seniors will usually click on these emails which instantly downloads malware onto their devices. In most cases, these seniors remain unaware until it is too late.
As we know, we can buy all sorts of things on the internet. Most of us know that we must be careful in ensuring the purchases are from legitimate sources. Unfortunately for seniors, some of them do not know this and are duped into purchasing counterfeit drugs. Seniors in the US consume one-third of all prescription drugs and scammers know this. These counterfeit drugs are not only extremely low in potency, but they also contain additives that can make the seniors health deteriorate even further.
Sweetheart scam
A sweetheart scam is one of the worst because it can ultimately destroy the victim in terms of preying on their emotions and also tricking seniors into giving up all their money. This type of scam preys on the loneliness of seniors who might just be innocently looking for companionship online. In one example, daughter Angie Kennard only found out that her father was scammed of over $700,000 by a ‘woman’ he met online. Even then, Angie only found this out by chance, when her father had a stroke and handed his finances over. And it was too late – her father was scammed out of all his savings.
Sweepstakes/Lottery
You’ve probably seen this before – bright, loud, and pulsing images of lottery or sweepstakes advertisements claiming you’ve won a prize. While most of us today know better than to fall for this trick, unfortunately, many seniors do not know this. These scams usually bait seniors to give up their bank information in order to ‘claim their prize’. Naïve seniors unfortunately do not know better and give up their information with ease.
It is heartbreaking that there are so many online scams out there targeting vulnerable people like our seniors. Besides the few listed above, there are in fact all sorts of other scams as cyber-attackers are always getting creative in their attacks. Nevertheless, one of the biggest ways we can prevent attacks from occurring is by creating awareness and educating seniors on responsible cyber safety etiquette. By being aware of what can happen, seniors can be more alert and think twice before believing everything that they see online.
This holiday season is the time to go big and bold with your desserts. Nothing satisfies those sweet tooth cravings like a white candy cane layered cake. Three layers of peppermint cake smothered with a sensational whipped topping make this cake a treat to slice up and serve or keep for yourself.
Three Cake Layers Make All the Difference
When you make a cake at home the temptation is to do a sheet cake or to only make one or two layers. If you only have one or two pans, this is completely understandable, but adding a third layer is the number one way to improve any cake. 3 layered cakes generally have a much better appearance. They are the perfect height. While additional layers may require a little bit more finesse, adding a third layer to your cake adds visual appeal while remaining relatively easy to assemble.
A third layer also improves your odds of pulling together a professional-looking cake. If you hit a snag with one of the layers, you can sandwich the imperfect layer between the two perfect ones. Thus salvaging your mistake, when otherwise you would have to work much harder to cover up any errors.
The Power of Peppermint
As holiday flavours go, it’s hard to think of a more perfect winter ingredient than peppermint. Candy canes are iconic and the spicy burn of peppermint feels like biting frost on your tongue. The sweetness of this cake is not to be underestimated, but it’s balanced and measured so you won’t have any trouble finishing your plate. at the same time, don’t worry about the peppermint being too strong. This recipe is perfect whether you are a peppermint fanatic or not.
Don’t Get Stuck!
The biggest challenge of backing a Christmas cake (decorating is an entirely different story) is getting the baked cake out of the pan. If you aren’t careful in applying the grease to the pan, you may have to resort to impractical tricks to try and jimmy or shake the cake loose. To be extra safe, be sure to use parchment paper, well greased, or coated in cooking spray to line the pan. If your cake is stuck in the pan, try placing the bottom of the pan in hot water for about ten minutes to loosen things up. Don’t use a knife unless all hope is lost!
What To Serve With The White Candy Cane Layered Cake
You can serve the white Candy Cane Layered Cake with vanilla ice cream! For a special treat, you can drink it with a glass of Homemade Eggnog or even spiced Eggnog cocktail with Peppermint Schnapps, or a hot cup of cocoa. This delicious Christmas cake will make your guests want a second portion! It’s such a tasty Christmas dessert for everyone coming over for the holidays.
YOU CAN SERVE THE WHITE CANDY CANE CAKE WITH THESE HOLIDAY DRINKS:
Preheat oven to 350 degree’s and spray all 3 cake pan with pam baking spray and set aside.
In a medium mixing bowl, whisk together the milk and peppermint and set aside.
Using a standing mixer, beat together the butter and sugar until light and fluffy.
In a large mixing bowl, whisk together the flour and baking powder.
Alternating between the milk and dry ingredients, gradually pour into the butter mixture. Mixing on low to medium speed until combined.
Using another large mixing bowl and a hand mixer, beat the eggs until stiff peaks form.
Fold into the cake batter.
Divide the batter evenly between 2 mixing bowls.
Leave one bowl white.
In the second bowl, mix in about 3-5 drops of red food colouring.
Scoop 1 cup of white batter into the cake pans.
Scoop 1 cup of red batter next to the white in the cake pans.
Repeat steps until all batter has been evenly divided between the three pans.
Take a butterknife and gently swirl the batters together.
Bake in the oven for 23-26 minutes or until a toothpick comes out clean in the centre.
Allow the cakes to cool completely before removing from cake pans.
Place the cakes onto a cutting board.
Using a cake slicer, remove the domes from the cakes.
Place one layer of cake onto the cake board.
White Candy Cane Layered Cake Frosting Directions
Using a standing mixer, beat all ingredients together until stiff peaks form. About 5-7 minutes.
Scoop 1 cup of frosting into the piping bag.
Building the Cake Directions
Scoop about 1 cup of frosting onto the first layer and smooth out with a angled spatula.
Place the second layer of cake onto the first layer of frosting.
Scoop another cup of frosting onto the second layer of cake and smooth with evenly.
Place the last layer of cake onto the second layer of frosting.
Scoop remaining white frosting onto the cake and cover the sides completely with the crushed candy canes.
Pipe dollops of white frosting on top of the cake and sprinkle some crushed candy canes on top.
How To Store The Frosted Cake
The best way to store this frosted cake is with a cake keeper. I love my Round Cake Taker from Tupperware as it fits any 3 layer cake with ease. Since the frosting is made with heavy cream, this layered cake is best kept covered and refrigerated until you are ready to serve. Bring a refrigerated cake out 30 minutes to an hour before serving and let sit at room temperature.
When you slice a piece of cake, moisture begins to escape, and the cake begins to stale. At this point, it’s best to cover the sliced edges with frosting or with a piece of plastic wrap press onto the open and sliced sides.
I hope you enjoyed my White Candy Cane Layered Cake Recipe as much as I did! If you make it, please share your photos with us on Facebook or Twitter! Also, check out all of our other recipes!
THE WHITE CANDY CANE LAYERED CAKE RECIPE
This holiday season is the time to go big and bold with your desserts. Nothing satisfies those sweet tooth cravings like a white candy cane layered cake. Three layers of peppermint cake smothered with a sensational whipped topping make this cake a treat to slice up and serve or keep for yourself.
Preheat oven to 350 degree’s and spray all 3 cake pan with pam baking spray and set aside.
In a medium mixing bowl, whisk together the milk and peppermint and set aside.
Using a standing mixer, beat together the butter and sugar until light and fluffy.
In a large mixing bowl, whisk together the flour and baking powder.
Alternating between the milk and dry ingredients, gradually pour into the butter mixture. Mixing on low to medium speed until combined.
Using another large mixing bowl and a hand mixer, beat the eggs until stiff peaks form.
Fold into the cake batter.
Divide the batter evenly between 2 mixing bowls.
Leave one bowl white.
In the second bowl, mix in about 3-5 drops of red food colouring.
Scoop 1 cup of white batter into the cake pans.
Scoop 1 cup of red batter next to the white in the cake pans.
Repeat steps until all batter has been evenly divided between the three pans.
Take a butterknife and gently swirl the batters together.
Bake in the oven for 23-26 minutes or until a toothpick comes out clean in the centre.
Allow the cakes to cool completely before removing from cake pans.
Place the cakes onto a cutting board.
Using a cake slicer, remove the domes from the cakes.
Place one layer of cake onto the cake board.
WHITE CANDY CANE LAYERED CAKE FROSTING DIRECTIONS
Using a standing mixer, beat all ingredients together until stiff peaks form. About 5-7 minutes.
Scoop 1 cup of frosting into the piping bag.
BUILDING THE CAKE DIRECTIONS
Scoop about 1 cup of frosting onto the first layer and smooth out with a angled spatula.
Place the second layer of cake onto the first layer of frosting.
Scoop another cup of frosting onto the second layer of cake and smooth with evenly.
Place the last layer of cake onto the second layer of frosting.
Scoop remaining white frosting onto the cake and cover the sides completely with the crushed candy canes.
Pipe dollops of white frosting on top of the cake and sprinkle some crushed candy canes on top.
Notes
EQUIPMENT NEEDED
3 -9 inch round cake pans
3 sheets of parchment paper
1 – 10 inch round cake board
1 large piping bag with star tip
angled spatula
cake smoother
HOW TO STORE THE FROSTED CAKE The best way to store this frosted cake is with a cake keeper. I love my Round Cake Taker from Tupperware as it fits any 3 layer cake with ease. Since the frosting is made with heavy cream, this layered cake is best kept covered and refrigerated until you are ready to serve. Bring a refrigerated cake out 30 minutes to an hour before serving and let sit at room temperature.When you slice a piece of cake, moisture begins to escape, and the cake begins to stale. At this point, it’s best to cover the sliced edges with frosting or with a piece of plastic wrap press onto the open and sliced sides.
Are you looking for a Christmas or holiday gift idea? These Christmas Gift Baskets DIY and Hamper Themed Ideas For Families provide a few suggestions for unique festive gifts for families.
Christmas family gift baskets and hampers can make unique and special gift ideas. Finding the right gift for the right person or family can sometime be a major headache. Those looking for family gift basket ideas with a difference could consider giving DIY themed holiday gift baskets or hampers. Christmas gift baskets can also include items for the whole family including pet lovers like a cat coffee mug or dog ornament.
First of all, let’s look at some different types of hampers and gift baskets.
Christmas Gift Baskets And Hampers
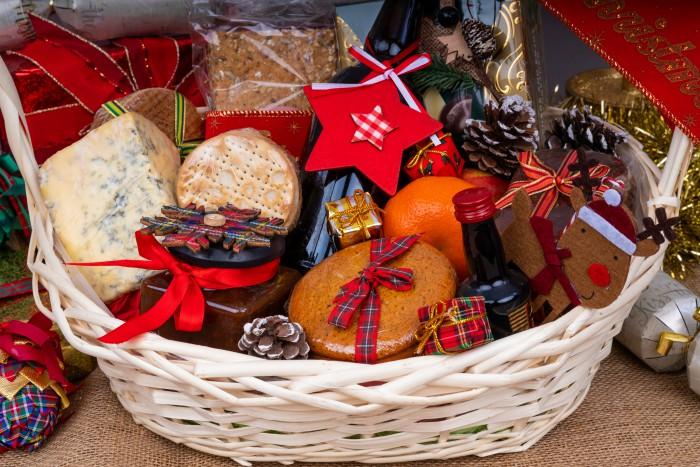
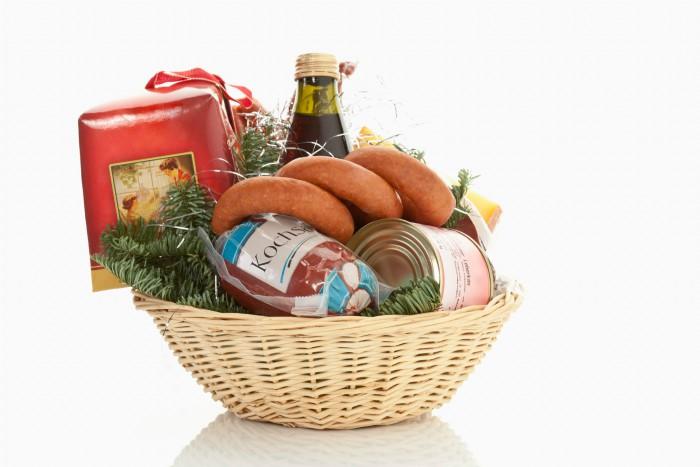
Some hampers and baskets are specially designed for the Christmas season. The contents of this kind of gift could, for example, include traditional foods and wines for the holiday. These options come in all shapes and sizes. Larger sized options could contain virtually everything needed for the main Christmas meal with some extras thrown in. Smaller gift baskets could contain a range of seasonal condiments, sweet treats, jams, and chutneys.
Drinks Gift Baskets And Hampers
As an alternative, many like to give gifts that are based around alcoholic or soft drinks (or a mix of the two). A hamper or Christmas basket ideas may include:
Fine wines
Champagnes
Whiskies and other alcoholic bottles
Specialist soft drinks
Again, these products can range from large luxury hampers through to smaller gift baskets.
Food Gift Baskets And Hampers
Hampers and baskets containing a specific type of food are also popular. So, for example, you can pick a few products to make your gourmet gift basket:
A range of fine cheeses
Gourmet foods
Luxury regional foods
Biscuits and cookies
Chocolates
Fresh and dried fruits and nuts
The contents of a food hamper or gift basket may have some Christmas related products in them. They may alternatively simply contain general foods and products.
Dietary Needs Gift Baskets And Hampers
Some people may have special dietary needs that makes it hard for them to enjoy a regular gift of this kind. There are other options here that may be worth considering such as hampers/baskets for:
Diabetics
Vegetarians and vegans
Those with celiac disease
Those with food allergies such as gluten intolerance
How To Make A Homemade Christmas Gift Basket Or Hamper
Buying these items as gifts can work out to be expensive and many will opt instead to make up their own hampers and baskets. This will definitely save some money. It will also help to make a more personalized gift as they can be made up to suit the tastes of the gift recipient. See the video above for ideas on easy Christmas gift baskets.
This is easy enough to do. All that is needed is:
A hamper, basket or even a pretty decorated box such as the one below.
A range of items to put in the basket (which could be store bought or homemade)
Wrapping paper or cellophane paper with a tie twist to wrap the basket
Ribbon and a bow to decorate the basket
Christmas Themed Gift Baskets And Hampers
Arranging a creative and cheap Christmas gift basket is an alternative to buying a more pricey ready-made basket for a family. Some suggestions below include a movie theatre themed basket, a hot beverage basket, or a dinner for the family gift basket. Also included are additional items that can be added if a more expensive basket is desired.
Start with a very large bowl as the “basket”. The idea is that this bowl will be saved to be used for popped popcorn. A large plastic bowl will typically cost $2 to $5 at a discount retail store.
Add a box of microwave popcorn and several packages of movie theatre-style boxed candy.
For a more expensive basket, add sodas, wine, or beer, a gift card to purchase a new movie.
Hot Beverage Themed Christmas Gift Basket or Hamper
This gift basket idea can mix together a variety of hot beverages or just focus on either coffee, tea, or hot cocoa.
Start with a basket. Add two ceramic mugs. Mugs can be holiday-themed or just a traditional style. Inexpensive mugs can even be purchased at dollar stores.
For a coffee or hot chocolate themed basket: Add small bags of flavoured ground coffee or a variety of hot cocoa mix packets. Then include 1 flavoured beverage syrup, such as Torani. Both can be purchased at most grocery stores. For a more expensive basket, add flavoured liquor, such as amaretto or Baileys Irish Cream.
For a hot tea basket: Inexpensive, bagged teas can be found in any grocery store. Include a variety of boxes of traditional, herbal, and flavoured teas. Another slightly more expensive option is to include a variety of ground tea tins, usually purchased at a specialty food store. Also include a tea infuser ball for this option. Finally, for a more expensive basket, a teapot can be added. Teapots can sometimes be found at discount retail stores for $10 or more.
Dinner For The Family Holiday Gift Basket
This family dinner night Christmas basket option can be done in a variety of ways, depending on the budget and preferences of the recipient. This example is for an Italian themed dinner.
Start with a large stockpot as the “basket.” These can run as high as $100 or more; however inexpensive, quality stock pots can be found at Walmart and other discount stores for a low as $10 to $20.
Appetizer: Include a jar of olives, a pepperoni roll, and crackers.
Entree: Add a fun shaped pasta and a jar of pasta sauce.
Dessert: Include a package of biscotti. This Italian cookie can generally be found in the packaged cookie aisle at most grocery stores.
For a more expensive basket, include a bottle of Italian wine.
Holiday and Christmas gift baskets and hampers can be made for unique and budget-friendly presents. Gift assortments found in stores and online sites are often expensive and impersonal. These DIY Christmas Gift Basket and Hamper Themed Ideas For Families we mentioned above are just a few ideas for the many options for creating affordable and perfect gift baskets at home.
Have you given Christmas hampers or gift baskets as gifts before? Did you create a themed hamper or basket? Comment below!
With the weather turning chillier each and every day, there is nothing I love more than cozying up at home and being WARM! With Christmas around the corner, it’s the perfect time to give the gift of comfort with Magic Bag also known as Sac Magique! And, my family was just graciously gifted some to review. In fact, I already have one that I used for around my neck when I was experiencing neck pain, so I already know they work beautifully, and was happy to review some new ones!
The three products we were asked to review
Magic Bag Review
We received the following three Magic bag products to review:
One of the best parts is that their products are 100% Canadian! Made in Canada of 100% Cotton and cut and hand sewn in Canada. It’s even filled with organic Canadian grains so rest assured you’re using a safe product and don’t have to wonder about what’s inside.
The fact that the grains are organic and compostable is important for a sustainable future since you can cut open your bag and compost the grains when you’re done with it! (average life span 100 uses to still retain heat).
THE ORIGINAL 19 X 12 NECK TO BACK MAGIC BAG COMPRESS
Retailing at $29.99 Canadian, The Neck-to-Back Magic Bag acts as a hot or cold compress to relax muscles and reduce pain. Measuring 48 x 31 cm, it wraps comfortably around your neck draping down to soothe your back and shoulder area as well.
After being out in the cold with my kids, I love using it to relax and get cozy. It’s really quite soothing after a long day; however, it’s much more than just relaxing. The heat therapy releases muscle tension, promotes circulation, and relieves stomach cramps, aches, and pain. All you have to do is place it on a paper towel in your microwave for 20 – 30 seconds.
MAGIC BAG Heating Pads
There are health benefits in using Magic Bag! What’s great is that it’s multipurpose in that it can also provide cold therapy, reducing inflammation, and swelling. It is also helpful for migraines. I’m all about a product that multitasks!
It also helps with anxiety, which at this time is unfortunately at an all-time high during the Pandemic. In fact, according to Mental Health Research Canada, levels of anxiety are four times higher than pre-pandemic period and depression levels have doubled.
Magic bag heating instructions
Place the Magic Bag in the centre of a clean microwave and spread the grains evenly. If your bag is too long and doesn’t fit in the microwave, fold it in half. Heat the Magic Bag in the microwave in 30-second intervals for a maximum of 2 minutes.
MAGIC BAG WARMY – OLLIE THE OWL AND ALIX THE LAMB
Just like us, our little ones are feeling the stresses of the pandemic. Among other stresses that they may be experiencing in their lives, the Magic Bag Warmy is a comforting little friend to help them with tummy aches, chills, bumps and bruises, and more. The cute little designs make it a lot more comforting and inviting than a plain old ice or heat pack. They are registered with Health Canada and are carefully filled with hypoallergenic rice.
Retailing at $14.99 and $21.99, these little guys provide a sense of relief for anxiety and can promote relaxation while contributing to a restorative sleep. My boys loved Alix the Lamb & Ollie the Owl! And, with every Warmy Magic Bag sold, a portion goes to Make-A-Wish Foundation. To date they have raised close to $80,000. I absolutely love that they do this! It’s no surprise they won the “Parent-Tested, Parent-Approved” award.
MAGIC BAG: PRACTICAL GIFTS GIVING THIS CHRISTMAS
I highly recommend the gift of comfort with Magic Bag this Christmas. They make excellent practical gifts for under the tree. In fact, my boys both love Alix the Lamb so much that I am thinking of buying one for under our tree so they both have their own!
This holiday season can always be fun! Even with the pandemic and the stress of the year sticking around, it can still be a fun, worthwhile holiday for you and your family. Here are some amazing and fun holiday activities that you can engage in with your child, which happen to be fun things that they will love to do.
Santa Writes a Letter
A fun activity is Santa Writes a Letter, which is a small letter from Santa that you can get for your children. With the pandemic happening, keeping the Christmas magic alive can be stressful, but this is a fun way to do it. You can get this for your kid, and it will make them feel like they really got a letter from Santa at the North Pole. It’s a fun, simple holiday activity that children will love, and it’s a great way to get into the spirit of Christmas.
Bake Together!
Baking Christmas cookies is so fun! And, of course, it’s a fun holiday activity for you and your child! You can bake some yummy treats together, and you can get everyone in the family involved in decorating and making amazing cookies. Plus, you’ll get to eat your delicious treats!
Baking cookies is a fun, COVID-safe activity that you can do at the house. Not only is it a fun little way for you to improve your morale, it’s also a good way to prepare for Christmas.
Get a tree and Decorate
Some people say you shouldn’t decorate too early. But with the stress of this year, I don’t blame anyone for getting that tree up and keeping the magic of Christmas alive.
Even getting a real christmas tree is a fun adventure you and your family can try together. You can get a tree, get some fun ornaments, and decorate while listening to your favourite holiday music. This is a good way to get everyone involved, and also is a fun way to keep the Christmas magic alive.
Getting into the semantics of when to put your tree up is tiresome. If you want it up now, then there is nothing stopping you.
Get a Gingerbread Kit
A gingerbread house kit, or even different variants of different gingerbread types of kits, is a fun way to get the whole family together and working on it.
These gingerbread kits are simple to do and are fun to engage in. You can decorate them as much as you need to, and there are a lot of cool ways that you can. There are so many different types of gingerbread houses to choose from, and you can build the best gingerbread house out there for you and for your family.
Make Fun Christmas Accessories
Christmas accessories are super fun. From hairbows, to necklaces, to even getting some socks to decorate them with, it can be a fun way to really make things enjoyable for many.
Making Christmas accessories is a fun way to bond together, especially as a COVID-safe activity.
Make Homemade Ornaments
You can also make homemade ornaments if you have boys and they’re not interested in the idea of making bows and necklaces.
Getting simple ornaments and different projects together can make a fun afternoon of holiday decorating. Homemade ornaments are a wonderful way as well to create something magical, and you can give it to them when they get older. A fun little gift and something to reminisce.
See Christmas Lights
Finally, there are still lots of Christmas lights to see even during the pandemic. You can drive over to different places, and of course, look at these fun lights.
There are some Christmas light shows, some with music attached to them, and some you may be able to walk around and see from a safe and socially distanced location.
Christmas lights might seem trite, but it can be something that’s perfect for the family, and it’s a good way to keep the magic alive. Those twinkling lights, the way that it shines, can be a good way to keep the Christmas spirit going.
Take Care of Your Mental Health Too
While keeping the kids happy is important and keeping everything together in the family is probably at the forefront of your mind, you need to take care of your mental health too.
You should get help if you’re stressed out, and talking to someone can be beneficial to your mental health. You can go to Mind Diagnostics to find out how you’re feeling, whether it’s depression, stress, or something else. From there, you can get the help that you need, even during the hustle and bustle of the holiday season.
The holidays are hard for many, and sometimes figuring out COVID-safe activities can be hard, but these holiday activities are right there, and fun for you to do with the whole family too!
Holidays are a season of celebration where we take time off work to be with our family and friends, have a great time, and have a good laugh; however, holidays can be an awful season to look forward to when you’re going through a divorce. You won’t be spending the holidays with your former partner and, depending on if you have kids or had a set of holiday traditions with your partner’s family, you may not be getting to spend the holidays with all of the people you’re used to sharing them with and who you wish you could be sharing them with. You may even be dreading this holiday season all together.
But as much as you want to escape it, you have to get through it. This first holiday season will be the worst, but each one will get easier and easier. For now, here are some tips on how you can spend your first holidays after divorce to make the process easier on yourself:
Let Go of Perfection
With all of the emotional baggage that you’re going to bring, expect that the holiday season will not be perfect. Don’t try to have everything go according to your plan and allow flexibility with your holidays. The season is about happiness, not perfection. Even if you can’t do exactly what you wished, you can still have a wonderful time going with the flow.
Spend Time with Loved Ones
When you get divorced from your partner and you have children, you must accept the hard fact that you won’t be able to spend the holidays with your children all the time. There will be a time when they get to spend it with your partner and times when they spend it with you. When it’s not your turn, you should occupy and surround yourself with people who matter to you the most and try to enjoy the holiday. You could spend your holidays with your parents or with your siblings, or even with your friends who aren’t spending the holiday with their families.
Elevate Your Mood
With the holiday season coming up as a single person, you may want to lighten up your mood a little. You do deserve a little fun after all. You could do activities that you enjoy the most or do things that you didn’t get to do while you were married.
You can go shopping and buy yourself a nice gift, party, redecorate the whole house, apply for a painting class, or whatever it is that you’re dying to do. Do something out of the ordinary and you might find yourself better after the holidays.
Be Civil
If you have children and they want both of their parents to be present during the holidays, be civil to your ex. Your divorce is as difficult as it is to them. You get the chance to decide to lose your partner, but they did not get a chance to decide to change their family.
During the first holiday season, be civil and mature about your feelings and be present with your children – but you have to make sure that it’s clear that you’re just trying to be a family and not be a married couple anymore. You don’t want to get their hopes up and be sad right after.
Focus on Others
The holiday season is all about being thankful for the life you have and celebrate it. It’s the perfect time to spend with your family and friends. Sure, you’re going through a divorce, but people around you might be going through something too and just waiting for you to lend a shoulder.
Focus on others. Focus on making other people happy so that they can have a great holiday. You could even go volunteering at a soup kitchen as it’s time to give back to those who are in need. This will make you feel good and take off your mind of the things that are bothering you.
Conclusion
Going through a divorce is tough, especially during your first holiday as newly single. But the holiday season is the season of joy and peace. There are a lot of different ways on how you can distract yourself and make yourself happy during the holidays. Just remember that you’ll get through it and, soon, you might even start dating again! Just do your best to make the best of an unideal situation and appreciate all of the people in your life who are still with you and who love you.
This crowd-pleasing homemade cranberry orange sauce will complete and complement any Thanksgiving or Christmas dinner.
Homemade Cranberry Orange Sauce
This wonderful recipe makes about 2 1/4 cups of cranberry orange sauce. It’s quite enough for Thanksgiving and Christmas holiday meals, or you can store it in pretty glass jars to share with friends.
Gather the Ingredients
1/2 cup water
1 cup of sugar
1/2 cup fresh orange juice
3 cups fresh or frozen cranberries (12 oz or 350 g)
2 teaspoons orange zest
Instructions
In a medium sauce pan over high heat, bring the water, sugar, and orange juice to a boil.
Stir the mixture with a spoon a few times while it’s boiling.
Add the cranberries and orange zest, and return to a boil.
Reduce the heat to medium and boil gently for 10 to 12 minutes.
Remove sauce from heat and cool.
Transfer sauce to a serving bowl.
What If My Cranberry Sauce Is Too Watery?
Once the cranberry orange sauce cools down, the natural pectin in the cranberries will solidify the sauce and make it more like jelly. Ideally, you should cook the homemade cranberry orange sauce the day before and allow it to chill in the refrigerator.
How To Store The Cranberry Sauce
Pour a portion of cranberry sauce in a mold or bowl and allow it to set overnight in the refrigerator.
The cranberry sauce can also be served in any serving dish.
Extra cranberry sauce can be stored in glass jars or dishes and refrigerated for use later.
Cranberry Sauce Make-Ahead/Freezer Instructions
You can keep the cranberry sauce in a covered container in the refrigerator for 10 days.
You can freeze it up to two months. It’s a good idea to thaw it overnight in the refrigerator before serving.
What To Serve With The Cranberry Orange Sauce
Serve your cranberry orange sauce with turkey, dressing, twice baked bacon potatoes, green beans, and all of the fixings to create a tasty Thanksgiving or Christmas dinner that will be all the more memorable due to your special guests, good conversation, and happy holiday spirit.
You can serve the cranberry orange sauce with these 7 Turkey holiday recipes:
The flavours of fall include plenty of seasonal fruits like cranberries that blend beautifully with a moisten turkey. This traditional recipe for Cranberry Orange Sauce is one that brings together the flavours of fall in a dish that is sure to be a favourite for all ages gathered at the holiday table.
I hope you enjoyed my Homemade Cranberry Orange Sauce Recipe as much as I did! If you make it, please share your photos with us on Facebook or Twitter! Also, check out all of our other recipes!
HOMEMADE CRANBERRY ORANGE SAUCE
This wonderful recipe makes about 2 1/4 cups of cranberry orange sauce. It’s quite enough for Thanksgiving and Christmas holiday meals, or you can store it in pretty glass jars to share with friends.
In a medium sauce pan over high heat, bring the water, sugar, and orange juice to a boil.
Stir the mixture with a spoon a few times while it’s boiling.
Add the cranberries and orange zest, and return to a boil.
Reduce the heat to medium and boil gently for 10 to 12 minutes.
Remove sauce from heat and cool.
Transfer sauce to a serving bowl.
Notes
WHAT IF MY CRANBERRY SAUCE IS TOO WATERY? Once the cranberry orange sauce cools down, the natural pectin in the cranberries will solidify the sauce and make it more like jelly. Ideally you should cook the homemade cranberry orange sauce the day before and allow it to chill in the refrigerator.HOW TO STORE THE CRANBERRY SAUCE Pour a portion of cranberry sauce in a mold or bowl and allow it to set overnight in the refrigerator. The cranberry sauce can also be served in any serving dish. Extra cranberry sauce can be stored in glass jars or dishes and refrigerated for use later.CRANBERRY SAUCE MAKE-AHEAD/FREEZER INSTRUCTIONSYou can keep the cranberry sauce in a covered container in the refrigerator for 10 days. You can freeze it up to two months. It’s a good idea to thaw it overnight in the refrigerator before serving.
Keyword Christmas, Cranberry Sauce, Side Dish, Thanksgiving
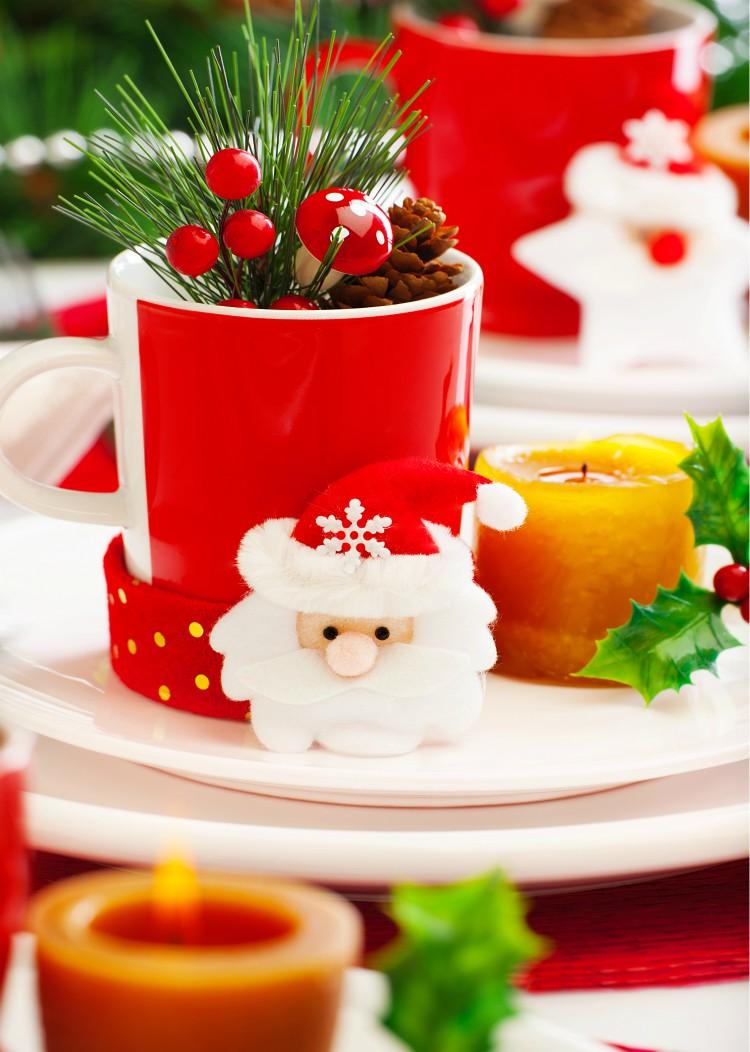
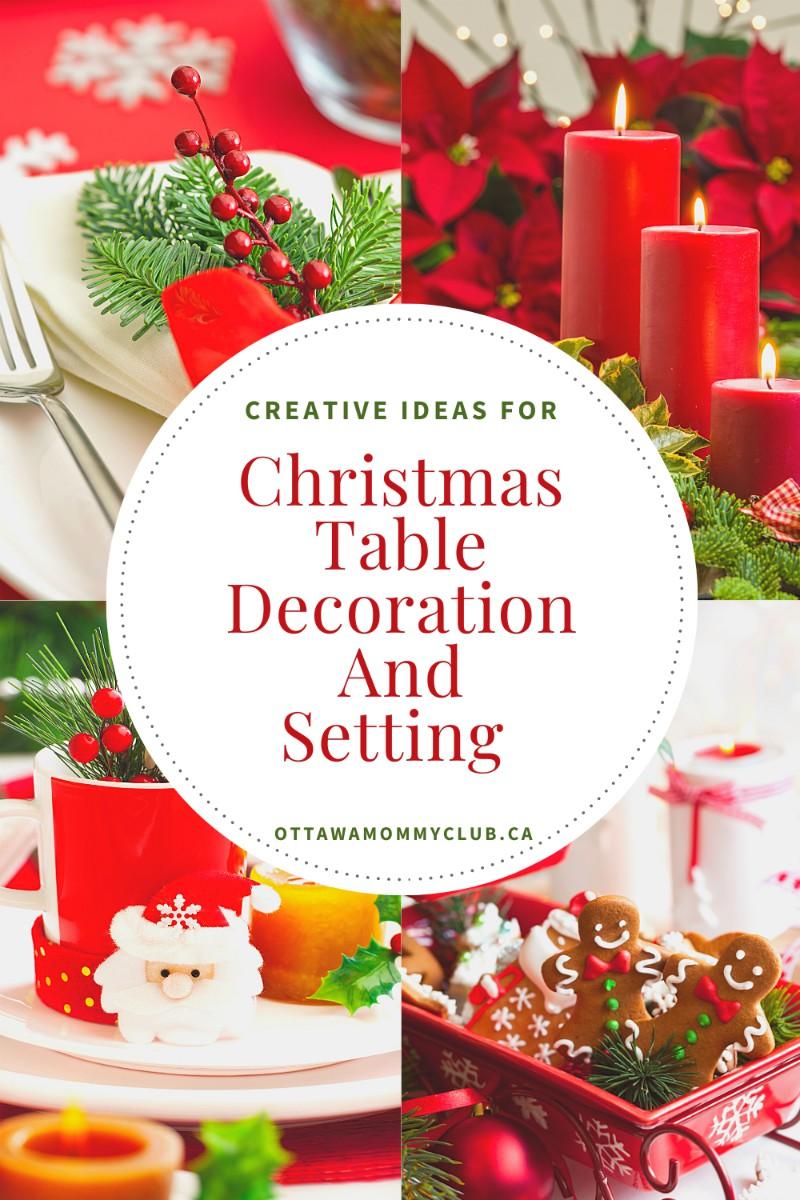
Christmas is a season of tradition. Grandma’s mashed potatoes, white lights on the tree, and reading the Nativity story on Christmas Eve top the list of what to expect each December. All that is missing is a perfectly set table for Christmas dinner. You will find below creative ideas for Christmas table decoration and setting.
A Classic Christmas Table Decoration and Setting
Let one of the most recognized holiday traditions – a green and red colour scheme – play out in beautiful classic Christmas table settings. These ideas for place settings, centrepieces, and all the extras are rooted in tradition, but still fit in with a modern sense of style.
Many people have special sets of china that only come out during the holiday season. A classically decorated table is the perfect way to show them off. Whether it is fancy with sparkling trees and snowflakes, or whimsical with jolly Santa’s and candy canes, put the china to use on a traditional Christmas table.
First, set up place settings at each seat.
Decide on a foundation piece for china, such as a gold charger or red damask placemat.
If the china pattern is overwhelming, then substitute a basic white dinner plate or a glass salad plate for one piece of china.
Have fun with glassware. Gold-rimmed crystal works well with a formal setting, but vivid red stemware adds a striking pop of colour with a more casual look.
Red and Green Classic Christmas Centrepieces
Create a centrepiece for a classic Christmas table based on the shape of the table. These two ideas, one for around and one for a rectangular table, will put a modern twist on traditional ideas.
Round table:
Start by using a mirrored tile (found in crafts stores) in the centre of the table.
Place several red candles of varying heights on top of the tile.
Arrange fresh greenery or artificial holly around the base of the candles.
Rectangle table:
Using place settings as a guide, lay down a table runner in a co-ordinating pattern or complementary colour.
Then, set real or artificial tabletop trees running in a line down the middle of the table.
Accent the base of each tree with a matching ribbon tied in a bow.
Decorating a Classic Christmas Table
With the china set out and the centrepiece in place, it is time to put the finishing details on classic Christmas table settings.
Place cards:
Stay traditional with basic paper cards.
Add interest with place card holders in fun shapes or exciting colours.
For tented cards, choose unexpected designs like Rudolph with a rhinestone nose.
Or, go chic and simple with coloured cards handwritten in white ink.
Favours:
As an extra treat for guests, accent each place setting with a small gift (an ornament, chocolates, or decorated cookie).
Wrap each box in gold paper tied with red or green ribbon.
Whether for a formal or casual celebration, red and green Christmas table settings provide a festive addition to holiday traditions.
Creative Christmas Table Decoration And Setting Ideas
There are a variety of colour schemes that work well on a Christmas table. These can be modern or traditional or something completely different that suits personal taste.
As mentioned above, red, gold, green, and white are classic and traditional Christmas colours. They can be used with great effect. Combinations such as white and gold or gold and green also work well.
Natural colour schemes should include earthy colours such as rust, hunter green, and burgundy. Add a metallic colour such as copper or bronze for a festive touch.
Pastel themes such as lavender or pink with silver have become more popular over the years.
A combination of jewel colours such as emerald, ruby, and sapphire can create a rich effect when teamed with gold.
Bright colours such as purple or blue mixed with silver create a light atmosphere with plenty of sparkles.
Creative Themes for Decorating a Christmas Table
With the wide range of Christmas merchandise available, there is a wonderful choice of themes for a Christmas table.
Plain tablecloths generally work best on a Christmas table.
Colour coordinate napkins and tablecloths. Use Christmas napkin rings or tie napkins with metallic ribbon.
Choose a centrepiece or two if the table is long. These can be a wreath, a small Christmas tree, or a glass bowl full of baubles. A floral arrangement laced with tinsel or sparkly leaves also works well.
Decorate wine glasses with a bauble, an angel, or a snowflake.
Fine glitter dusted across the table cloth adds sparkle.
Curls of ribbon on side plates or in the centre of the table can look festive.
Wrap a tiny gift for each guest and place it on their side plate or in a wine glass.
Christmas crackers come in a range of prices and colours to enhance any Christmas table.
Creative Christmas Centrepieces
Lastly, dress up your table during the holiday season with a special centrepiece arrangement. Use items from around the house for a more personal touch. Beautiful centrepiece decorations will liven up any table during Christmas. It doesn’t have to cost a fortune. Using some imagination and easy-to-find items, inexpensive centrepiece ideas are endless. Get the whole family involved for a holiday tradition everyone will be proud of.
Floral Centrepiece
Elegant and festive, red or white roses against deep green foliage will add an air of sophistication to any table. A mix of red and white flowers of various shapes and sizes will sparkle with a few shiny silver or gold ornaments nestled in between them. A simple bunch of long-stemmed red roses or lilies in a clear glass or crystal vase tied with ribbons to match the décor will give the table a festive touch.
Crafty Centrepiece
Take any handcrafted items and dress them up for the holidays. Fill hand-woven baskets with flowers or ornaments. Drape hand-beaded jewelry over a stuffed animal. Place handmade ceramic decorations on a cloud of scrunched tulle.
Candle Centrepiece
Place three candles of varying sizes on a wooden board, silver tray or mirrored tile. For a more decorative touch, add a handful of tiny, colourful ornaments. Use a variety of sizes and shapes of candle holders to display among real or man-made greenery. For all-white or cream candles, add some colour with holly berries or bright red ornaments to the greenery. Floating candles in a crystal bowl create a soothing atmosphere for any occasion.
Edible Centrepiece
A basket or bowl filled with a variety of fruits will decorate the table and provide guests something healthy to munch on later. A variety of decorated, wrapped holiday candies on a multi-tiered lazy Susan will bring smiles to the guests’ faces. Fill a colourful ceramic bowl or ribbon-tied basket with cookies or nuts. Don’t forget to hang a few nutcrackers so guests can enjoy them.
Crystal and Glass Items for Table Centrepiece
Pull out the best crystal or favourite glass pieces and display it on satin or velvet. These pieces may be filled with tiny ornaments for more colour or sparkle. Line a bowl with a luxurious fabric to match the décor. Gently nest crystal ornaments or balls in the folds of the fabric. Place crystal trees on a bed of greenery for an elegant winter scene.
More Holiday Centrepiece Arrangement Ideas
Place a small green wreath in the centre of the table and fill the centre with any colourful items, such as holiday knickknacks, ornaments, or even toys. Create a Christmas scene of whimsical holiday characters for a light touch.
Christmas is a time to celebrate and eat fine food. A beautifully decorated table adds to the excitement and atmosphere of the day. Keep in mind that a holiday centrepiece doesn’t have to be expensive, but it adds a festive touch to the occasion. It’s okay to be creative and mix and match a variety of Christmas centrepieces for more than one table. With the wide range of Christmas decorations available, it is possible to create a unique setting that adds to the festivities and impresses guests.
These creative ideas for Christmas table decoration and setting are just a few examples we shared with you! How do you decorate you Christmas table? Comment below!
Homemade gift bags crafted with love make Holiday presents that much more special. Use the following to come up with DIY Christmas Paper Gift Bag Ideas!
DIY Christmas Paper Gift Bags
Gift packaging can be as personal as the gift itself. Choose a day to create numerous homemade Christmas gift bags as a family Christmas craft.
Christmas presents wrapped in eco paper with handmade decors in rustic style
Ideas for Christmas Paper Bag Gift Wrapping Supplies
Children should not use glue guns or work with hot glue. Let children use good quality craft glue.
Young children should not use sharp scissors. Either let them use child-safe scissors or do the cutting for them.
Stamping Paper Gift Bags
Give the youngest children potato stamps and red and green paint. Let them decorate gift bags.
Children can also use store-bought Christmas stamps with non-toxic ink or water-based paint.
Use Craft Paper Or Water-Based Paint
Children can decorate their homemade paper gift bags for Christmas by using coloured construction paper or water-based paint. They can make their own stencils or download some from the internet to create a reindeer face, to paint white Christmas trees, or fancy laces on the bags.
These are some easy DIY Christmas Paper Gift Bagideas for you to try with the family and fun gift wrapping ideas!
Who can deny that chicken is an awesome, versatile food that can be used to enhance and create so many delicious recipes? If you are looking for some creative and delicious chicken recipes, here are 12 Instant Post Chicken Recipes to help get you started!
Another great use of chicken? It’s a great addition to many recipes that may need an extra boost of protein! It is lean and a healthier option as well than adding other meats that are greasy and full of fat content. Plus, the fact that you can create some awesome recipes using chicken in your Instant Pot? Sounds like a perfect dinner combo to me!
Healthy Chicken Stew: Who can resist this healthy, and super yummy stew that only has 5 ingredients? A must-try recipe for dinner one night!
Mango Chicken Curry: Your taste buds will thank you for eating this delicious Instant Pot chicken recipe. You may find that you aren’t satisfied with just one bowl!
Mexican Chicken Soup: Looking for a filling soup with a spicy little kick? Give this filling soup a try!
Have fun cooking and creating these awesome chicken recipes in your Instant Pot. Not only are they all super easy and quick to make, but they will make an awesome dinner for you and your family to enjoy as well. With these 12 Instant Pot Chicken Recipes, you will have dinner planned for the next several weeks without any issues!
In 1960, the Benny brothers, all eight of them, went into business and opened their first rotisserie in Joliette, Québec. This year, Benny&Co. celebrates 60 Years as Master Roasters and they want to make this celebration even more special by giving you the chance to win one $60 Benny&Co. gift card!
Benny&Co. Family History
Prior to this family business venture, Joseph-Georges Benny decided to raise chicken and become a poultry breeder in 1947. One by one, each brother decided to take part in their own poultry farming business and eventually joined forces to build a hatchery and slaughterhouse before launching their own distribution network to become poultry producers and distributors. In 1959, Benny et Frères Limitée was founded to everyone’s delight! Today, Benny&Co. offers healthy eating with quick service option meals to cater families.
Family Business Venture
As you can see, the Benny brothers’ background in poultry farming certainly made them visionaries in this family rotisserie business venture! So much that their 47 children would gradually be involved in the management of the rotisseries and the opening of new restaurants across the province of Québec.
Six decades later, all 63 Benny&Co. rotisseries are operated by 11 children and 25 grandchildren of the eight co-founding brothers. Thirty-six members of the Benny family work work for this proud family-owned and operated business! It’s not a surprise that Benny&Co. is Canada’s largest family of master roasters (64 restaurants by the end of the year) and chicken rotisserie experts!
Master Roasters’ Specialist
It’s interesting to know that the youngest brother, Gilles Benny, a machinist, even created and manufactured the very first slow-cooking oven that would make their roast chicken so famous! How is Benny&Co. unique as a rotisserie?
Authentic roast chicken uses the exclusive three-hour slow roasting technique;
Superior quality of their grain-fed chicken (after all, they are chicken experts);
90% of their menu is made up of Canadian products;
Proud third generation local family business!
Benny&Co. Outaouais and Ottawa Restaurants
Benny&Co. have been in the Outaouais region for more than 40 years, so it was a natural step for them to cross the river to Ottawa. They now offer two locations, one in Stittsville and one in Orléans, to serve you better!
Ever since the Orléans restaurant location opened, our family has enjoyed several delicious meals in a warm family-friendly atmosphere with courteous and attentive service. We are also taking advantage of ordering take-out online or via the drive-thru due to COVID-19 dining closures in Ontario. We take great pride in encouraging local family businesses, such as Benny&Co. during these difficult pandemic times.
Their menu items include:
Appetizers like wings and mozzarella sticks.
Side dish such as fries, salad, coleslaw, onion rings, rice, and poutine.
Pies and cakes for desserts.
Main dish features ribs, rotisserie chicken, the Benny&Co. famous poutine, wrap, club sandwich, hot chicken, chicken strips, and a salad with crisp lettuce and vegetables served with chicken breast, three breaded strips of white meat, or vegetarian strips.
We had the pleasure of trying out their classic chicken tacos this summer during their Tacos Festival. Their unique crinkle fries are made from PEI potatoes, the best in Canada! I have to say that their food is tasty and the portions are of generous size. With winter fast approaching, their meals offer the perfect comfort food for shorter days and the cold that slowly sets in.
Make sure to check out Benny&Co.’s website as they offer promotions, daily deals, and specialty meals for the family throughout the year. For more information, you can also follow them on Instagram and Facebook!
This post is sponsored by Benny&Co. Opinions are my own.
Organization is a skill and quality that not everyone possess. Some of us are just naturally slobbish, and some are not. You will find below home organization tips to make it easier for your family!
The first tip is to determine your organizational personality. Once you have decided how organized you can be, go with your instincts, home size, income, and family participation. No system will work if you are the only one following. As a fairly organized person, and the mom, certain rules and living accommodations can be forced. Getting the family to adhere to them is another story.
Foyer Organization Tips
For the foyer, coat tree is a great option to hold the coats and jackets when you walk in the door. Then a large two shelves unit can hold the book bags, brief case, purses, and a basket for winter needs. The closet has coats hung up, containers for boots, shoes, rain gear, etc..
A few years back, at my house there was the elimination of nick knacks, and places to put the nick knacks. Less tables, shelves, etc., and less to dust. This means there are only a few areas to pile things besides the floor.
Entry Floor Organization Tips
On the entry floor, you can add an old stylish trunk. This holds different things depending on the need. During the spring/summer, it’s used for the sporting equipment, mitts, balls, cleats, etc.. It the winter, it holds mittens, scarfs, tuques, etc., and some other not used items.
My mom always said “a place for everything, and everything in it’s place.” This is so true and is the best tip for being organized.
Office or Computer Area Organization Tips
Baskets on the computer desk or at the top shelf of the computer desk can hold magazines, papers, and a nice plant. You can also add a clear plastic rolling three drawer unit and use 1 drawer per child or family member. This is also where the tablet, iPad, cords, phone charge, and other electrical items should go.
On the wall you can hang a giant wipe off one month calendar. You can stick notes on it. The dry erase pens are in a one drawer unit.
If the computer station has one file drawer or a two drawer filing cabinet, you can sort house hanging file folders, which can be personalized, colour coded, etc. Use the F.A.T. rule, File, Act, Toss for all the papers that accumulate.
On top of the file cabinet, add a flat basket for current things and a larger stylish file box with dividers inside for greeting cards. A cork board is another great organization tool. Place it on the wall and add important/invites/meetings and school calendar.
Kitchen Organization Tips
The kitchen is next. A point that needs to be made, organizing is something you have to revamp, repeat, or rearrange. Your lifestyle and things always change so keep up on the switches.
Under the sink, you can add two cans. One holds trash, and the other holds recycling. Liquid soap and a dollar store sponge holder can adorn the sink. On the counter, you can place the blender, the coffee maker, and a toaster oven. Less on the counters is better. Some kitchens have the space to hang other items like pots and pans. Use pull out shelves to store items in your pantry which make it easy to reach for items stored at the back.
Use drawers for spices, silverware, and towels. The other drawers can store pots and pans, storage wraps, and kitchen needs.
Your cupboards, available space, layout, family size, and needs determines organization in the kitchen. This is a very personal place for most, so do research or watch those Home Renovations TV shows. The hardware stores have tons of ideas and books as does the library.
Bathroom Organization Tips
In the bathroom, it’s closet, and other storage spaces use the same techniques. You can use baskets and bins in a drawer/shelf unit. Empty baby wipe containers are great. The can hold cotton, band aids, Q-tips, shavers, or more. Label with a permanent maker.
Hall Closet Organization Tips
Same goes for the hall closet. On the bottom, two bins with toys, 1st shelf holds the kids homework station, 2nd shelf holds the board games, and the last shelf is for extra blankets and pillows.
Basement and 2nd Floor Organization Tips
If your home has a basement and upstairs, use the same ideas and tips.The bedrooms are their own domains, but encouragement can bring organization.
You can use a wall in the basement for the school projects and art. The laundry room and extra bath need to be arranged and functional like the bathroom.
Basically the best home organization tips are what works for you. Everyone has different needs and lifestyles. The goal is to make it better and easier for yourself and your family. A home is never absolutely perfect because it’s lived in, but it can be organized.
A breastfeeding mom might have been happily breastfeeding so far, or has just recovered from sore nipples, but now encounters this thing called plugged ducts or clogged milk ducts. You will find below 4 easy ways to relieve clogged milk ducts.
She can easily address clogged milk ducts at home by taking a breastfeeding break, trying different breastfeeding positions, gently massaging her affected breast, and/or applying a hot compress before massaging or breastfeeding.
What Are Clogged Milk Ducts?
First of all, what is it? According to kellymom.com, a clogged or plugged milk duct “is an area of the breast where the milk flow is obstructed.” Usually, a clogged duct is a hard lump on the mother’s breast that may feel slightly painful and looks swollen or may even be a reddened spot. There are a number of reasons why this may have happened: the mother might have missed a feeding or it might have been the way she positioned her baby.
Why It’s Best Not To Ignore A Clogged Duct?
The breastfeeding mom may end up having a low-grade fever. At worst, it may lead to mastitis or inflammation of the breast which requires a visit to the doctor.
Here are four easy ways for a breastfeeding mom to deal with clogged milk ducts at home:
1. Take a Breastfeeding Break
She should stop what she’s doing, rest, and just nurse her baby. In other words, she should take a break to just breastfeed. The breastfeeding mother should offer the affected breast first because the baby will suckle more vigorously at the start of a feeding. She should make sure her baby suckles the affected breast for as long as he or she can. She should try to position her baby’s chin on the affected area so that her baby’s suckling motion will gently massage the affected area.
2. Try Different Breastfeeding Positions
She should try different breastfeeding positions with the baby. This will help the baby drain all the breast milk ducts more thoroughly and not just concentrate on some ducts. Check out this video below to view for 5 different breastfeeding positions.
She can also apply a hot compress before and after breastfeeding. An effective hot compress is a rice sock. Get a clean old sock (maybe one that has no pair anymore) and fill it halfway with uncooked rice or beans. Microwave it for less than a minute. The sock will remain hot longer than a hot towel and it can be applied to the affected breast before the massage to further loosen up the milk in the clogged duct.
A breastfeeding mom may encounter clogged milk ducts at any stage of her breastfeeding relationship with her baby. While a clogged milk duct may not be as serious a problem as sore nipples or mastitis, she shouldn’t ignore it either because it might lead to a low-grade fever or, at worst, mastitis.
If you are looking for a new recipe to try this fall, this Pumpkin Cookie Donut recipe is for you. Made with easy ingredients you might already have on hand, this dessert is unique and totally delectable!
Versatile Recipe
I love recipes that make use of pantry staples. This pumpkin cookie donut is no exception. It puts a cake mix to work to create a dessert that tastes so good that no one would believe it was made with a cake mix! The pumpkin puree compliments the vanilla cake mix perfectly.
This is also a versatile fall dessert. It works for after dinner at home, or present it as the star of your Thanksgiving dessert spread. You can top this with a variety of goodies like apple pie filling, fresh sliced pears, cinnamon sprinkles, or even a nut topping if you wish. We like the Pumpkin Cookie Donut dessert topped with pears, but I will definitely be experimenting with other ideas!
Easy Fall Dessert To Make
If you like pumpkin donuts or pumpkin bread, chances are that you will love this easy dessert. You will also love that the cookie donut base only takes 4 ingredients to create.
To make the hole in the centre of this pumpkin dessert that makes it look like a giant donut, you will need to use a wide rimmed glass, or maybe a wide mouth mason jar. I would encourage you to keep the centre you cut out too, because who can resist a fresh donut hole?
Icing and Toppings
You can make homemade icing, or use the canned variety. Whatever you have on hand, or like the best will work just fine. When you make this, I hope you come back to let me know how you topped the pumpkin cookie donut. Apples or peaches sound so good too!
More Pumpkin Recipes
If you are craving more pumpkin recipe ideas, you will want to check out these reader favourites including:
I hope you enjoyed this Pumpkin Cookie Donutrecipeas much as I did! If you make it, please share your photos with us on Facebook or Twitter! Also, check out all of our other recipes!
Whether your Christmas tree is real or fake, there are simple rules for making it look its best during the holiday season. Looking for attractive Christmas tree decorating tips? Discover below some great Ideas On How To Decorate A Themed Christmas Tree!
How To Decorate A Christmas Tree
When picking out your Christmas tree, whether real or fake, choose one that is about a foot to a foot and a half shorter than the top of your room to allow clearance for the tree topper. Also, Christmas trees can be five feet wide, so keep in mind the tree may fill most of the floor space in a small room. If it’s a live tree, remember to trim enough branches from the bottom to make room for gifts.
First Step for Trimming a Christmas Tree: LED Lights
Once the Christmas tree is properly positioned in the house, many people are tempted to throw down the tree skirt. Wait. You will want to sweep up needles that fell during decorating, so save the skirt for next to last.
The first step when trimming a tree is to string the lights. Plug in the lights to make sure they work and string the tree with the lights lit so you can see how you are doing. A rule of thumb is that you’ll need one strand of lights per foot of tree. Therefore, a six-foot tree requires six strings of lights.
Start placing the lights at the top of the tree and work between branches until the bottom is reached. Wind the lights not only over the outer edges but inward to give the tree depth. The inside branches are easier to reach when not inhibited by other lights, and ornaments so always do those branches before the others. This will ensure that the tree is more captivating and full once the ornaments are used. After the lights are on, keep them lit as you decorate the rest of the tree. Due to the use of electricity, it is best not to involve young children with this part.
The Best Way to Hang Decorations and Ornaments
Once the LED Christmas tree lights are in-place, show the kids where to put the ornaments and trims. Whether your ornaments are homemade, heirlooms, or store-bought, there are a few rules to make them look their best.
If you plan to use garland, ribbon, popcorn strings or the like, now is the time to put them up. The garland should wind around each row of branches with graceful folds and bends and not stretched tight. Tinsel is also best placed after the lights have been strung and before the ornaments are in place.
An important Christmas tree decorating tip is to continue the same strategy of placing ornaments on the inner branches, as this makes the tree look more impressive. Always place the nicer ornaments on the outer branches.
Placement of Ornaments and Tree Trims
First, hang ornaments that require placement next to lights. Certain ornaments glow, sparkle, and shine when placed on branches that allow them to dangle next to or in front of lights. Space these evenly across the tree. Next, choose ornaments that are breakable and place them on the top half of the tree, out of reach of little hands, paws, or teeth.
Fill in the rest of the decorations, evenly spacing ornaments of the same color and style. Place oversized ornaments closer to the bottom where they will not stick out awkwardly. Stand back every few minutes to see where the bare spaces are. You have too many decorations if you need to place more than one ornament on a single branch. Consider paring down your collection or investing in a second tree in another room. You have too few ornaments if your ornaments are spaced more than 9 inches apart. This will also vary slightly depending on the size of your tree.
Putting the Final Touches on Your Christmas Tree
After the decorations, it is finally time for the Christmas tree skirt. Your Christmas tree skirt should be wide enough to hide the tree stand, but not so wide that it peeks out from under the tree. You don’t want step on it, trip over, or accidentally tug it, toppling the tree. Lastly comes the Christmas tree topper.
Now turn off the lights, sip a little cider or eggnog with Christmas cookies, and enjoy your perfect tree!
Christmas Tree Decorating Ideas
Choosing the most appropriate Christmas tree decorating idea may appear to be wasteful of time, but it helps greatly later on. Buying all the LED Christmas tree lights and ornaments only to find that they don’t go with the decor of the home could prove to be a costly exercise.
The right Christmas tree decorating idea can significantly enhance the look and feel of the family home. Learning more about maintaining the health of a tree, investing time in the selection process, and choosing a colour scheme that fits in with the room’s decor can save time and money further down-the-line. Involving the children can make this a fun and enjoyable event for all.
Real Christmas Tree Health
Before continuing with a Christmas tree decorating idea, it is important to make sure that, if you have a live tree, it is kept healthy – an important learning exercise for kids. The stump of the tree should be freshly cut and given its own water reservoir. Provided that this is topped-up regularly, the longevity of the tree will be maximized.
Christmas Tree Color Scheme That Fits With Your Home Decor
It is important to choose a colour scheme that fits in with the decor of a home. Whilst silver ornaments may look nice when a room is a bolder primary colour (blues, greens, and reds), it won’t be nearly as impressive when the walls are a neutral colour. Show children the various colour combinations to see which one they prefer:
Red and silver
Blue and silver
Purple and silver
Blue and gold
Green and gold
Red and gold
Purple and gold
Conversely, combining silver and gold will look attractive when a room is a bolder primary colour, such as red, green, or blue. A contrasting colour scheme is usually the correct option when Christmas decorating.
A combination of old fashioned, homemade, and collected ornaments from over the years is a wonderful way to decorate a Christmas tree. Well-worn seasonal decorations create a sense of warmth for everyone with their old fashioned traditional style; however, if a theme tree is more to what Christmas calls for this year, here are some simple guidelines with easy ideas on how to decorate a themed Christmas tree for making it the talk of the holiday season!
Country Rustic Christmas Tree Theme
Style: Old Fashioned Traditional
strings of popcorn, strings of cranberries
gingerbread ornaments
sprigs of holly berries
painted, wooden ornaments, or simple homemade ornaments
ornaments should be in earth tone or natural country colours
a combination of amber and/or white lights to simulate candlelight
Note: Stay away from Christmas tree ornaments that glitter or shine.
any type of musical instrument, preferably realistically styled; any ornaments representing pianos or piano keys
sheet music scrolls
musical notes
homemade parchment ornaments with musical words like sonata, symphony, and concerto or composer names like Bach, Beethoven, or Mozart
mini chair ornaments of any style
white or coloured lights according to taste
Note: White lights will have a classic look; colored lights are more whimsical.
Favourite Color Christmas Tree Theme Style: Whimsical or Elegant (Depending on Decorations Chosen) and/or Specific to Home Decor
combination of ornaments and garland in a chosen colour
lights in the chosen colour to match
Notes: Adding silver or gold to the combination depends on the chosen color, i.e., gold garland or tinsel works with red and burgundy theme trees, silver garland or tinsel works with blue, green, or pink theme trees.
Decorating for the Holidays in a Theme Will Refresh the Season
I hope you liked our easy and simply ideas on how to decorate a themed Christmas tree! Enjoy exploring other ideas by using these Christmas tree themes as a guideline. Wonderful Christmas displays are easy conversation starters for when guests arrive. Consider the style that works best with the decor of the home and let imagination take it from there!
You will find below how to make a Martini such as the Classic Martini and the Shaken Martini, and also included are some alternative Martini recipes.
As anyone who watches Adult TV shows such as the cult comedy, Scrubs, will know the Martini has been reinvented over the years in many fruity forms such as the Appletini. For most Tini fans, however, the original Martini is the best and a definite for anyone wanting pure and simple alcohol hit.
The History of the Martini
As with a lot of the classic cocktails, many people claim to have invented the Martini, and so its origin remains unproven. Most sources agree that it was around from the mid or early 1800s and rose in popularity during the prohibition period of the 1920s as gin was quick and easy to produce, unlike spirits such as whiskey. The James Bond films of the 1960s saw a change for the gin-based drink by replacing the gin with vodka to create Bond’s famous “Vodka Martini – shaken not stirred.”
The classic Martini glass is similar to a wine glass in shape i.e., with a long stem, but the bowl is a shallow triangle shape.
Some famous fans of the drink are Franklin D. Roosevelt, Frank Sinatra, Richard Nixon, Ernest Hemingway, W.C Fields, and of course, James Bond and his creator Ian Fleming.
3 measures of gin (1 measure is approximately 3 tablespoons or 1 ½ oz)
1 tablespoon of dry vermouth
3 green olives
Kitchen tools Needed
Mixing jug or cocktail shaker
Martini or coupe glass
Hawthorne strainer
Bar spoon
Jigger
Recipe for Classic Martini
Prepare your glass: You can chill your glass in the freezer before you prepare your drink.
Combine the ingredients: Combine ice cubes, the vermouth, and gin into a mixing jug and stir for 30 seconds.
Fill 1 glass: Strain the drink with a Hawthorne strainer into a Martini glass.
Serve: Garnish with 3 green olives on a cocktail pick for decoration.
Recipe for Shaken Martini
Prepare your glass: You can chill your glass in the freezer before you prepare your drink.
Combine the ingredients: Combine ice cubes, the vermouth, and gin into a shaker and shake vigorously for 10 seconds.
Fill 1 glass: If you prefer ice shards floating at the top of the Martini, simply strain the drink into your Martini glass. If you don’t want any, then strain it through a fine-mesh strainer to catch the ice shards.
Serve: Garnish with 3 green olives on a cocktail pick for decoration.
Martini Recipe Tips
Vermouth is not a distilled spirit therefore it has a short shelf life because it’s a fortified wine. It’s time to replace it when your bottle has been open for longer than 3 months.
You can skewer either one or three olives on a cocktail pick or simply drop them in the glass.
How To Make A Martini
Lyne Proulx
Martinis are the best and a simple alcohol hit. Have a look at how to make a Classic Martini and the Shaken Martini.
3tbspgin1 measure is approximately 3 tablespoons or 1 ½ oz
1tablespoondry vermouth
3green olives
Instructions
Recipe for Classic Martini
Prepare your glass: You can chill your glass in the freezer before you prepare your drink.
Combine the ingredients: Combine ice cubes, the vermouth, and gin into a mixing jug and stir for 30 seconds.
Fill 1 glass: Strain the drink with a Hawthorne strainer into a Martini glass.
Serve: Garnish with 3 green olives on a cocktail pick for decoration.
Recipe for Shaken Martini
Prepare your glass: You can chill your glass in the freezer before you prepare your drink.
Combine the ingredients: Combine ice cubes, the vermouth, and gin into a shaker and shake vigorously for 10 seconds.
Fill 1 glass: If you prefer ice shards floating at the top of the Martini, simply strain the drink into your Martini glass. If you don’t want any, then strain it through a fine-mesh strainer to catch the ice shards.
Serve: Garnish with 3 green olives on a cocktail pick for decoration.
Notes
EQUIPMENT
Mixing jug or cocktail shaker
Martini or coupe glass
Hawthorne strainer
Bar spoon
Jigger
Tips
1. Vermouth is not a distilled spirit therefore it has a short shelf life because it’s a fortified wine. It’s time to replace it when your bottle has been open for longer than 3 months.2. You can skewer either one or three olives on a cocktail pick or simply drop them in the glass.
MARTINI RECIPE VARIATIONS
A Vodka Martini is the same as a Classic Martini but using vodka instead of gin.
A Gibson is a Classic Martini with 2 or 3 cocktail onions instead of pickles.
A Dirty Martini is a Classic Martini with a ½ measure of brine from the cocktail olive jar added.
A Tequini is mixed from 6 ice cubes, a dash of Angostura bitters, 3 measures of white tequila, and a ½ measure of dry vermouth finally strained into a Martini glass.
A Saketini is a mix of 6 ice cubes, 3 measures of gin, and a ½ measure of Sake strained into a Martini glass
An Appletini is 1 measure of vodka or gin and 2 tablespoons of sour apple schnapps
A Vodka Martiniis the same as a Classic Martini but using vodka instead of gin.
A Gibson is a Classic Martini with 2 or 3 cocktail onions instead of pickles.
A Dirty Martini is a Classic Martini with a ½ measure of brine from the cocktail olive jar added.
A Tequini is mixed from 6 ice cubes, a dash of Angostura bitters, 3 measures of white tequila, and a ½ measure of dry vermouth finally strained into a Martini glass.
A Saketini is a mix of 6 ice cubes, 3 measures of gin, and a ½ measure of Sake strained into a Martini glass
An Appletini is 1 measure of vodka or gin and 2 tablespoons of sour apple schnapps
From the Martini Website, you can also find many experimental and fun Tini recipes.
No matter what the mix is, one truth remains – a Martini is a matter of personal taste. In fact, there has even been a Martini atomizer invented, which is used to spray little droplets of vermouth over the gin or vodka for the driest of Martinis.
7 Best Martini Recipes
These are 7 of the best Martini recipes for your to make for your cocktail parties!
I hope you enjoyed my Classic Martini and Shaken Martini recipes as much as I did! If you make it, please share your photos with us on Facebook or Twitter! Also, check out all of our other recipes!
The human brain is wired with an inborn teacher. Soon after children learn to walk, the developing brain urges toddlers and preschoolers to climb. Climbing develops the brain in a variety of ways. When children climb, both sides of the brain work together to tell the right hand and the left foot to move together and the left hand and the right foot to move together.
Climbing builds pathways in the brain that teach the muscles and brain to work together and especially how to use both sides of the body at the same time. When children climb, their eyes and brain work together to learn where to grab and hold, where to place knees and feet, important skills for developing spatial awareness skills.
Parenting Tip – Provide Appropriate Climbing Opportunities
If parents don’t want children to climb on furniture, where do parents want kids to climb? Choose a place indoors or outside where toddlers and preschoolers are allowed to climb. Encourage climbing fitness and offer climbing time as part of a child’s daily routine.
Small Hard Plastic Slide – Several manufacturers make small portable slides that can be used indoors or outdoors. Children can climb up the ladder and slide down over and over again.
Outdoor Play Equipment – A variety of safe outdoor play equipment is available for preschoolers.
Public Preschool Playgrounds – Check in your local area for public playgrounds that offer safe climbing equipment for preschoolers.
Climbing Gyms – Some indoor climbing centres provide preschool play areas with low level climbing holds suitable for young children.
Trees – Small sturdy trees can provide a place for kids to explore but make sure that the surface below the tree is dirt, mulch, or a comparable soft surface. Do not allow children to climb above concrete or hard paved surfaces.
Parenting Tip – Redirect Misbehaviour
When children climb in inappropriate places, instead of trying to stop the climbing, redirect children to a safe, appropriate place to climb. Discipline for climbing means teaching children where they can climb. Children learn through repetition and parents and caregivers may have to redirect children a number of times before children will remember where to climb. Redirection works best when adults stay calm and focus the child on where he can climb, instead of where he can’t climb.
What if My Child Still Climbs after Redirecting Misbehaviour?
If children are offered appropriate places to climb on a daily basis, are redirected for lengthy amounts of time, and still climb on in appropriate spaces, then children may be climbing to get the adult’s attention.
If you suspect that children are climbing to get your attention try some of the strategies below:
Spend focused time with a toddler or preschooler several times throughout the day doing age appropriate activities such as finger plays, reading short books, and cuddling.
Create a few simple routines during the day for getting dressed, cleaning up toys, and spending focused time with the child.
If the child has little interaction with other children, set up some play dates with sibling’s kids or visit a local playground to give the child opportunities to play with other children.
Children need plenty of social interaction for healthy development. If you suspect that your child climbs only to get your attention, make sure that your child’s needs for social interaction are being met both by you and by interacting with other children.
Not long after children learn to walk, they learn to climb. Climbing is a natural part of healthy physical development and optimal brain development. But when kids climb all over indoor furniture, many frustrated parents scold, punish, and yell in an attempt to get toddlers and preschoolers to stop climbing. Instead of trying to stop the climbing, parents will be more successful if they redirect climbing to appropriate spaces.
Bring the fun of a craft session to a classic kids story with this really cute Three Little Pigs Story Puppets project. This paper craft is perfect for kids of all ages, but preschoolers will especially love this hands-on activity to go with a time honoured tale.
Paper Crafts Are Awesome For Kids!
As with most paper crafts, as long as you have paper, glue and some markers, you are ready to create! This Three Little Pigs Story Puppet craft looks like it might be complicated to make, but it really isn’t thanks to the free included template. While younger kids will need help with the intricate cutting this project entails, they will love helping to assemble the puppets. Older kids will enjoy adding extra details to make their puppets unique.
Fun Storybook Craft
This storybook craft is perfect to make with the kids on a rainy day, or it is a really fun addition to a classroom story time setting. The kids will love having the three little pigs and the big bad wolf puppets for re-enacting the book. Plus, the puppets are awesome for encouraging dramatic play in kids. Don’t be surprised if these characters make a cross over appearance with some other favourite toys!
Free Printable Template
You will want to pin this Three Little Pigs Story Puppets Craft template for use later. These puppets are so much fun that your kids are probably going to want to make this craft again. You might want to print a few extras and share with a friend who has little ones too because they are truly adorable paper puppets!
Three Little Pigs Story PuppetsCraft Supplies
Coloured craft papers
Pencil
Scissors
Craft glue
Sharpie
Popsicle sticks
Template
Paper Craft Ideas For Kids
If you want to have more paper crafting fun with your children, check out some of our favourites:
Step 1: Select different coloured craft papers for the 3 little pigs and fox paper craft puppets. I’m using pink for the pigs and brown for the fox. Select more colours for the other patterns of the puppets. Trace the template patterns on the selected craft papers and cut them out nicely.
Step 2: Take the pig pattern cutouts and stick the oval shaped papers in the middle of the head parts of the pig base cutouts.
Step 3: Stick the swirly tail cutouts on a side, near the bottom side of the pig base. Stick the bow patterns below the head parts.
Step 4: Use a black sharpie to draw the eyes, nose, and mouth of the pig paper-crafts.
Step 5: Grab the fox puppet patterns. Stick the oval shaped paper in the middle of the body base cut out of the fox.
Step 6: Stick the tail on a side and stick the head on the top side of the body base. Use a sharpie to draw the eyes, nose, mouth and the tip of the tail.
Step 7: Stick the pig and fox paper-crafts on popsicle sticks to complete the puppet crafts.
Three Little Pigs Story Puppets Craft With Printable Template
Yield: 4 Puppets
Prep Time: 10 minutes
Active Time: 40 minutes
Total Time: 50 minutes
Difficulty: Easy
Estimated Cost: $5
Bring the fun of a craft session to a classic kids story with this really cute Three Little Pigs Story Puppets project. This paper craft is perfect for kids of all ages, but preschoolers will especially love this hands on activity to go with a time honoured tale.
Step 1: Select different coloured craft papers for the 3 little pigs and fox paper craft puppets. I’m using pink for the pigs and brown for the fox. Select more colours for the other patterns of the puppets. Trace the template patterns on the selected craft papers and cut them out nicely.
Step 2: Take the pig pattern cutouts and stick the oval shaped papers in the middle of the head parts of the pig base cutouts.
Step 3: Stick the swirly tail cutouts on a side, near the bottom side of the pig base. Stick the bow patterns below the head parts.
Step 4:S Use a black sharpie to draw the eyes, nose and mouth of the pig paper-crafts.
Step 5: Grab the fox puppet patterns. Stick the oval shaped paper in the middle of the body base cut out of the fox.
Step 6: Stick the tail on a side and stick the head on the top side of the body base. Use a sharpie to draw the eyes, nose, mouth and the tip of the tail.
Step 7: Stick the pig and fox paper-crafts on popsicle sticks to complete the puppet crafts.
For most people, artificial Christmas trees can’t match the glory of a real Christmas tree. Before you purchase your seasonal tree, you should read our tips on how to buy, care, and decorate a real Christmas tree.
In most homes, the Christmas tree is a glorious symbol of Christmas, ablaze with Christmas lights and garlanded with shimmering Christmas decorations. Too often, though, a neglected tree quickly becomes no more than a skeleton of bare branches on a carpet of needles, but a little Christmas tree care will keep your live tree fresh and green right through Christmas.
Why Choose A Real Christmas Tree
One way to reduce waste is to buy a living Christmas tree. Some of these trees are sold in a pot with their roots intact, and they can be successfully grown at home to provide trees for several Christmas celebrations in a row. The drawbacks of buying a living tree are that the pot is heavy and cumbersome, so it is not practical to buy a very large tree. Choose a container-grown tree which has been grown in its pot for at least one year for the best chances of success. It is best to re-pot into a larger container after Christmas to allow the tree to grow ready for the next year. Once the tree becomes too large, it can be replanted in the soil outside.
Real Christmas trees are good for the environment as they provide a habitat for wildlife including several species of bird, and locally grown trees do not require long-haul transportation. The trees are fully biodegradable and can be composted or recycled in lakes and ponds to create better habitats for fish. Tree growers also point out that carbon dioxide is taken in by the trees while they are growing; however, this carbon dioxide will be returned to the atmosphere when the tree is recycled or burned.
Buying A Real Christmas Tree
Always start by buying from a reliable supplier who can tell you where the trees were grown and when they were cut or lifted. You may have a local tree farm or a good garden centre near you.
Some types of Christmas trees last better than others. Whichever species you select, choosing a good Christmas tree is important, and try not to buy your Xmas tree before, at the earliest, the last week in November. A fresh Christmas tree tends to be less of a fire hazard than a dried-out one. One way to tell if the tree is still fresh is by its needles. If the needles are pliable and can retain its original shape after being bent, then it is fresh. Once you’ve chosen, caring for your tree properly right from the start is essential.
Wind will quickly dry out any tree. It’s best to transport a Christmas tree inside your car if it’s small enough, or in a covered trailer. If using a roof rack, protect the tree from the wind with a tarpaulin or sheet of plastic.
Taking the Christmas Tree Home
A centrally heated house is the worst possible environment for a real Christmas tree. Even trees that are resistant to needle drops, like Nordmann Firs, Scots Pines, Fraser Firs, and Colorado Blue Spruce, will suffer if exposed to these conditions over a long period, so it’s best to delay taking the tree indoors for as long as possible.
As soon as you get home, find a sheltered spot in the garden protected from the wind and “heel it in,” and soak the soil to keep the roots – or butt if it’s a cut tree – moist. Cutting half an inch of the bottom of a cut tree before doing so will help it take up water.
Setting Up The Christmas Tree
Standing the tree on a tree skirt or mat will not only catch any falling needles, but also protect the carpet or floor from water and soil. Remember that a potted tree can be very heavy and awkward to maneuver; it saves a struggle to bring a big tree indoors to its final position before potting.
If using a Christmas tree stand, always choose one with a water reservoir. Otherwise, stand the tree in a good big pot – either one with a drainage hole and a saucer to stop water staining floors and carpets or one of the special ornamental Christmas tree tubs with a solid bottom.
Wedge the tree firmly in the pot with wooden braces or a couple of bricks to stop it moving around, then fill the tub with garden soil to a couple of inches below the rim, firming it down well and water thoroughly.
Pot Grown or Bare Root Christmas Trees
Norway Spruce Christmas tree in sizes up to five or 6 feet are often sold with their roots, and these will always last better than cut specimens. If the potted tree is small enough to handle, it’s best to pot the tree up as soon as you get it home. Otherwise, heel it in as described above until bringing it indoors and potting.
When potting a rooted tree, use a pot with a drainage hole and stand it in a saucer. A waterlogged tree is just as likely to shed its needles as a dehydrated one.
How To Care For A Real Christmas Tree
It’s very easy to take care for a real Christmas tree. Top up the water reservoir or water the pot daily. Never let the water level go below the tree’s base.
If you treat a potted bare-root tree well and don’t keep it indoors too long, it should survive to serve another year or to plant out in the garden.
The placement of the tree is always a factor in its safety as well. A fresh Christmas tree is safest for the family when it is not in direct sunlight or near direct sources of heat.
Recycling Real Christmas Trees
In order to minimize the environmental impact of Christmas trees, it is important to dispose of them responsibly once the festive season is over. Most local cities operate special seasonal waste disposal points for Christmas trees throughout the end January, so why not give yours a good, environmentally friendly send-off.
Safety Precautions When Decorating the Live Christmas Tree
Christmas tree safety may not be at the forefront of people’s minds during the holiday season, but it is every bit as important as finding the perfect Christmas tree. When the family comes together to decorate the fresh-cut tree, be sure to follow certain safety precautions when decorating the live Christmas tree.
Larger light bulbs can potentially dry out or even scorch the needles of your tree. They can be a fire hazard.
Rather than candles, use lights that are Laboratory-approved.
If the lights are damaged or are not cool to the touch, discard them.
Avoid tangling the cords around the tree, and turn off all Christmas tree lights when leaving home.
Those with young children can consider using string or ribbon to hang ornaments rather than wire hooks to prevent an emergency room visit.
People with pets should avoid allowing the animal to be in the room with a tree alone, as this can lead to a disaster.
Many people choose to decorate their homes with real Christmas trees during the festive season. And of course, tree care is needed to retain that glory throughout Christmas. After the Christmas tree is finally all set up, it is time to enjoy a hot cup of cocoa with Holiday Double Chocolate Cookies in front of the picture window staring into the star-filled sky.
Fall is the perfect time to kick back and get cozy with good company and a great drink. Whether you are gathered around a bonfire, or comfortable in the living room reading a book, a well crafted cocktail helps to set the mood for a fun relaxing time. You will find below 15+ Fall Cocktails To Make!
Fall Drink Flavours And Spices
After a summer of sipping on French Vanilla and Pina Colada Dalgona style drinks, I can’t wait to warm up with some fall inspired drinks! I think the Spiked Apple Cider Cocktail will be the first I make. Followed shortly by the Pumpkin Spice White Russian and the hot buttered rum. That sounds like the perfect way to warm up after a walk outside!
With so many spices, flavours and options, picking one to try first might be a challenge! No matter which you decide on, you are sure to pick something that tastes wonderful and takes the edge off after a long day.
Best Cocktails For This Fall
I have gathered some of the best cocktails to make this fall. This list has some incredible options that aren’t too complicated to put together. I have a feeling you will find a few that you want to mix up and share. If you want to try them all? This is a judgment free zone, so why not? Be sure to let me know your favorite.
Toasty Drinks And Meals For Fall
If you are looking for a favourite homemade fall drink that always warms you up on a cool day, check out our list of 15+ Toasty Drinks For Fall! Don’t forget to pair your fall cocktail or drink recipe up withone of these 15 Flavourful Fall Meals For The Family!
15+ Fall Cocktails to Make
From Ginger Bourbon Apple Cider that is perfect for a crowd, to classic fall drinks like hot buttered rum. This list has something for everyone on it. I can’t wait to hear which of these cocktails you will make first!
Getting creative with your kids doesn’t always just include painting and drawing — think outside the box and set your kids up with some of these fun projects:
Make your own coloured paints
Shake things up a bit with your painting sessions and get kids to make their own coloured paint using things you have in the home and garden. Paints are essentially dyes — they’re made from pigment and a binder — but you can use all sorts of natural things like fruits, plants, and vegetables to create colours.
What you’ll need:
At least three jars or dishes
Berries, fruit, vegetables – anything with a strong color
Water
Honey
White paint
Paintbrushes
Start with some empty jars — you’ll want three to make the primary u and then some extras so you can mix them together and make other shades.
One of the simplest things to use for color is berries: you can use blueberries, blackcurrants or blackberries to create a blue color, and then raspberries or strawberries for red. You could also use beetroot for a red color.
Either layout the things you want the kids to use, or let them find them for themselves. Top tip: it could be a good way of using up fruit and veg that’s a bit over.
One of the best ways to create yellow paint is with mustard powder and water. But you could also use pollen from flowers, or vegetables like pumpkins or squash.
For berries, soft fruit and vegetables, you can either mash them down and strain the juices or push them through a sieve to collect the pigment. Mix them with a little water and they’ll be ready to paint with. For harder materials, you’ll need to grind them down to a fine powder and mix them with a tiny bit of something like honey or just plain white paint.
Try making different consistencies and different shades, and then with the three primary colours, you can mix together colours to create others. Try looking at this guide for colour mixing ideas.
Create a make-and-play activity
Put your kids’ creative skills into making an activity kit they can play with again and again. Take a look at some of the activity boxes that are already available for some inspiration and try to make one yourself. Pick a theme like animals on a farm, a shop, or kitchen and make props with your kids that give them endless hours of fun.
What you’ll need:
Card
Pens
Scissors
Paint
Glue
Start by getting the kids to draw out templates for the props – if you choose to do animals you can find plenty of templates online. Depending on how creative you’re feeling these could just be outlines, or you can make them 3D. Try decorating the animals – they could look something like this Goldilocks and the Three Bears Puppet Craft.
Getting the kids to draw, cut out, and put together the animals will help them learn about different animals, colors, and construction. You could also make models out of playdough or modeling clay.
Turn photos into collages
This project will get kids to think about different colours and textures, as well as starting to learn about photography.
What you’ll need:
An instant or disposable camera (or a camera/phone and printer)
Glue
Scissors
Card
Pen
Decide on a category for your collages such as animals or people – you’ll then need to list all the colours you’d need to create a collage of them.
Once you’ve done this take your kids and the camera out for a walk. If you’re worried about them using your camera, there are plenty of kid-friendly cameras that will survive a few knocks and drops.
Ask the kids to take pictures of things that are the right colour for the collage. For example, if they want to create a tiger they need orange and black photos so you could take a picture of orange flowers, or signs and then a road or buildings for the black. And gather anything they find that can be used such as leaves, twigs, and flowers.
Now you need to print out the photos and draw up some outlines for the collage. Next, you can take the photos and cut them up into small squares ready to be stuck into the collage.
Collect all the squares of different colours, as well as the other bits and pieces you found and start gluing them to the picture. When they’re done your kids will have made a collage full of different colours and textures.
These are just a few fun ways in which you can move beyond crayons and paint with your kids to help develop their creativity.
We have learned a simple universal truth from our amateur experience with horse training that carries over very well to raising children. It’s to make the right thing easy and the wrong thing difficult. Okay, but how does that relate to my child and me? How can you achieve parenting from the heart?
Immerse your family in wholesome activities
Regular attendance at church is an excellent opportunity to make doing the right thing easy. Immerse your family in wholesome activities such as Boy Scouts, Girl Scouts, and 4-H to name a few. Don’t just send your child to the venues of the activities. You should go with him or her. If your area doesn’t have these activities, volunteer to start a local chapter. If your child can’t find a productive way to spend his or her time, there are probably other children feeling the same way in your area.
Get your children involved with peers
Peer pressure can be overwhelming to children. Giving children opportunities to be involved with peers who come from families with principles and values that are consistent with those of your family lessen the chance that they will be exposed to negative influences. You are a role model for your children. Volunteering to lead those groups shows your children the importance that you place on these types of activities and allows them to see you in different roles. It also shows your children that you care enough about them to become involved in their lives.
Eating meals together can lead to conversation
Sit down and eat meals together as a family, preferably at a table, without any MP3, cell phone, laptop, or TV. Your child will have to talk with you even if it only starts with pass the potatoes. Children might even decide it feels pretty good to talk with their parents. Mealtimes are excellent opportunities to engage teens to talk and encourage them to ask questions.
Turn off the TV too
Not turning on the television during times set aside for homework makes it easier for the children to finish their homework. It is hard for some kids to do their homework when other family members are watching TV. Showing them the importance of finishing assignments by providing a homework-friendly environment teaches your child that the schoolwork is important to you, too.
Parenting from the heart means being a part of your child’s life. Children live what they see. Making the right thing easy and the wrong thing difficult by doing the right thing shows your child that you love him. Nothing can take the place of a loving parent who gives his time and attention to meet the needs of his children.
Are you looking for a fun DIY craft project for Halloween? This DIY Easy Jack-O’-Lantern Felt Plush is perfect to make and share. It comes together easily thanks to the included printable pattern template and is a great and simple sewing project for all skill levels.
Halloween Decor
The DIY Pumpkin Felt Plush makes a great addition to your Halloween decor if you are looking for something that is more friendly and less frightening. Even if you aren’t a pro seamstress, you can complete this project in only a short amount of time.
What To Do With The Jack-O’-Lantern Felt Plush
These Jack-O’-Lantern Felt Plush are tiny little friends, perfect for popping into a pocket for on the go cheer, maybe you will want to make a few dozen to hand out as a trick or treat candy free alternative, or make a garland to decor and display in your home.
This Jack-O’-Lantern project requires basic supplies like felt, scissors, thread and needle, and a pencil to create an adorable little friend that kids will love.
One thing about this project I love is that you can stuff it with cotton batting or balls, or you can make good use of your scrap felt and use that to fluff these little Felt Jack-O’-Lantern Plush with. To give the faces variety you can turn the eyes this way or that way to make them all look a little different, like a hand carved pumpkin, or sew them all the same way for a uniform look.
Step 1: Select orange, black, pink, and green coloured felt fabric for the Jack-O’-Lantern plush craft. Trace the pumpkin bases on the orange felt, the stem on green felt, the blush circles on pink felt and the rest of the patterns on black felt. Cut out the traced patterns nicely.
Step 2: Place any one of the stem cutouts on the top middle part of a base cutout. Stitch the bottom overlapped part of the stem with the pumpkin base.
Step 3: Place the other stem on the back side of the stitched stem and stitch around the sides and top end of the stems to attach them, leave the bottom side intact for now. Place the other pumpkin base piece on the back side of the stitched base and make sure to bring the back side of the stem to the front of the back base piece. Now stitch the back stem with the back pumpkin base to join them.
Step 4: Flip the base to the front (in case you’re using orange felt for both sides you can select any one side as the front). Start attaching the face cut outs to the base piece.
Step 5: Complete the Jack-O’-Lantern face pattern.
Step 6: Stitch around the side of both base pieces with matching thread. Keep a small opening for stuffing.
Step 7: Stuff the felt pumpkin with cotton or scrap felt.
Step 8: Stitch the open end after the stuffing is complete. Tie a knot and cut off extra thread to complete the craft.
DIY Easy Jack-O'-Lantern Felt Plushie
Yield: 1 Jack-O'-Lantern Felt Plushie
Prep Time: 10 minutes
Active Time: 25 minutes
Total Time: 35 minutes
Difficulty: Easy
Estimated Cost: Under $5
This DIY Easy Jack-O’-Lantern Felt Plushie is perfect to make and share. It comes together easily thanks to the included printable pattern template and is a great and simple sewing project for all skill levels.
Step 1: Select orange, black, pink and green coloured felt fabric for the Jack-O-Lantern plush craft.
Trace the pumpkin bases on the orange felt, the stem on green felt, the blush circles on pink felt and the rest of the patterns on black felt.
Cut out the traced patterns nicely.
Step 2: Place any one of the stem cutouts on the top middle part of a base cutout.
Stitch the bottom overlapped part of the stem with the pumpkin base.
Step 3: Place the other stem on the back side of the stitched stem and stitch around the sides and top end of the stems to attach them, leave the bottom side intact for now.
Place the other pumpkin base piece on the back side of the stitched base and make sure to bring the back side of the stem to the front of the back base piece.
Now stitch the back stem with the back pumpkin base to join them.
Step 4: Flip the base to the front (in case you’re using orange felt for both sides you can select any one side as the front).
Start attaching the face cutouts to the base piece.
Step 5: Complete the Jack-O-Lantern face pattern.
Step 6: Stitch around the side of both base pieces with matching thread. Keep a small opening for stuffing.
Step 7: Stuff the felt pumpkin with cotton or scrap felt.
Step 8: Stitch the open end after the stuffing is complete.
Tie a knot and cut off extra thread to complete the craft.
How would you use these Halloween Pumpkin Felt Plushies? As a part of your decor? Or maybe as a treat alternative that is just as sweet as candy? Let us know in the comments below!
As a parent, balancing work and play can be quite hard. Stress can cause a lot of problems for parents, and while there are stress management techniques you can use, you may want to consider online counselling. Here are some ways BetterHelp can help you curb stress as a parent.
Helps You Manage Time Better
Learning to juggle work and your kids is a challenge. Maybe you struggle with working and cooking for your family, or maybe you feel like you aren’t being the best parent you can be. Well, BetterHelp can assist you with time management and learning to mitigate stress so you’re prepared for the day ahead.
Helps with Anxiety and Stress
Stress and anxiety are all too common amongst parents, especially working moms. After all, you have to balance out taking care of the kids, working, and even catching a breath every once in a while. BetterHelp is an online therapy service, and you can talk to a counselor who is dedicated to help you. If you feel panicked by the pandemic and working to get your kids acclimated to online class while also heading to Zoom meetings for your own job, you may want to consider a therapist.
Even if you seem to have it handled, anxiety is all too common, and talking to a therapist at BetterHelp is great for helping you feel more secure and certain about the times ahead.
It’s Perfect for On-the-Go parents
Dual-income families are now the norm. As a parent, you may feel like you can’t get the help that you need to control your mental health. But, BetterHelp is on the go, with a chat-based service to help you get the assistance you need. But not only that, you can meet with your counselor for video sessions once a week too for great results.
Many parents love this because they can meet quickly and get the help they need. There’s a reason why BetterHelp is one of the best online therapy sites out there for you to use. It even has a handy little app for you to contact your counsellor on, so if you aren’t able to sit down at your computer, this is an alternative to this.
Quick, Efficient, and Useful
If you’re a parent who is tearing your hair out just trying to catch a break, then you should consider therapy. Online therapy is on the rise for a few reasons. For starters, it doesn’t involve much to meet up with your counselor to get the help that you need. In fact, some parents may even multitask while helping their kids with schoolwork and taking care of them. You have a counselor who is there to listen to your concerns, even if they’re silly by some standards. BetterHelp is perfect for many parents because it’s so easy to use, and in the digital age, it’s obvious that most of us have phones, which is what is needed to begin the health service.
More and more people are flocking towards Telehealth too. Telehealth is simple, effective for most common issues, and good to use. Plus, the apps are super easy to navigate, and BetterHelp is easily one of the best there is. If you need assistance, then you should definitely consider Telehealth as it is very easy to begin with, and offers numerous benefits for you as well.
Helps with Avoiding Parenting Burnout
One of the most common things parents experience is something called parenting burnout. This is very common for parents, especially in the pandemic world. With lockdowns pushing parents to be closer to their kids than ever before, catching a break isn’t always possible.
But, BetterHelp can sit down with you and help you figure out what you can do to combat parenting burnout. This can include de-stressing techniques, help you figure out the source of parenting burnout and if it can be avoided, and how you can manage parenting burnout easily and effectively.
Parenting burnout is something that’s much too common, and something most parents struggle with avoiding. After all, it’s hard to get away from your kids, but with BetterHelp, it’s all right there and easy for you to manage.
Helps with Parenting Issues
Are you a parent with a child who tends to be a bit more unruly, or maybe you’re a parent with a teenager that’s starting to go their own way? Well, BetterHelp can help you be a better parent to teens. There are therapists who do counseling for parents, teens, and family members, and parenting issues are tackled by these counselors. You can sit down with them, and they’ll help you sort out what’s going on.
This is perfect for you as a parent, especially if you deal with a child who is beginning to be unruly.
If you’re dealing with a kid who just won’t listen, or one who’s started to become much more independent, this can be a bit jarring for you. Luckily, the therapists at BetterHelp can assist you with your parenting concerns, which is perfect if you don’t know what to do next.
They can also help with estranged family members. If you have a kid who’s started to distance themselves from you, or maybe they left to go to college, BetterHelp can help with making it easier to manage the feelings, especially the anxiety and depression that comes with this too.
Get the help You Need Today!
As a parent, you deserve help. BetterHelp is ready to assist you, and you can contact them today for more information from their Facebook page, or from their site directly.
You don’t have to parent alone, and BetterHelp can assist you with all of your parenting needs!
Marie Miguel
Marie Miguel has been a writing and research expert for nearly a decade, covering a variety of health-related topics. Currently, she is contributing to the expansion and growth of a free online mental health resource with BetterHelp.com. With an interest and dedication to addressing stigmas associated with mental health, she continues to specifically target subjects related to anxiety and depression.
We use cookies to ensure that we give you the best experience on our website. If you continue to use this site we will assume that you are happy with it.