Although many people like the idea of living a more environmentally-friendly lifestyle, they think that it will be time-consuming and difficult to make changes to their lifestyle; however, this doesn’t have to be the case. As Earth Day is fast approaching, it’s time to make some changes and be more eco-friendly. Here are some simple tips on easy ways to go green at home!
6 Easy Ways To Go Green At Home
Reduce, Reuse, Recycle – Go Green
1. Recycling
Recycling only takes a few minutes each day to do and will soon become a normal part of your day-to-day life. By simply sorting rubbish into separate bags or trash cans, you can make a real contribution to the environment and go green at home. Many areas have separate recycling collections to remove your recyclable rubbish. Otherwise, you can usually find recycling points in public areas such as car parks, parks, or shopping malls. Your local city council should be able to offer advice with regard to the removal of recyclable products.Your old electronic devices can get recycled in an environmentally responsible way.
Blue Recycle Bin
2 .Reuse and repair
It can easily become a habit to throw away an item as soon as you have finished with it or it becomes slightly damaged; however, many items can easily be repaired or reused. Plastic storage containers are ideal for storing food in the freezer, and glass bottles have many uses.
3. Using less water
Sustainable habits to conserve resources such as water is environmentally impactful. There are several simple steps that can achieve to use less water. First of all, opt for a shower or simply use less water in the bath. Secondly, remember to turn off the taps when they are not in use. A third tip is to avoid the use of items, such as hose pipes, that unnecessarily use larger amounts of water than are actually required. Finally, make use of rainwater as it is a free and natural source of water that avoids waste. Rainwater can be used for flushing the toilet, washing the car, and watering the plants in your garden.
4. Eating organically
Another way to go green at home is to eat organic foods. They avoid the use of pesticides that can be harmful to the environment. Buying organic foods reduces the amount of damage caused and is thought to be more healthy. Alternatively, you can grow your own vegetables, and this will also save you money. Even those with smaller gardens can grow a few simple fruit and vegetables, such as tomatoes, as these can be grown in plant pots on a windowsill.
Environmentally Friendly light bulb
5. Reducing electricity and gas usage
One of the greatest contributors to each person’s personal carbon footprint is their use of gas and electricity. Using electricity-saving light bulbs, turning off the lights when not in the room, and turning down the central gas heating by just a few degrees can all make a significant difference on a daily basis.
6. Daily Travel
How you choose to travel each day can have a large impact on the environment. If you must travel in a car, then use unleaded gas and consider starting a car share scheme whereby several people who are traveling in the same direction take it in turns to drive and collect other people. Public transport is a better option than driving as it reduces the amount of traffic on the roads, thus reducing air pollution. If you live within a reasonable distance from work, then walking and cycling are the best options. Additional benefits to walking and cycling are the benefits to your health and the likelihood that you will save a significant amount of money over the year.
Easy Ways To Go Green At Home
As you can see, there can also be additional benefits to go green at home such as saving money, living healthier, and helping the environment, thus making these simple changes mentioned above.
Your wedding is fast approaching! You’ve dreamt of this day since you were little, and now, finally, your happily-ever-after is just around the corner. So, you should make it a time of great joy, booming exaltation, and overwhelming passions and emotions.
Your wedding day is a significant milestone, filled with love, joy, and the promise of a lifetime spent together. It’s a day when dreams become reality and emotions run high. To make your wedding truly unforgettable, you need to plan every aspect with care and attention to detail. From selecting the perfect venue to how wonderful you will be in that gorgeous dress with a diamond ring.
After those long months of planning and preparation, you would want to ensure that everything’s ready. Now, all that is left is to dot some I’s, cross some T’s, and get your planning filed away… you simply can’t leave anything to chance on that magical day.
One of those pesky I’s is music; your nuptial soundtrack. That little tidbit will either break or make your day. In fact, it’s as important as your dress, your hors d’oeuvre, and where to sit your estranged relatives.
Music is partly what adds dynamism to the event. It is what compels people to get off their chairs and really bring the house down. So, you have to start rifling through your options and picking out the perfectwedding band, where do you start?
Here are 5 questions you have to ask yourself before you pick a live band for your wedding:
1. How Many Guests Am I Expecting?
There’s a tipping point to picking a band, a Goldilocks Ratio, where everything has to be “just right” for a band to actually gel with the crowd. You need to know how many people you invited to your nuptials because the larger the gathering, the larger the band you’ll need.
If you have a packed house, you simply can’t have a lone-wolf with a Taylor guitar singing his heart out to an acoustic rendition of “Don’t Stop Believing.” You need the pomp and circumstance that a jam-packed room with rowdy celebrants demands.
A collection of trained musicians, not just a one or two, that know how to draw in the crowd and snake charm them away from the bar and into the dance-floor. You need a spectacle that will visually impact your guest and a show that sounds big and looks exciting. For all of that to happen, you first need to know how many people are going to get an R.S.V.P.
2. Where Is My Wedding Going To Take Place?
Location! Location! Location! To get in contact with a band and start hatching out the contracts, you’ll need to get yourwedding venue locked because it’s a matter of logistics.
If your wedding is a long way out of town, not only the guests will need overnight accommodations but also the band members. You’ll need to have this tidbit of info in your pocket way before you start interviewing possible bands.
Bands are a prized commodity, so they are in high demand. Some bands receive more than 25 inquiries a day about possible gigs.
For these melodic cats to keep things fair they need to see some scratch. In other words, they need a deposit, paid and in their bank account, to confirm a booking. Check with them in advance and lock in your wedding date performance ASAP.
Need A Live Wedding Band? Here Are 5 Questions You Should Ask Yourself
4. Do I Want To Have Dancing With a Live Band or A DJ?
It’s all about the vibe you want your wedding to have. The music is one of the things most people remember from a wedding. It sets the atmosphere and reflects your personality.
Both not only carry the musical ambiance. But as performers, they also pay close attention to the “feel” of the room and escort the guests through their musical repertoire accordingly. They are ringmasters, and oftentimes, interact with the crowd.
For that end of the night jamboree, both aDJ and a band will work just fine. They afford the climax a different vibe and said vibe is personal in nature. There are things a DJ can do that a band can’t and vice-versa.
To keep it simple, you have to ask yourself this set of questions: “What do I want for the final moments? Where do I want to transport my guests? A music hall and concert or a night-club?” Both are awesome answers and you can do no wrong with either.
If you’re still on the fence, some bands even provide a mashup of both services – live music as part of the DJ service.
5. Do I Want To Have Live Music At The Ceremony and Cocktail?
Nowadays, there are services out there that really streamline the whole musical process as far as a wedding is concerned. They are well aware that a wedding, aside from being one of the happiest moments in your life, is also one of the most stressful. As such, they offer countless customized packages for that day.
Why is this important and what does this have to do with the initial question? Let’s say you want to have live music during the ceremony, the cocktail, and the reception. You can either interview and deal with a score of different suppliers or you can deal with just one that synchs everything up and takes the weight off your shoulders.
For your convenience, you can look for one supplier tasked with having a band present at the ceremony, at the cocktail, and at the reception/party.
Wrapping It All Up
Once you answer all these 5 questions, you’ll be able to make an informed decision as to what sort of band you’ll want for your wedding day. More importantly, you will be able to figure out how to perfectly negotiate with them.
There is no doubt about it, Canadian families are dealing with unprecedented times. COVID-19 has kept Canadian schools closed having many parents take on the role of an educator, while continuing to work from home. As parents learn to adapt and keep up with the new normal, their child’s education and future remains top-of-mind. Now more than ever, Canadians should consider opening a Registered Education Savings Plan (RESP) for their child. An RESP is a way to help you save money for your child’s post- secondary education. But more importantly, it’s a way to empower your child: to help ensure that there are no limits on their dreams, no matter how big those dreams might be.
Open a Registered Education Savings Plan from Your Home
Girl looking at money to be saved for her future.
If you haven’t yet opened a Registered Education Savings Plan for your child (or grandchild), consider CST Spark. CST Spark is the newest member of the CST family empowering Canadians to achieve their post-secondary education savings goals through easy-to-use technology on their digital devices, at any time. With strict social distancing measures in place, your RESP can be opened online, from the comfort of your own home.
CST Bright Plan™ is the first of its kind and is based on an investment strategy built for RESPs. As part of our mission to make RESPs simple and accessible, your plan can be accessed through our easy-to-use website portal.
Here’s what sets CST Bright Plan™ apart from other RESPs:
We invest with one goal in mind and that is to ensure you can help pay for post-secondary education. We use tried-and-true strategies for our clients’ RESPs, by investing mostly in equities in the early years to maximize growth and then transitioning to fixed income investments in later years to preserve the gains.
The investment mix is tailored according to your child’s age and we make it easy to change contribution amounts safely and securely online through our website.
We offer online convenience and no waiting in line at the bank. You can open and access your Registered Education Savings Plan anytime safely and securely online through our website and if you have any questions, our Direct Dealing Representatives are available to chat online or over the phone.
You can control how much and how often you invest safely and securely online through our website – with as little as $10 a month!
Tuition is on the rise and your child (or grandchild) will be off to post-secondary school before you know it! That’s why it’s important to start saving early, as the earlier you start, the more time you have for your savings to grow while you benefit from the eligible government grants.
Open a Registered Education Savings Plan from Home
Our Direct Dealing Representatives are available to answer any questions you have. To see if CST Bright Plan is right for you contact us at 1-800-461-7100 or visit our website at www.cstspark.ca.
Written by: Bernadette MacPherson, Vice President, Digital Sales at CST Spark Inc.
This post is sponsored by CST Spark. CST Bright Plan is only sold by Prospectus.
Our family tries to visit Walt Disney World in Florida on a yearly basis. This year, with the pandemic, it is no more a certainty and looking more of a dream. And now more than never, do we ever feel totally withdrawn of the Disney magic sitting at home and in isolation. Does your family enjoy Disney like us so much that you are looking for activities, recipes, crafts, printables, and colouring pages to do with the kids? You will find below a list of over 100+ ideas to bring the Disney magic at home!
100+ Ideas to Bring The Disney Magic At Home
Why Do We Love A Disney Vacation So Much?
I am often asked, why do we visit Disney when my family now consists of all adults? Isn’t it just for kids? Disney is a wondrous place that taps into one’s emotions and provides an escape from routines, work problems, and everyday life. What makes Disney a magical vacation is that it allows someone to experience it through the eyes of a child. That child’s eyes could be the five year old next to you or the little person inside.
Despite crowds, exhaustion from walking, and tantrums heard by all, Disney vacations are an experience worth remembering. As you enter the park, you are greeted by cleanliness and smiling faces. It is as if someone changed the screen from black and white into colour. The vibe is happy, musical, and safe. Drop your worries at the door. A ride awaits you. That’s the Disney magic!
Fantastic Fireworks
The fireworks at Disney send cascading colours around the castle and throughout the sky. Cheerful music is synchronized with the blasts of brightness. This delightfully choreographed display will uplift any mood within a twenty mile radius.
Fireworks at Magic Kingdom
Monorail Magic
Every Disney vacation experience is more rewarding after a monorail ride. For over fifty years, guests have been riding on the monorail at Disney. This tradition excites each guest as they roam the territory overhead. One can truly enjoy the beauty of the park by seeing it from up high. Taking a monorail ride through the park at night or during non-peak hours can enhance the experience and bring some Disney magic.
Mickey and Minnie on a float at Magic Kingdom
Panoramic Parades
The variety of parades offered at the Disney parks are as diverse as the guests that travel there. Each of the different parks have a unique parade that caters to the needs of the visitors. The smaller parks have a sleepier tone to the parade. That might be exactly what is needed that day. Sometimes parades allow for a needed break when walking one more step is not an option. The nighttime and holiday parades will leave you with an unforgettable experience.
Donald Duck giving a kiss to my daughter.
Charismatic Characters
Notice the smiles on the faces of the guests as they meet the characters. The characters appeal to young and old alike. When at the Disney parks, it is easy to notice the effect that the characters have on everyone. If you want to have a bit more time with your favourite character, check out a character meal. You will enjoy fantastic food and get individual time with your character.
The Beauty and the Beast Live Show at Hollywood Studios.
Spectacular Shows
The shows at the Disney parks fill the spectrum. Dancing, singing, technological, cinema style and humorous shows are presented daily. You will enjoy the enormous talent during your Disney vacation while you relax. You may have a few folks in your group that are not into the shows; however, after seeing the shows they will leave without complaints. Each show pays attention to detail and provides an escape from the hectic world.
Millennium Falcon Smugglers Run ride Star Wars: Galaxy’s Edge.
Rousing Rides
Disney rides bring an element to the park that is past down from generation to generation. The rides bring along rich memories that become part of the tradition for visitors. The enjoyment level of the ride is every bit as important as the emotions that it evokes from the guests. Disney builds onto their traditional rides each year by adding new surprises. One can go back to the park twenty years later and visualize its elements. The predictability of the rides keeps guests coming back for more Disney magic!
A Disney vacation gives each guest the excuse to play. This can be a challenge in a busy world. Disney has carved out a niche that brings celebration, happiness, and amusement to all. Escaping into this sparkled place of merriment is what makes Disney a rewarding and magical vacation.
100+ Ideas to Bring The Disney Magic At Home
You will find below 100+ fun filled Disney ideas, activities, and printables for your kids for kids to do while at home. These are perfect to make before heading on a Disney World vacation with the family!
Learn how to make your very own Monsters Inc donut that looks like everyone’s favourite one-eyed monster, Mike Wazowski! This recipe is inspired by the “Monster Mallow Donut” that was sold at Schmoozies in Disney California Adventure Park during Pixar Fest 2018.
S’mores dip on graham crackers by Life Family Joy.
Cookie cups are an incredible take on the traditional cookie and they’re undoubtedly a fun, must-try recipe, especially if you’re looking to try something new!
The Muddy Buddies recipe is a classic just like Peter Pan. Brown sugar was added with the powdered sugar coating resembles more of the brown forest as well as blue sprinkles.
They are not only beautiful to look at, but so yummy. Kids are going to love the colours and decorations. And, don’t be intimidated by the swirled frosting, the technique is easier than you might think!
Disney Inspired Drinks for Adults
The Sorcerer Cocktail Disneys Aladdin Inspired by Cool Moms Cool Tips.
These Frozen Puppets are quick and easy to make and will provide hours of imaginary play. Make your cereal box theatre to go with it or simply play behind the sofa!
It’s easy to make these Forky painted rocks with the kids. If your child is old enough to use paint pens, you’ll be able to show them how they can easily recreate their favourite character from Toy Story 4!
When I was younger, one of the things I remember is making Christmas ornaments for the tree. Sometimes we did paper ones, and sometimes we used clay and baked them. Either way, this was one of my best family memories. Give the gift of memories to your preschooler this year by making a Snow White Ornament together.
Disney fans are going to love this Paper Princess Ariel Paper Doll Craft! It is perfect for an afternoon craft session to pair with the Disney The Little Mermaid movie!
This easy Jack Skellington Craft for Kids is a must if your family loves The Nightmare Before Christmas movie! You’ll only need a few supplies, such as paper plates, construction paper, and glue.
You can turn these free printables into either a Paper Disney Doll DIY or you can use them as a Paper Princess Ornaments to used as Christmas Tree Decorations or as Party Decor.
Paper Disney Doll DIY: Princess Printables by Red Ted Art.
Make your own princess capes and honour a relationship with a sister or someone who is like a sister to you with sister bracelets! And also a rock troll craft, Frozen colouring pages, and more!
The fun doesn’t have to end when the movie’s over. These cute Onward printable colouring sheets and activities will keep the kids entertained for hours.
Printable Disney movie checklists (all movies!). Read them together, check off the ones you’ve seen, highlight the ones you want to see, and reminisce about your favourites. How many Disney Movies will you watch? Check mark the ones you do!
Enjoy this Avenger free printable colouring book with your favourite Marvel heroes. They are here to save the globe (well, at least from boredom!)
With this list of over 100+ ideas to bring the Disney magic at home, your family will have hours upon hours of fun bringing everything that Disney offers right to you!
Do you live amidst chaos? Are you not able to actually see your table because of paper clutter? Do you always run late because you can’t find your keys, homework, or cell phone? Is life turning you into one big stress case? The following tips on how to control your clutter in 10 easy steps may just be for you!
These quick and easy steps will guide you toward the big goal of a clutter free environment! By implementing them as often as possible, the day-to-day chaos that you live with will evaporate.
Clear Clutter written in blocks in front of a laptop.
Control Your Clutter In 10 Easy Steps
1. Tray on the Entry Table
This is a really easy thing that is often overlooked. Put a tray, platter, basket, whatever is relatively flat and you find attractive on your entry table, to collect your stuff (keys, mail, wallet) as you enter your house.
2. Clean out your inbox in your computer
Empty, file, and delete your inbox on a weekly basis. If you haven’t found a home for that email in a week, then you probably do not need it.
3. Collect all of your mail in one spot
Collect all the piles of mail and put them in that decorative box on your entry table! Of course, junk mail should go in the garbage without ever being set down. Set aside one day per week and sort, shred, and toss.
4. Unsubscribe from email lists
Clean up your inbox by unsubscribing from companies’ emailings list that you no longer what to receive. It will decrease your emails that you don’t read by a lot!
Greeting Cards
5. Greeting Cards
Send out greeting, birthday, and anniversary cards at the beginning of the month that the date occurs. This frees up so much time, and people are thrilled to be remembered, even if it is early. Buy extra and store them then send out, and you will not miss the date. You can even buy greeting cards for the entire year and then they will always be on hand.
6. School mail, email, and correspondence
Keep a multi-pocket folder in your junk drawer. Each family member has a pocket as well as miscellaneous folders for takeout menus, maps, invitations, and phone directories/lists. These pockets are for papers that need to be kept, but not dealt with on a daily basis. You can also keep one on your computer for all the emails you get for each child.
Control Your Clutter In 10 Easy Steps
7. Seven Days to less Clutter
You will need 14 garbage bags and a week where you can stroll through your house each day for about 10 minutes per bag. Try this as it really works! Each day, grab 2 garbage bags and off you go. One bag is for garbage – do not cheat- this is garbage that is not in your garbage containers. Look behind bureaus and desks, sort through expired beauty products, sun tan lotions, anything that needs to go to the garbage. The second garbage bag is for donations. Sort through shoes one day, out of season clothing, old paperbacks. Things that you have wanted to donate and just never had. Each day, either throw out the garbage bag, or set the donate bag by the back door to go with you. Now, it’s been a week and you have rid your house of 14 bags of “stuff”.
8. Move (not literally)
You, of course, do not need to sell your house to rid yourself of clutter, just act like you are going to! Pick a moving date on the calendar and start sorting through your things. If you do not want to “pack” it, it should be tossed or donated. This really pares down what is important to you.
White basket
9. Separate gathering baskets for each family member
Set aside 10 minutes each day to pick up. Each family member gets their own container and needs to pick up their own items to declutter. Designate specific containers for everyone! A beautiful basket for you, a sandbox pail for the toddler, a backpack for a school-age child, and a toolbox for dad.
10. Buying in bulk
Buy in bulk to save a bit of money only if you have a place to store the excess. The few cents that you save is not worth the stress of storing 20 rolls of paper towels, or having to move it to get to something else.
These are tried and true “secrets” that busy and organized people already do. Make them a part of your routine, and actually regain some precious time in your schedule! Time to do what YOU want…isn’t that what we all crave?
It’s always seems to be an issue at our house as to which afternoon snacks to eat. I want my kids to eat healthy nutritious snacks and remind them constantly. When they were teenagers, I can’t say it was any easier as the bars, cookies, and popcorn are well from reach. Even today, I try to imply to eat healthy snacks. I try to have on hand fruits or veggies with a protein or carbohydrates to make sure they will be full until supper time. I thought I would share 3 of my children’s favourite super easy snack recipes.
Fresh summer fruits on sticks.
Snack recipe #1. Rainbow Fruit Kabobs (makes 6)
These Fruit Kabobs are our family’s favourite snack recipe! You can also create your own Snack on a Stick and let your children place their favourite ingredients on a stick.
Ingredients
12 blueberries
1 kiwi cut in cubes
1 slice of pineapple cut in cubes
1 orange cut in cubes
1 grapefruit cut in cubes
6 raspberries
6 Wooden skewers (5 to 6 inches)
Direction
Alternate 2 blueberries, 1 kiwi cube, 1 pineapple cube, 1 orange cube, 1 grapefruit cube, and 1 raspberry on a skewer. Serve.
Do you suffer from allergies? Are you looking for a more natural way to cope? Explore the options of aromatherapy for allergy relief and decide if this is a good option for you. If you have allergies, then you know how uncomfortable they can make you. For those of us who prefer to deal with allergies in a more ‘natural’ way, we can use essential oils to help heal the allergy symptoms.
Essential Oils For Allergy Relief
The first step is to find the underlying cause of the allergy.
Whether you have a day-to-day allergy or an occasional one, you need to be aware of the situation and the underlying cause of the problem. Finding the cause will help to create a more effective remedy for the symptom in the long run and help with allergy relief.
Eczema is just one type of allergy you can develop.
Eczema is one type of allergy that can develop on people with sensitive skin. One type, contact eczema, is extremely noticeable. This allergy can be set off by anything from clothing to various chemicals such as soaps and make-up.
The other type, atopic eczema, has a history of affecting people who have a family history of asthma, hives, or hayfever. Certain foods may also trigger this condition. Some people grow out of this particular type, while others never do. Stress has been proven to play an important role in these conditions.
Essential Oils For Allergy Relief
Choose essential oils that will help with your allergy treatment plan.
Using essential oils that help to calm and relax you can be helpful to the overall treatment plan. Chamomile is an excellent oil to use. Just add two to three drops to your bath water. This will help you to relax and calm your mind. Lavender is another excellent essential oil to use for this purpose.
Asthma can be triggered by allergies.
Asthma can also be triggered by allergies like dust, mould spores, mites, feathers, and pet dander or hair, especially long haired pets. Other triggers can include cold air or drafts, pollution, and stress, as well as certain foods. Placing a diffuser in the room with essential oils for someone that has asthma can help ease the symptoms. You can a few drops of the following essential oils to the water in the diffuser: Eucalyptus, Peppermint, Thyme, Ginger, or Lavender. If your asthma is triggered by breathing in strong fumes, you might find that essential oils trigger your symptoms rather than relieving them.
Essential oil diffuser
Don’t forget about food allergies.
Food allergies can be a big problem for many people causing symptoms such as headaches, dizziness, irritable bowels, and colic in babies. For food allergies, a local nutritionist or naturopath may be able to help you identify the offending foods. The best treatment for a food allergy is avoidance.
For irritable bowels, there is nothing like a warm compress placed on top of the abdomen. You can make a “rub” out of an essential oil and a carrier oil to rub on the skin before applying the compress. Essential oils that work really well for this include ginger, lavender, fennel, peppermint, thieves, and oregano.
Many practitioners such as a medical herbalist, registered homeopath, holistic nutritionist, or naturopath can discuss your options further with you on an individual basis.
Conclusion
Always use pure essential oils in treatment. As with any home remedy, this advice is not intended to be used in place of consulting a licensed medical practitioner. Essential oils should not be used to replace medication such as for asthma. Many doctors today are discussing the prospects of using herbs and essential oils as part of their overall allergy treatment plan. You can discuss this option with a local doctor of your choice.
This Dalgona iced coffee has a special twist since I added French Vanilla syrup to it! If you don’t want to add the syrup, you don’t have to, since you can simply make the original version without it. You can also omit the ice and make it a hot beverage by heating up the milk!
Did you know that Dalgona coffee is the viral drink everyone’s making during the Covid-19 pandemic? With the promotion by governments to self- isolate and use social distancing, people are baking and cooking more at home and also using off-the-shelf ingredients to make food and beverages. Dalgona coffee is actually whipped coffee that is similar to a toffee-like texture when whipped into foam.
How Did The Dalgona Coffee Craze Start?
Dalgona coffee (Korean Coffee) is all the rage on TikTok, Youtube, Instagram, and Facebook social media pages. It’s also called Frappe Coffee in Greece and Beaten Coffee in India. This new craze started with a South Korean actor named Jung Il-woo! He was served a similar beverage at an eatery in Macau that reminded him of “dalgona”, a Korean honeycomb toffee. The beverage became famous when he presented it on a South Korean TV show called Stars’ Top Recipe at Fun-Staurant.
How to Make Dalgona Iced Coffee?
Dalgona iced coffee is a beverage made by whipping equal amounts of instant coffee, sugar, and hot water until it becomes creamy and then adding it to cold or hot milk. I added French Vanilla syrup and ice, but you can also add any flavour of syrup you like such as Salted Caramel or spike it up with Baileys! You can also add sweet toppings like crumbled cookies, brownie bites, shaved chocolate, honey, and coffee or cocoa powder.
Dalgona Iced Coffee Recipe with French Vanilla Syrup
You can’t make Dalgona iced coffee using ground coffee beans, so you must use instant coffee to create the dense and foamy topping.
Makes 2 Servings
Ingredients
2 tbsp of instant coffee
2 tbsp sugar
2 tbsp hot water
1 tsp to 1 once of French Vanilla syrup (Sebastiano’s, Davinci, Torani or others)
1 cup of Milk
Ice cubes
How to make a dalgona iced coffee
1. Whisk together instant coffee, sugar, and hot water until peaks are formed. (You can use a hand whisk, a hand mixer or a stand mixer.)
2. Fill a glass with ice cubes and top with desired amount of French Vanilla Syrup. If you just want a little flavour go for a teaspoon, but if you’re looking for a big bunch of vanilla sweetness you might want to go with an ounce.
3. Top the rest of your cup with milk.
4. Put one to three scoops of the whipped coffee mixture on top of the Dalgona Iced Coffee and serve!
I hope you enjoyed my Dalgona Iced Coffee with French Vanilla Syrup as much as I did! If you make it, please share your photos with us on Facebook or Twitter! Also, check out all of our other recipes and coffee recipes!
Dalgona Iced Coffee With French Vanilla Syrup
Lyne Proulx
Dalgona Iced Coffee With French Vanilla Syrup is actually whipped coffee that is similar to a toffee-like texture when whipped into foam.
1tspFrench Vanilla syrupto 1 once of Sebastiano, Davinci, Torani or others
1cupMilk
Ice cubes
Instructions
Whisk together instant coffee, sugar, and hot water until peaks are formed. (You can use a hand whisk, a hand mixer or a stand mixer.)
Fill a glass with ice cubes and top with desired amount of French Vanilla Syrup. If you just want a little flavour go for a teaspoon, but if you’re looking for a big bunch of vanilla sweetness you might want to go with an ounce.
Top the rest of your cup with milk.
Put one to three scoops of the whipped coffee mixture on top and serve!
As a parent, you may dream of having a wonderful relationship with your children, and have them establish a strong bond with you and each other as they grow up. You may do everything possible to work that out, but fights between your children, which eventually leads to sibling rivalry and jealousy, is almost always unavoidable.
If that sounds like something you are struggling with, here’s a little help your way. Keep reading to discover some of the most effective tips and tricks to deal with sibling jealousy.
a boy and a girl arguing
Never Compare
As much as you may be tempted to, refrain from comparing your children to each other as well as to anyone else whether it comes to schoolwork, extra curricular activities, or literally anything else. Constantly remind your kids that they are special in their own way, have their own qualities that make them what they are, and the only person that they should ever compete with is themselves.
Listen to Them Both
During an argument or a fight, make sure you listen to both sides of the story, and give each of your children a fair chance to speak up. Doing this puts forward a strong message that you respect each of your children, and this simple trick can very effectively stop jealousy between siblings right in its tracks.
Stay Out of Their Arguments
You may be tempted to settle the spat between your children, but no matter what, stay out of it as much as you can, unless you feel things are getting out of hand. Most children settle their arguments themselves if they are left alone. If your children try to involve you, gently explain them that it is they themselves that created the problem, and they should try to work it out by themselves.
Sibling Jealousy: Effective Tips to Deal with It
Find Special Alone Time
One of the best ways to make both your children feel special and wanted, and make yourself a fair parent is to set out some alone time with each one of your kids. It can be anything, a short walk, baking some cookies together, watching his favourite movie, you get the drill. During this alone time, try to nurture your relationship with your child as much as you can, and strengthen the bond between him and you.
Never Punish One in Front of the Other
One of the biggest mistakes you could make as a parent that is bound to stir jealousy and hate between your kids is that you punish your kid in front of his/her sibling. If one of them has demonstrated unacceptable behaviour that needs to be punished, make sure you do it privately. Scolding one child in front of the other can literally fuel the fire.
Share your most effective tips and tricks to deal with sibling jealousy. Comment below!
I would like to share some pretty amazing kids free printables that consist of activities, colouring pages, crafts and much more. You can download each one directly from their pages as a PDF and print them. There are many more free printables on the blogs listed below, so give them more love and view their other pages!
45 Free Printables For Kids
Here is a free printable colouring page thanking nurses and doctors. How to print this free printable? Simply click on the photo to download it! Have your kids colour the page and give it to a nurse or doctor next time they have a medical appointment.
These are a compilation of 45 Kids Free Printables:
Children’s Educational Printables
These free printables activities will help encourage your kids to learn!
The inside of Canada Doodles Printable Activity Book keeps the fun going with page after page of funny and inventive doodles to keep you busy on a road trip, during your lunch hour or when you have a few minutes to spare.
The learning cursive writing for kids printable activity package includes 26 printable cursive tracing pages plus the cover sheet. One printable page for each letter of the alphabet with both uppercase and lowercase cursive letters. These are ideal free printables for 1st grade students.
You can use this seven page learning unit to help with school projects. And if you homeschool, you are welcome to print it out and use it. Our Solar System is genuinely incredible!
A collection of over 25 free printable activity word searches for kids, including seasonal, holiday, and many more themes such as colours and zoo animals!
This activity will have your child place bee erasers on a honeybee do-a-dot printable. Your child will carefully line up all the bees on the dots, count them, and then do the activity again.
Are you looking for something cute to make for your little ones this Easter? These Easter Carrot Treat Boxes are so adorable and so easy to make. You can fill these with everything from jelly beans to M&M’s.
This farm printable puzzle is super cute and your little one will enjoy putting together their new puzzle. If you want your puzzle to be durable and last you should laminate it.
Do you remember playing with paper dolls as a child? They aren’t as easy to come by as they once were so we’ve got a fun DIY Paper Doll with 5 fashion outfits you can print yourself.
This free Let’s Go Camping Printable Activity Pack is the perfect way to get your kids excited for camping! All the elements from camping are captured in this adorable and educational pack!
These watercolour jungle friends spelling printable activity worksheets are the best of both worlds. Your child will have fun while learning fine motor, reading, and spelling skills.
Tipping teapot kids craft idea, to go with the nursery rhyme “I’m a Little Teapot”, for toddlers, preschool, kindergarten, library story times or at home.
It’s all about discovering Dinosaurs: from books, to sensory bins, crafts, and more, your little one will love learning about dinosaurs through creative play.
Get your kids involved in the meal planning. Let them each take a day or a week.
45 Free Printables For Kids
Hoping you had lots of fun being creative with your kids! Enjoy spending quality time with them as they grow up way too fast. These kids free printables will come in handy on a rainy day or when the kids are off school.
If you are looking for more inspirations, you are welcome to look at our craft pages on the blog!
It’s Easter Sunday, and the family is gathering to celebrate this joyous holiday. Many families converge at home to spend the day together, eating a big lunch, and then having some fun. What are some fun Easter activities to do at home? You will find below fun Easter activity ideas!
What is the most popular Easter activity? As Easter is in the early spring, one of the Easter activities for children that is most popular on this day is an Easter egg hunt, which is usually held outdoors. Oftentimes, the children have decorated boiled eggs for this event. Sometimes, people use pastel-coloured plastic eggs.
For an Easter egg hunt, the eggs are hidden in various places in your home, yard, or garden. Children are, of course, not allowed to peak as the eggs are hidden. Once the hunt begins, the children run and find as many Easter eggs as they can, and as quickly as they can! Usually, they place the eggs they find in their Easter baskets or in bags.
For some Easter egg hunts, there is a specially designated egg. In others, the plastic eggs are filled with coins or candy for the children. All in all, this activity is loads of fun for the kids.
It’s fun for the parents to watch as well. There are usually lots of squeals of delight from the children upon finding the eggs. This Easter activity is sure to bring lots of laughs and excitement! Children often want to have another Easter egg hunt after the initial one is completed. In fact, hunting for the eggs can tie up most of the afternoon.
2. Easter Baskets
Another fun Easter activity to do at home is giving them their Easter baskets. Parents usually fill the Easter baskets with all kinds of goodies. Chocolate bunnies are popular, of course, as well as chocolate creme-filled eggs.
Parents often enjoy preparing the Easter baskets, as they can sneak a bit of candy while doing so. Sometimes parents include an Easter bonnet or bow tie in these baskets as well. That way, their daughters or sons will have this extra accessory for Easter.
Easter eggs in a basket
3. Easter Eggs Decorating
A fun Easter activity for kids is actually egg decorating! You boil eggs and dip them in dye. Typically, this is not done on Easter Sunday, but on the evening before. That way, the eggs are ready for the big day. Children adore preparing Easter eggs!
Fun Easter Activities For Kds To Do At Home
4. Easter reading activity
One other Easter Sunday fun activity is reading them an Easter story. There are many books about this holiday, and it’s fun to gather the children and remind them of the real meaning of Easter. Children usually adore storytelling as well, and this activity can calm them down a bit after the egg hunt.
5. Easter Crafts
The kids will love making Easter crafts! If you are looking for ideas for Easter crafts, you can choose from one of these:
In conclusion, Easter is a special holiday, and it is one that can definitely be enjoyed with your children. These are a few of the fun Easter activities to do at home!
Have you ever been invited to a potluck meal and spend hours trying to figure out what you can take? I like to bake so I try to find an easy and delicious dessert that everyone will enjoy. In my pantry, I have all sorts of candies and nuts for baking. I tend to not use nuts if it will be served to a crowd where someone may have a peanut allergy. These chewy brownie chocolate chip cookie bars with Cadbury Eggs would be ideal and sure to please a crowd.
Cadbury Chocolate Chip Cookie Bars
Brownies and chocolate chips are a great combination for any dessert like these Chocolate Easter Eggs stuffed with frosted Brownie Bites. The recipe is simple and easy to make so in no time you will have the best chocolate chip cookies bars you have tasted. You can always prepare a few days ahead of time and freeze until you are ready to serve them.
Baking with Cadbury Eggs
Most times when we think about Cadbury mini or creme eggs we think about Easter. That’s when all the pretty pastel colours are out and fully stocked. Avid bakers will know that the local grocery store or even Walmart will have them available all year round. While not everyone likes cream eggs, they do make a nice topping for any cookie bar recipe. You can always substitute the eggs with the chocolate candy of your choice.
So you decided to bake these thick and chewy brownie chocolate chip cookie bars for your family. What a great choice! This recipe calls for a box of brownie mix and of course homemade chocolate chip cookie dough. When you can’t decide if you want brownies or cookies, this recipe has you covered.
Recipe for brownie chocolate chip cookie bars with Cadbury Cream Eggs
This year for Easter, we are baking with Cadbury Eggs and making these yummy cookie bars with Chocolate chips! This recipe for brownie chocolate chip cookie bars is ideal for Easter treats.
Cookie Bar Ingredients
1 stick unsalted butter
1/2 cup white sugar
1/2 cup brown sugar, packed
1 egg
1 Tsp vanilla
1 cup + 2 Tbsp flour
1/2 Tsp baking soda
1/4 Tsp salt
1 cup chocolate chips
8-10 Cadbury Mini Cream Eggs, halved for topping (1/2 egg of each piece, so you can add more if you like and you can use mini eggs too, but you will need 16 or so)
1/4 cup of pastel (or other colours) M&M’s for topping
1 box of brownie mix with eggs, oil, and water for brownie mix
Butter to grease pan or parchment paper
How to make brownie chocolate chip cookie bars
1. With an electric mixer, cream butter and sugars in a small mixing bowl.
2. Add vanilla and egg; cream again until smooth.
3. Add the flour, baking soda, and salt.
4. Stir gently until incorporated.
5. Stir in chocolate chips.
6. Store in the refrigerator until ready to use.
7. Preheat the oven to 350 degrees.
8. Prepare brownie batter as directed. Pour batter for the chocolate chip cookie bars into a greased glass 9×13 baking dish or use parchment paper.
9. Scatter pieces of cookie dough over the top of the brownie batter.
10. Bake for 35-40 minutes or until you can insert a toothpick and it comes out clean. If you are covering with foil to keep the cookies from getting too brown on top, leave for 50 minutes or more and keep checking every 5 minutes until you can insert a toothpick and it comes out clean.
11. While baking take your Cadbury creme eggs and half them, then set aside.
12. Once out of the oven quickly place the Cadbury creme eggs on top and the pastel M&M’s.
13. Let stand for 15-20 minutes and cut into pieces for serving.
I hope you enjoyed my Brownie Chocolate Chip Cookie Bars Recipe with Cadbury Eggs as much as my family and myself did! If you make it, please share your photos with us on Facebook or Twitter! Also, check out all of our other Recipes!
Cadbury Chocolate Chip Cookie Bars
Cadbury Brownie Cookie Bars with Chocolate Chips
Lyne Proulx
This Brownie Chocolate Chips Cookie Bars recipe is so good! It uses Cadbury Creme Mini Eggs and M&M's for a sweet Easter treat.
10Cadbury creme eggshalved for topping (1/2 egg of each piece, so you can add more if you like and you can use mini eggs too, but you will need 16 or so)
1/4cupM&M'spastel or other colours M&M’s for topping
1box of brownie mix
eggs, oil, and water for brownie mix
butter to grease pan or use parchment paper
Instructions
With an electric mixer, cream butter and sugars in a small mixing bowl.
Add vanilla and egg; cream again until smooth.
Add the flour, baking soda, and salt.
Stir gently until incorporated.
Stir in chocolate chips.
Store in the refrigerator until ready to use.
Preheat the oven to 350 degrees.
Prepare brownie batter as directed.
Pour batter into a greased glass 9×13 baking dish ( or use parchment paper).
Scatter pieces of cookie dough over the top of the brownie batter.
Bake for 35-40 minutes or until you can insert a toothpick and it comes out clean. If you are covering with foil to keep the cookies from getting too brown on top, leave for 50 minutes or more and keep checking every 5 minutes until you can insert a toothpick and it comes out clean.
While baking take your Cadbury creme eggs and half them, then set aside.
Once out of the oven quickly place the Cadbury creme eggs on top and the pastel M&M’s.
Let stand for 15-20 minutes and cut into pieces for serving.
Dating can be an expensive business, even for couples that have been together for a while. It can be difficult to find ways to have a good time together without spending a lot of money, which is a pain for couples who are trying to be more money-conscious. You can definitely consider cute affordable date ideas for you and your significant other. Here are some tips for affordable date ideas!
Not only are these cheap date ideas great for couples who are trying to get out of debt and say goodbye to their financial troubles, they are also a great way to mix things up and do something a little more different – and memorable.
Plan a Picnic
A romantic picnic may sound old-fashioned, but it can actually be a lot of fun if you’re willing to put the effort into it. Make a whole day out of it by starting out getting together in the morning to prepare the food and snacks. You can whip up something affordable like egg/tuna/chicken salad sandwiches with macaroni salad and snacks like carrot sticks, tomatoes, crackers and cheese, grapes, and melon.
It’s up to you how creative you want to get
with the food and beverages, but just make sure it’s something you made
yourself at home with reasonably priced ingredients from the grocery store.
You’ll both enjoy the time you spend together preparing everything, as well as
actually getting to enjoy the fruits of your labour once you get to your local
park.
Go Bicycle Riding
Either use your own bicycles or rent a pair and spend the day with your significant other exploring an interesting location. You might consider cycling on a local trail and take in all the beautiful sites of nature, or maybe through the city if that’s more your flavour.
In either case, you may want to bring along
some snacks and water so that you don’t get tempted to spend money while out on
your adventure.
Try Stargazing
What’s more romantic than gazing up at the star-speckled night sky together while wrapped up in a blanket? Sure, spring or autumn nights can be a little chilly, but this will only bring you and your partner closer together and make the experience that much more romantic!
Stargazing
There are lots of online tips for first–time stargazers and most options won’t cost you much except transportation. This is because you will have to find a good stargazing spot that is far enough away from light pollution so that you can see the sky clearly. For city-dwellers, this will most definitely mean getting a good distance away from the city first before being able to see anything.
If you want to know the best spots and
techniques for stargazing, try reaching out to a local astronomy club. They’re
usually happy to help and willing to give lots of great advice!
With this extended March Break, we are ever so grateful for Discovering maker March with DK Canada Books. Maker March came just at the right time with the recent COVID-19 situation and my family and I are grateful for all the awesome crafts, science experiments, and more that we have been entertained by with the three books we received recently. It was like Christmas when these awesome books came to our doorstep!
Three books gifted this month
Below are the three DK Canada books we were given to review:
My eldest loved learning about how infrared works with one of the super cool science experiments called “Invisible light beams” Lots of the experiments in this book work with things you already have in the house which is perfect. It’s nice to work on these experiments and break up our ‘screen time’ since the kiddos are stuck at home.
Page inside DK Canada book
The pepper repelling finger trick is ever so timely as it’s been exploding on the internet with the recent push for people to wash their hands! It’s a great way to explain to your little ones how washing your hands combats germs as the ‘pepper’ is the harmful bacteria that pushes away from you clean hands.
Crafts Galore with Junior Maker
As soon as we can get our hands on some craft material the boys are dying to make the bottle jetpack. They are super fascinated with space these days so becoming astronauts with jetpacks is right up their alley.
Junior Maker Book cover
This book is super cool because it has five different themes with some learning then the associated crafts. The five themes are space, nature, history, animals and science. A great way to make learning fun, especially when school is currently out.
We can’t wait to build our bottle jetpacks!
While we may not have the current craft supplies needed for the jet packs, we DID have the supplies for Marshmallow constellations which were fun to create then even better to eat when we were done!
Discovering Maker March with DK Canada Books Giveaway
Build, Invent, Create and Discover with Maker Lab
Cover of Maker Lab book
This beautiful book is divided into 4 sections – Food for Thought, Around the home, Water World and The Great Outdoors.
Under Food for thought, did you know you can make a battery using lemons?! All you need is copper wire, screws, lemons and coins and you can make an electric current?
Lemon Battery!
The experiments and crafts in this book require a bit more material than your average items lying around the house so in this time of social distancing we have picked our top three to try as soon as things settle. The lemon battery of course. Followed by a recipe to make your own bath fizzies and finally an Erupting Volcano from paper mache…..among many others in this awesome book.
All three of these books would make excellent gifts for birthdays or to help pass the time during social isolation!
This giveaway is open to Canadian residents and ends at 11:59 EDT on April 30th, 2020.
Good luck!
To enter more awesome OMC giveaways, click HERE!
If there are any issues with this giveaway, please email us at ottawamommyclub@hotmail.com.
Rules: Open to Canadian residents 18 +. You have 48 hours to reply by email once you are notified as the winner. If you don’t, we will draw another entry. Prize is non-transferable. No substitution or cash equivalent of prizes is permitted. The selected winner must correctly answer a mathematical question in order to win the prize mentioned above. The Ottawa Mommy Club is not responsible for prize fulfillment and for the delivery/shipment of the prize(s) mentioned above. For our complete set of rules, please click here.
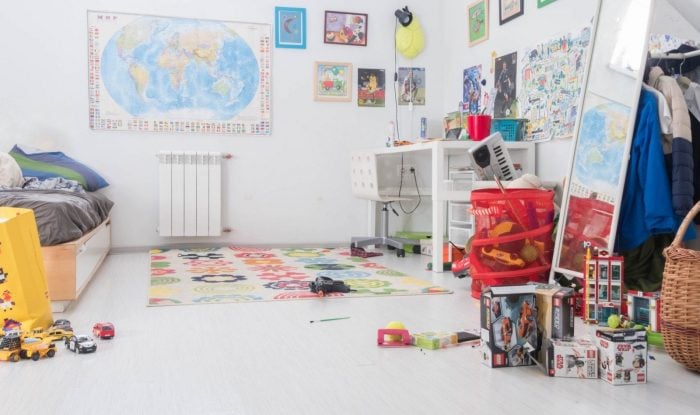
A room may look cluttered with toys because there is no where to put them and they are left in piles around the room. The closet is the-go-to place to put toys, but if it is just an open space closet it might be a good storage idea to add a shelving unit or closet organizer. This will give the best use of the space and make things more organized (It can also avoid the problem of shoving all the toys in the closet and then closing the doors as fast as possible so everything doesn’t fall out). You can have a toy chest or toy box in the room where your kids play with their toys a lot. Also helpful on shelves or along a wall are baskets, bins and boxes to keep toys.
Girl bedroom with storage solutions
2. Finding Space for Toys
Parents can maximize the space they have to “hide” and organize toys. Under the bed is a great place to store bins and baskets of toys. If you want kids to access them easily, then make sure the bins are within reaching distance for little hands and that see through containers are well-labeled so kids can get what they want quickly. Another toy storage idea is to put built-in shelving in the room or add something as simple as a shelf above the bed to store toys.
Toys on shelves
3. Kids’ Storage Furniture
If you need more storage options besides the closet, try bringing in a wardrobe, toy box, or shelving unit. You can put one or two free standing shelves higher on the wall and use them to not only store toys but to add to the décor of the kids’ room. Display nicer toys and collector items (like those expensive Star Wars figurines or a doll passed down from grandma) on these shelves. You can add a pictures or photos to match the colour scheme of the room as well.
Kids Toy Storage Tips
4. Hidden Storage
There are all sorts of great space-saving furniture that can do double duty in the kids’ room or playroom. You can buy beds with pull out drawers beneath the bed mattress or single beds built high like bunk beds but with space beneath where a desk or shelving can be put in. There are also stools and benches that lift up or have removable lids where toys can be stored.
Kids’ toy storage ideas range from organizing toys in baskets and storage bins to saving space by storing games and dolls under the bed, in the closet, as well as on shelves and/or in furniture that has built-in storage.
You would have to go back a long time to find the tradition of painting Easter eggs. These oval shapes which represent birth made the perfect symbol of fertility, and are purported to date back to pre-Christian times.
Tradition Of Painting Easter Eggs
Nowadays, a popular folk art practiced in many European countries, the Easter eggs show a variety of designs and colours. It shows that even on something as delicate as an egg, it is possible to create a style which is recognized as belonging to the traditions associated with certain countries. From many different countries within Europe, the Easter egg fashion has turned into a very real art-form, with different colours and styles representing the work put into the eggs. In fact, this page gives a good overview of the colours employed in different nations.
The Germanic, Hungarian, and Romanian Easter Eggs
The Germanic eggs take on a very traditional folk art look, but the style of those created in countries such as Hungary and Romania really do stand out as extraordinary, with their clever, intricate, and stylized designed placed on a very colourful background, often with representations of the cross of Jesus, and associated with the Orthodox Catholic church.
Austrian Easter Eggs
Austria has joined in with the tradition, and their Austrian eggs take on a much more contemporary style, using styles such as ladybugs to tempt market buyers. The wealth of designs used in Austria are diverse and include musical notes, strawberries, and other deliciously appetizing works of art, appealing generally to all ages.
Czech Easter Eggs
If comparing other artwork placed on eggs, the Czech Republic feature painted eggs for Easter, though their designs are in traditional colours and are decorated by girls to give to boys during the Easter celebrations. There is also a national contest for eggs around the Easter period. The materials used for the intricate work include bees wax to isolate different areas while painting another colour and these days even include transfers.
Looking across the Eastern block countries, many have adopted this tradition with Pysanka designs (printable to download) becoming popular throughout countries within the geographical limits of this area. The tradition dating from pre-Christian times has been traced back as a Pagan celebration. What is interesting is that the Pagans had much the same symbolism and used many of the inspirational designs used today, though allotted different meaning to those designs.
Kistka Tool
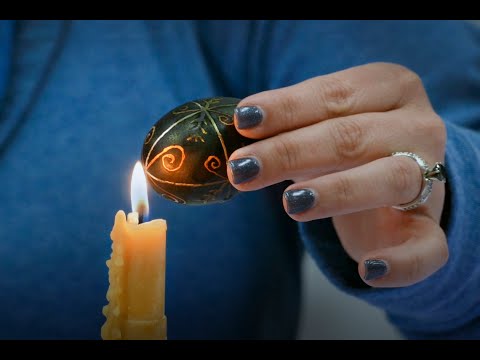
The tool used for the delicate patterns is called a Kistka, and the hot wax is used to create designs already sketched with light pencil. After each application, dye is added to the egg, so that eventually, after many applications of painted colour, the egg takes on a richness of colour. Similar to other art processes, the wax stops colour from staining areas of the egg during the dyeing process, and the painting of the egg isn’t complete until the wax is removed. It’s a very clever technique of blocking, which allows the paints to produce a very detailed design.
Marguciai Easter Eggs
The style of Lithuania is called Marguciai and similar to Pysanka designs in egg painting, the folk art style of marguciai seems less formal and encompasses folk art images as well as patterns which are repeated, but are basically simple. Using the same blocking techniques as those described above, the Marguciai eggs show pictures of rabbits, flowers and characters using paint colours which are applied with a different tool from the Kistka and which is relatively fine in nature.
An Overview Of The Tradition Of Painting Easter Eggs
For those wishing to try these painting Easter egg techniques, there are good instructional videos on YouTube, and this takes the painter through the different processes which make up the painted eggs. The paints used are water colour paints and different blends of colours can be tried to find the perfect colour.
Did you know that you can grow herbs or vegetables in your kitchen using mason jars? Mason jar gardening is a great way to enjoy delicious herbs or vegetables when you don’t have the space to plant outdoors or don’t want to deal with outdoor gardening. You can also grow herbs or vegetables indoors no matter what time of year it is. As long as your plants get enough sunshine throughout the day, you’re good to go. Let’s take a closer look at mason jar gardening. I planted green pepper seeds.
Mason Jar Gardening
Mason Jar Gardening
What You’ll Need
The supplies needed for mason jar gardening are very simple and can actually be found in many discount stores. You’ll need quarter-sized mason jars, small rocks, potting mix, seeds, and labels. You’ll want to invest in the best seeds you can. The reason being is that cheap seeds can sometimes be old and won’t sprout. This can be a waste of time and resources. If you have trouble finding good seeds in your area, go online.
Gravel
A mason jar
Peat Moss Organic ( You can also use potting mix)
Potting Soil
Pepper or herb Seeds
How to Plant Your Seeds
First things first. Thoroughly wash and rinse your jars. You never know what may be on these jars from the factory. Next, fill the bottoms of the jars with 2 inches of gravel. Add enough Peat Moss to reach 2/3 mark of the jar and top with organic potting soil. Follow the instructions on your seed package for planting the seeds. The last step is to label each jar with the name of the herb or vegetable.
A Beginner’s Guide to Mason Jar Gardening
Instructions
1. Cut seeds out of a pepper and allow to dry for several days or purchase pepper seeds.
2. Place several inches of gravel into the bottom of a mason jar.
3. Fill the jar to the 2/3 mark with Peat Moss.
4. Top with organic potting soil.
5. Get the soil damp.
6. Place a pepper seed into the mason jar.
7. Keep the soil damp until the seed begins to sprout, it takes several days.
8. Water and keep in a window or outdoors in an area that gets several hours of sunlight a day!
Keeping Your Herbs Or Vegetables Alive
You won’t believe how easy it is to grow and keep your plants alive. All you need to remember is that your plants need 6 hours of sunlight each day and that they need water. Be careful not to overwater. If your herbs or stems start to turn yellow, they may be getting too much water. As your herbs or vegetable grow, use scissors to clip off what you need. If your herbs grow too large, you can transfer some of the plant to another mason jar.
Preserving Herbs
If you find that you have an overabundance of herbs, you can preserve them for later use. Herbs can be dried in a dehydrator and stored in spice jar containers. You can also freeze your herbs in ice cube trays. One method is to fill a tray halfway with water and then add a tablespoon of chopped herbs to each cube. Freeze overnight and then fill the rest of the way with water. You can also mix 1/3 cup of olive oil with 2-cups of chopped herbs and pour into ice cube trays to freeze overnight. With both methods, once the cubes are completely frozen, you can pop them out and place them in zip top bags for storage.
Mason jar gardening is a wonderful way to enjoy the flavour of fresh herbs and delicious vegetables without breaking the bank. Fresh herbs and vegetables can be very expensive in the grocery store. When you’re growing your own herbs or vegetables, you also control how they are grown. You don’t have to worry about pesticides. You can even purchase organic, non-GMO seeds. This allows you to get the best herbs or vegetables possible.
A Beginner’s Guide to Mason Jar Gardening
Yield: 1 jar
Prep Time: 20 minutes
Active Time: 20 minutes
Total Time: 40 minutes
Difficulty: medium
Mason jar gardening is a great way to enjoy delicious herbs or vegetables when you don’t have the space to plant outdoors!
5.0 Stars (2 Reviews)
Materials
Gravel
A mason jar
Peat Moss Organic
Potting Soil
Pepper or herb Seeds
Instructions
HOW TO PLANT YOUR SEEDS
First things first. Thoroughly wash and rinse your jars. You never know what may be on these jars from the factory. Next, fill the bottoms of the jars with 2 inches of gravel. Add enough Peat Moss to reach 2/3 mark of the jar and top with organic potting soil. Follow the instructions on your seed package for planting the seeds. The last step is to label each jar with the name of the herb or vegetable.
INSTRUCTIONS
1. Cut seeds out of a pepper and allow to dry for several days or purchase pepper seeds.
2. Place several inches of gravel into the bottom of a mason jar.
3. Fill the jar to the 2/3 mark with Peat Moss.
4. Top with organic potting soil.
5. Get the soil damp.
6. Place a pepper seed into the mason jar
7. Keep the soil damp until the seed begins to sprout, it takes several days.
8. Water and keep in a window or outdoors in an area that gets several hours of sunlight a day!
Notes
KEEPING YOUR HERBS OR VEGETABLES ALIVE
You won’t believe how easy it is to grow and keep your plants alive. All you need to remember is that your plants need 6 hours of sunlight each day and that they need water. Be careful not to overwater. If your herbs or stems start to turn yellow, they may be getting too much water. As your herbs or vegetable grow, use scissors to clip off what you need. If your herbs grow too large, you can transfer some of the plant to another mason jar.
PRESERVING HERBS
If you find that you have an overabundance of herbs, you can preserve them for later use. Herbs can be dried in a dehydrator and stored in spice jar containers. You can also freeze your herbs in ice cube trays. One method is to fill a tray halfway with water and then add a tablespoon of chopped herbs to each cube. Freeze overnight and then fill the rest of the way with water. You can also mix 1/3 cup of olive oil with 2-cups of chopped herbs and pour into ice cube trays to freeze overnight. With both methods, once the cubes are completely frozen, you can pop them out and place them in zip top bags for storage.
A student once asked his teacher how he could look up a spelling word if he couldn’t spell: He made an excellent point. Many intelligent people find no logic in their sometimes phonetic and sometimes rule driven English language. An English speaking child that has a learning disability (LD) in spelling, would most likely spell successfully in a purely phonetic language such as Spanish. Help awaits the child that isn’t a natural at spelling, and the help is not for the LD child only. The following tips may not turn your child into the Rembrandt of the National Spelling Bee, but it can certainly bring up those spelling grades.
Love written in chalk on a sidewalk
Helping Your Child Succeed in Spelling
It’s time to add a new spin on the old “memorize and quiz” method of spelling practice. Understanding how your child learns is the first step to helping him succeed. Everyone learns through three of their senses. In the field of education, we call them modalities:
Visual
Auditory
Kinesthetic
Visual learners gather information by sight and remember what they see. Auditory learners remember what they hear and kinesthetic learners learn by touch. Most people learn through all three modalities with one being stronger than the other two. The next time you help your child with spelling practice see if you can figure out how he learns by using some of these techniques.
Spelling Practice for Visual Learners
Try this method to determine if your child is a visual learner:
“Let’s try a new way of memorizing your spelling words. I want you to think of your eyes as a camera. You can actually take pictures with your eyes. I’m going to give you 10 minutes to practice the words, but instead of just thinking in your brain about how the words are spelled, I want you to also take a picture of each word with your camera eyes, so when you take your spelling test, you’ll remember what the words look like.”
When you quiz your child, first remind him to think about how the words look. If your child does exceptionally well with this method, you’ll know he’s a visual learner.
Tips to Help Your Child with Spelling
Spelling Practice for Auditory Learners
Try this method to determine if your child is an auditory learner:
Kids love hearing how they sound on a recording. Let your child record himself practicing his spelling words and have him play the recording back. Make it even more fun by practicing the words with him. Record and listen to your voice. After your child takes his practice quiz, have him give the quiz to you. Your child will love it if you miss a couple of words. Choose the words he has the most difficulty spelling. When he corrects your spelling, it reinforces the correct way to spell them. You can even get a little silly about it. Having fun is a great way to reinforce learning.
Words written with Scrabble tiles
Spelling Practice for Kinesthetic Learners
If your child is a “touchy-feely” child, he’s/she’s probably a kinesthetic learner. There are many fun ways for the kinesthetic learner to practice their spelling words:
Spell the words with play dough
Write the words with chalk on the sidewalk, in sand or by using Scrabble letter tiles
Place dry jello or some cake mix in a pan to write the words in with him/her finger. Let your child taste the mix after each word is spelled correctly
Try all of these methods and learn how your child gathers and remembers information. If you have trouble deciding on one learning modality, use them all for spelling practice. The more fun you can make it; the better your child’s success. Before long, he will look forward to practicing his spelling words.
When helping your child study his spelling homework, utilize all of the learning modalities. Try to determine which modality your child’s strength is in and utilize it heavily. These tips can help all learners; not just LD children. Remember that English is not purely phonetic and many successful adults have difficulty with spelling.
Toy clutter is easy to end up with. It seems that kids start collecting toys at a very young age and the clutter doesn’t take long to develop. There seems to be an overwhelming need to do something about it, but few ideas that actually seem to work. Getting out a garbage bag may even be tempting; however, it doesn’t have to be that way. You can organize the toy clutter and teach your children to keep it that way.
Go Through The Toys
Whether you are starting out with organizing the toy clutter or you have been at it for awhile, there comes a time when you need to go through the toys with your kids. During this time set yourself up with three piles. One that you will keep, one that you will give away, and one that you will throw away.
Going through the toys in a bedroom
Throw aways are often easiest for parents, but it’s important to remember that while there are bound to be things that are broken beyond repair, it is hard to get rid of your toys. So, give kids a little room and let them say good bye to the toys that they are throwing away. But make sure that all toys that are broken beyond repair and have no use get thrown away.
Next, sort out toys your children no longer play with or have out grown. Yes, this can include toys that they hung onto a little longer then anyone imagined. Let them say good bye to these toys as well. You can also bargain with them. Take the toys to a second hand store and allow them to pick out something new from the toy or book section or let them sell them in a garage sale and take the money they make for a new toy.
Bookshelves
It is a good idea to have a bookshelf or two in your child’s bedroom. You can use the top shelves (where your kid can’t reach) for memorabilia, pictures, or decorations and use the bottom shelves for organizing books and toys. Give books their own section. Get small baskets and totes for different types of toys. These can then be stored on the shelves for easy use. You can mark them with words, symbols, and pictures for easy identification. Then teach your child to put things back as he or she uses them to keep the space clean.
Totes
For inexpensive and easy to use toy boxes, you can pick up totes. Get them in different colours so that you can put different types of toys in different bins. Have one for dolls or trucks and another for the kitchen supplies. This way you can pull out a specific activity and leave the rest stacked up and against the wall.
Stuffed animals
Stuffed Animal Rack
There are a few different types of stuffed animal racks, but you can even make one by tacking up a triangle of cloth. This can give them a place to store all their furry little friends when they aren’t using them. Keep it in the corner of a room but at a height they can reach so they can display their friends or take them out and play with them. If your child has an overwhelming number of stuffed animals, then it is a good idea to have one at a lower level and one at a higher level. This can let some be put up for awhile, or you can keep both within reach of your child.
Go Through It Again
It is a good idea to go through your child’s toys at least twice a year, which will allow you to keep thing cleaned up and make sure that the toy clutter you have is really stuff you want to keep. Make this a fun process for your kids and a time of renewing your organization system. You can make sure everything is really where it should be and give new options for organizing new toys.
How To Organize And Manage Toy Clutter
You don’t have to suffer from toy clutter. You can have an organized space that your kids can maintain. Just make a habit of going through things and helping your kids get rid of stuff they don’t need or use anymore. And you will be on your way to a well organized room and a whole lot less toy clutter!
Having a family vehicle is an asset in today’s modern world. It is considered a need, especially among families with children. In Canada, there is an average of 1.47 vehicles for every household. Traveling with the family using your own car can convert long road trips to family bonding time. It can also make running errands like going to the grocery or fetching the kids to school more convenient.
Factors To Consider When Choosing A Vehicle
Owning a car eliminates commute, which means lesser travel time, especially during rush hours so you can save time and do more with your day. That means less stress and an increase in productivity. Today, road networks are also getting better. With these factors, invest in a family vehicle. What are the major factors to consider when buying a car for the family?
Comfort and Seating Capacity
A family vehicle should be spacious enough for six or more family members to sit comfortably. Kids can take up a lot of space, especially during long drives. Choose a vehicle that is roomy enough even when a baby car seat is installed. Sliding seats can add up space while reclining seats add comfort. Make sure that the door opening is big enough and that car seats are not in the way. Since you might be carrying a lot of supplies and groceries, or even strollers and toys, cargo space should also be big enough.
Guaranteed Safety on Travel
Traveling should always be safe, especially when you are with kids. In Canada, it is estimated that there are 200 deaths and 165,000 injuries caused by vehicle-related accidents. When purchasing a family vehicle, choose one that guarantees the safety on the road and the passengers as well. Most cars are now equipped with advanced safety features. This includes automatic door locks, child safety locks, frontal and side-impact airbags, 360-degree cameras, and driver assistance features. There should also be sufficient space to install child car seats and seat belts should be properly in place for passengers, especially the kids’ safety.
Two Major Factors To Consider When Choosing A Reliable Family Vehicle
These are just some points to consider before purchasing a family vehicle. We all want to give our families the comfort and the safety that they deserve and it also applies during travels. Drive with confidence and peace of mind with a properly-chosen family car. No matter what size of vehicle you need, it is better to always consider the family-friendly features that it offers.
Easter is coming up, which means springtime fun is in the air. Kids love the idea of Easter and the Easter Bunny, especially if they are still young enough to believe. Make this Easter a special day by adding some fun and creative touches to your holiday. Their smiling faces will make you glad you did!
Fun Easter Activities For The Kids
Things You’ll Need:
Easter basket (packed with any Easter treats you like)
Plastic eggs that pull apart
Coins (quarters are most fun)
Paper and a pen or marker
Make an Easter basket
Create a fun little Easter basket for your child that he can search for and find somewhere in the house. Put anything you like in the Easter basket such as candy, a stuffed animal, games, or whatever you know your child will like. Presentation is everything so get creative and fill it full of colourful Easter items. Pick a good hiding spot and place the basket out of sight so your child has to hunt for it.
Chocolate eggs in a basket
Create a plan for the Easter basket hunt
On separate pieces of paper, write directions for places your child will need to go to find his Easter basket. Start with one that you hand to him that tells him a place to look (if your child can’t read, read it for him…pretend it’s from the Easter Bunny himself). For example…look under the bathroom sink. Your child will go to the sink and you should have another piece of paper under there with a different place he has to look. Keep this up a few times until you have sent him to the hiding place of his Easter basket. Your child will have so much Easter fun and be amazed to finally find a special treat waiting for him!
How To Make Easter Fun For The Kids
Have an Easter egg hunt
Fill colourful plastic, pull apart, Easter eggs with different amounts of quarters (or candy or gum if you don’t like the idea of money) and hide outside in the yard. If it’s raining or not a very nice day, you can also hide them in the house. Have your child look for the Easter eggs and watch him get excited as he finds a special gift in each one. Just remember how many you hid and where you hid them to be sure he got them all. An Easter egg hunt is even more fun with a bunch of children.
Have an Easter item scavenger hunt
For an Easter item scavenger hunt, you need to pick items that are Easter oriented and have your child find them one by one. This is a lot of fun if you can scatter items throughout the yard. Write a list of the things that your child needs to find. Pick about 10 things (anymore and he will get bored). Have your child mark off the things he finds on the list and when he is finished, he gets to keep the items. Easter items to choose could be…a chocolate Easter bunny, an Easter book, a small toy that your child loves (mine loves mini dirt bikes), cookies, gum, Easter sunglasses, a card game, Easter pens or pencils, stuffed Easter Bunny or chicken, lip gloss (for girls of course), Easter stickers…or any great little items you can come up with.
Have your child do an fun Easter obstacle course
Another great idea for an Easter egg hunt is to fill the plastic eggs with small pieces of paper that tell your child some kind of fun exercise he has to do. For example, fill eggs with paper telling your child that he has to…jump and down up 3 times, spin in a circle, jump like a leap frog, run a short distance, or hop on one foot. Each Easter egg he finds can tell him to do something different. When he is finished with the course, give him a treat or prize. He’ll love doing something different and you’ll be giving him exercise in the process. Just be sure to only do about 10-15 eggs so he doesn’t get bored quickly with the activity.
Crafts are so wonderfulfor preschoolers. Not only do they help them beat boredom, but they also inspired creativity. Activities like these 30 Paper Plate Crafts are so much better than having your children turn on the TV and play a video game. They also keep your kids entertained when they can’t go outdoors due to bad weather. If you’re low on preschoolers craft ideas, keep reading.
Preschool Crafts
While crafts can be a great way to keep kids busy, craft supplies can sometimes be expensive. What isn’t expensive are preschool crafts using paper plates. You can find paper plates at your local discount stores for really cheap. If you’ve already got paint in your craft stash, your preschooler can make many of these paper plates crafts listed below.
Whether your kids want to make frogs, bugs, owls, or even the sun you’ll find the directions for these paper plate crafts listed in the links below. Print them out and keep them in a binder in your craft room along with the supplies. That way you always have something fun for your kids to do whenever they complain about being bored.
It can be a real lifesaver when you’re trying to get stuff done around the house and your preschoolers are home and under foot. And, if you’re really trying to keep them busy, ask them to come up with their own craft with paper plates using the same supplies. You could give your kids a theme to inspire them and then see what they come up with.
30 Paper plate crafts for preschoolers
Many of these crafts simply call for scissors, paint, glue, and markers. Your preschoolers will be able to make so many different crafts with these simple supplies. You’ll want to keep a few of these paper plate crafts for kids handy any time there’s a rainy day. You can even keep the supplies stored together so that you have everything ready whenever your kids need something to do.
Hope you like the above list of crafts with paper plates for preschoolers! If you are looking for other craft inspirations, you can look at our craft section!
Being a Disney princess fanatic, I have to share with you my 13 favourite Snacks and Crafts inspired by Disney princesses! This list of all the princesses and some super cute Disney princess crafts and yummy snacks will come in handy for a Disney princess Birthday party.
As a child, I remember reading Disney Cinderella and Snow White’s children books over and over again! Later when my kids where born, Disney made new princess movies such as Pocanthas and Mulan. Did we ever watch The Little Mermaid movie with my daughter! We even decorated her bedroom as an Ariel theme! I have to say that the list of Disney princesses have grown quite a bit since my childhood days.
13 Snacks and Crafts Inspired by Disney Princesses
First, lets talk about all the Disney Princesses! Many parents of little girls and boys may have helplessly shrugged their shoulders when challenged by their little ones to correctly identify each and every Disney princess. But fear not, this handy guide will once and for all clear your doubts and list each princess and her characteristics in the order of her first cinematographic appearance. Though growing, there have only been twelve so far, and the list is still manageable.
1. Snow White ~ Snow White and the Seven Dwarfs (1937)
Snow White is the one with the shortest hair of all Disney princesses and was also the first one. Her trademark outfit is a blue top with red decoration, a yellow skirt (not covering the ankles) and a red hair band.
2. Cinderella ~ Cinderella (1950)
This classic Disney princess wears a flowing light blue gown with long white gloves. An important distinguishing characteristic (to tell her apart from Sleeping Beauty, for example) is that her reddish (sometimes blond) hair is piled up high on her head, held in place with a white hairband. She is also the only princess wearing a black choker around her neck.
3. Aurora ~ Sleeping Beauty (1959)
Much to parents’ despair, Aurora or Sleeping Beauty is drawn in the tradition of Cinderella and overall quite similar to her. Yet, Aurora’s flowing gown has a darker shade of blue and full sleeves. As strict as Cinderella’s hair was kept in place, as free-flowing and blond is Sleeping Beauty’s. She’s also the only princess to wear a crown and a golden one too.
4. Ariel ~ The Little Mermaid (1989)
Ariel might be the Disney princess most easy to identify thanks to her flowing, long red hair. Even easier when she is depicted with her turquoise mermaid’s tail and purple bikini top. In human form, she wears a light pink dress with long puff sleeves. She wears no necklace, hair band or crown, but small pink clips in her hair and white hanging earrings. Ariel also marks the advent of Disney princesses with a mind of their own.
5. Belle ~ Beauty and the Beast (1991)
Being closely released after Ariel, Belle is very much sketched in her tradition. Yet, Belle’s long brown hair and yellow, strapless gown with long yellow gloves are distinguishing features. She also wears yellow button earrings and part of her hair tied up with a yellow hair band, with one lock usually falling in front.
6. Jasmine ~ Aladdin (1992)
With Jasmine, we got the first princess not looking like an advertisement for a fairness cream. Jasmine is a dark-haired, exotic beauty straight out of Arabian Nights. She usually wears harem pants in turquoise matched by a tiny top whose straps playfully fall over her shoulders. The ensemble is completed by a turquoise hair band with a giant gem stone and otherwise massive bling ñ huge golden earrings with a necklace to die for.
7. Pocahontas ~ Pocahontas (1995)
Inching ever further away from the fair ideal with Pocahontas, Disney gave us the first Native American, and until then, the darkest skinned princess with proud features. Just like her, the free-flowing, long black hair is held in place by nothing and no one. She wears a simple, fairly short, beige dress with one shoulder strap. Completed is her outfit by a thick, dark turquoise necklace with a huge gem stone.
8. Mulan ~ Mulan (1998)
Mulan, the Chinese warrior princess, marks Disney’s foray into Asian territory. Thus, she wears a long-sleeved, light pink and red kimono-style dress with a blue and red belt. Her absolutely straight black hair is held in place behind one ear with a white flower. She wears no jewelry or other accessories.
9. Tiana ~ The Princess and the Frog (2009)
It took Disney almost 60 years to come out with the first black princess, but finally, we got her. Tiana’s strapless gown is light green and off white; its style reminding one of delicate leaves sewn together. She wears long, light green gloves and a crystal necklace. Her black hair is pulled into a tight bun that leaves only one lock showing behind her ear. Banking on our memory challenge, her creators gave us another clue by calling the only tiara-wearing princess Tiana.
10. Rapunzel ~ Tangled (2010)
Rapunzel in the renamed movie Tangled. Easy to make out by her meter long blond hair that looks slightly unkempt, she peers at us out of huge green eyes. Wearing a purple dress with puff sleeves, Rapunzel has tucked a purple flower behind her ear.
11. Merida ~ Brave (2012)
Merida is the first princess since Ariel to have red hair! She has long, curly, red hair and blue eyes. Merida is brave, bold, daring, courageous, stubborn, and rebellious. She wears a glamorous green gown with gold detailing and Celtic imagery. Her primary weapon of choice is a recurve bow.
12. Moana ~ Moana (2016)
Last but surely not for long, Moana is the second princess after Pocahontas to be a daughter of a chief. She has medium brown skin, brownish-pink lips, long wavy black hair, and brown eyes. Moana’s outfits are all made out of leaves, Tapa, feathers, Pandanus, and other natural resources found on the island of Motonui.
Doubtlessly, when it comes to a Who’s Who of Disney characters, in most nurseries, the princesses rank high on top and distinguishing them becomes a sport the tiny tots engage in as soon as they can utter their first words. Following the clues in this description of Disney princesses, parents will finally know exactly who their kids are talking about. A tip at the end: if the dresses change, just look at the hairstyles and accessories, they usually don’t!
Which one is your favourite Disney Princess? I love Snow White! Comment below!
13 Snacks and Crafts Inspired by Disney Princesses
13 Snacks and Crafts Inspired by Disney Princesses
And now here are some amazing ideas when it comes to Snacks and Crafts Inspired by Disney Princesses!
3 Things Single Moms Can Fix Themselves And 2 They Shouldn’t
Single moms are not known for their overabundance of cash. When something breaks, a bit of DYI magic can really help them save a lot of money; however, they’re also not known for their overabundance of spare time. As a single mom, you need to pick your battles carefully to make sure a weekend project doesn’t stretch out over a few weeks. You need to find that sweet spot of money-saved-versus-time-spent. To help you find it, here are three things that you can absolutely fix on your own and two fixes that you should leave to the pros.
woman wearing a tool belt
Fix: Change Your
HVAC Filter
If you’re
finding your home’s heat or A/C isn’t operating as efficiently as possible
(i.e. your hydro bills are noticeably higher than last year), the problem could
be a dirty HVAC filter.
How often
should you change them?
Single occupancy or vacation home: Every 6
months
Family home with no pets: Every 90 days
Family home with pets: Every 60 days
Family with multiple pets or serious
allergies: Every 20-45 days
An air
filter is about $20.00, give or take. The step-by-step is
also incredibly simple and can make a huge difference in your home’s energy-efficiency
and air quality.
Fix: A Running
Toilet
A toilet that runs all the time is annoying and a water-waster, but you may not have to call a plumber.
In most
cases, the toilet flapper inside the tank isn’t making a tight seal after a
flush, causing water to just keep leaking through it. This is a super-easy fix
and you can pick up a kit in any hardware store.
Fix: A Blown
Fuse
Older homes
are notoriously bad for this problem. Old fuses are prone to blow any time
you’re using too much power in a given room.
If your garage door has stopped opening or closing, you can try replacing the batteries in the remote; however, we wouldn’t do much more than that.
The garage door is expensive and complex, as well as potentially dangerous. Your best bet is to call the experts in garage door repair to come in and fix things. The risk-versus-reward ratio is simply not there for this fix.
Don’t Try to
Fix: Gas Leaks
This one is
automatic. Never, ever try to fix this by yourself.
In fact, if you smell gas, get your children and pets out of the house right away and call your gas company’s 24-hour emergency number. They should be able to dispatch a trained and certified technician to find and fix the problem safely.
3 Things Single Moms Can Fix Themselves And 2 They Shouldn’t
The more expensive and potentially dangerous a piece of equipment is, the more hesitant you may be to go near it, even when it fails; however, your furnace, your toilet and your fuse boxes are safe enough for the fixes we talked about today. Meanwhile, anything with complex machinery, electrical wiring, or gas should be left to the pros.
We use cookies to ensure that we give you the best experience on our website. If you continue to use this site we will assume that you are happy with it.