There is one breakfast so hearty and so richly nourishing, that it’s hard to believe it’s as simple as making toast. Peanut butter toast with bananas is a protein and vitamin-packed way to enjoy a quick breakfast and it also makes a sweet Mother’s Day or Father’s Day offering for breakfast in bed.
Unlike avocado toast, peanut butter toast is made simply by spreading peanut butter on toast instead of butter or margarine. There is no peeling, slicing, or scooping required. In fact, the whole recipe is so easy to throw together. The only knife work you need is cutting up a banana. Significantly easier than pitting and slicing an avocado for avocado toast.
The best recipes come with a sprinkling of a dash of extra flavour. You can really put this peanut butter toast over the top by giving it a touch of sweetness. I like to use grated chocolate for this. The type of chocolate is up to you. With banana, I prefer semisweet chocolate, but it goes with everything. Finish it off with a sprinkling of hemp hearts. These tiny nuts come packed with even more nutrients and are an easy way to give even more goodness to your small but mighty breakfast.
Which Type Of Bread To Use
For this recipe, I used brioche bread slices for a special breakfast kids can make and surprise mom and dad on Mother’s Day or Father’s Day. Brioche bread is actually a French bread made with butter and eggs. It’s light in texture and has a subtle sweet taste to it. The crust is soft, of golden shade, and is brushed with an egg before you bake it.
You can use any type of bread you like such as white, whole wheat, rye, sourdough, multigrain, and more. I prefer the thicker slices too!
How To Keep Bananas From Ripening Too Fast
You can prevent bananas from ripening too fast with the help of these hacks. Although overripe bananas are perfectly edible, keeping them fresh for longer is ideal.
Wrap the stems in plastic wrap.
Hang them on the counter on a banana hanger.
Once they ripe the way you like them, put them in the fridge.
Peanut Butter Toast With Bananas, Chocolate and Hemp Hearts Recipe
This Peanut butter toast recipe is a favourite at our house when you want to make an ordinary toast into a sweet and wholesome all-in-one breakfast that includes grains, protein, fruit, omegas 3 & 6, essential amino acids, and vital nutrient such as magnesium, fibre, zinc, and iron.
1 tbsp grated chocolate (I used semi-sweet chocolate)
1 tbsp hemp hearts
Equipment Needed
Toaster
Knife
Plate
Grater
Cutting board
How To Make A Peanut Butter Toast
Toast bread slices in a toaster and spread on the peanut butter. Peel the banana and place it on a cutting board. Slice the banana in about 1/2 inch pieces and arrange in rows on the toast. Garnish with some grated chocolate and hemp hearts.
I hope you enjoyed this Peanut Butter Toast topped with Bananas, Chocolate and Hemp Hearts Recipe. If you make it, make sure to share with us on Facebook or Twitter! Also, check out all of our other Recipes.
Peanut Butter Toast with Bananas, Chocolate, and Hemp Hearts
Lyne Proulx
This breakfast is so richly nourishing, that it's hard to believe it's simply a toast with peanut butter, bananas, chocolate, and hemp hearts.
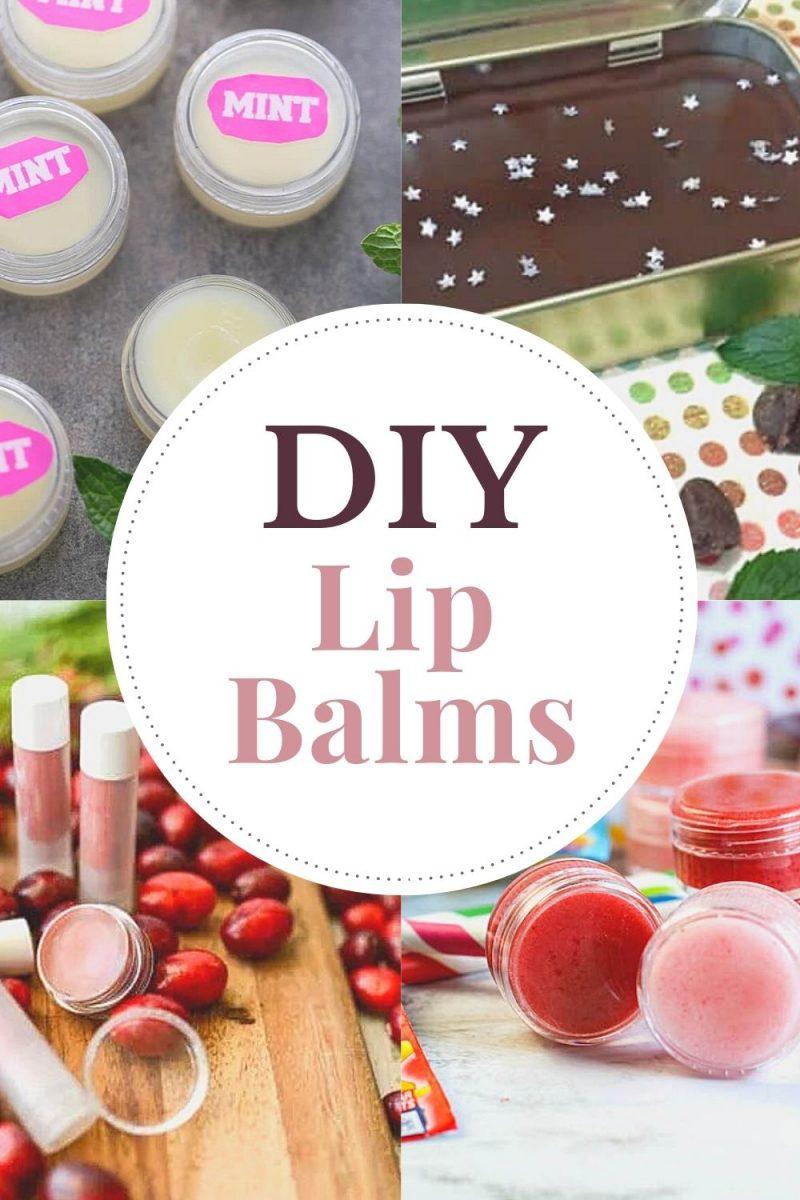
Homemade lip balms are easy to make and you can find all the supplies you need in many big box stores. If you want unique flavours and scents, you’ll probably want to have a look at our DIY lip balm ideas below. There, you’ll also be able to find a large variety of containers for storing your lip balms.
There’s something wonderful about lip balm. Many women can’t go without it and with good reason. After all, who doesn’t want soft and smooth lips? Throw in a great scent and flavour and they’re impossible to resist. Plus, who doesn’t love trying a new lip balm and getting their husband to pucker up give them a kiss to try their new lip balm?
If you’re tired of using lip balms that have questionable ingredients, why not make your own natural lip balm? It’s not only easy and fun, but also really affordable. You’ll spend a lot less making DIY lip balms than buying lip balms in a store.
Homemade Lip Balms As Gifts
Homemade lip balms make awesome gifts. It’s something you can make a lot of at once and then place in decorative containers. This is great for the holidays, birthdays, or just because. If you’re really into making lip balms, you could even turn this into a business. Women all over the world love lip balms. Start a shop on Etsy or sell through craft fairs. You could even talk to local businesses about carrying your products. The key is to stand out from others by having unique flavours and scents. For example, if you’re selling locally, create a flavour that features a local favourite.
DIY Lip Balms
Lip balms come in a variety of shapes and sizes. There are roll-on applicators, those with sponge applicators, and even those in cute little containers. If you’re looking to add more to your collection, why not consider making homemade? You can control the ingredients, get the flavour and scent you want, and even make them for gifts.
You will find below 8 Homemade lip balm recipe ideas for you to make!
Having a small yard or garden area doesn’t mean that the garden can’t be productive and look well. Most people these days live in apartments or small homes with limited space for planting a garden. Some people have just a patio or porch with no soil at all, but this should not limit one from growing plants. So how do you make the most of a small garden? See our gardening tips below!
Tips On Making The Most Of A Small Garden
Pots
Pots are a simple way to expand a small yard or garden. Some yards have pavement or concrete, limiting space. Using pots allows for planting in an area where using soil isn’t an option. They are simple to move around from place to place, allowing their location to be changed. They can be filled with potting soil for growing plants where the soil is in poor condition, or where soil is not available.
Hanging Baskets
Hanging baskets are great for small areas because they can be hung anywhere. They can be hung from eaves on a house or they can be hung from the branches of trees. A stand can be made or bought that will hold several of these basket in a very small area. These are good to hold flowers and vegetables and they can be planted on the bottoms of the hanging planters facing down, as well. They are easy to water, and with peat moss lining the bottom of the planter, it will hold water well.
Pole Gardens
There are many types of plants that are available and will grow on pole gardens. To make a pole garden you simply locate a three foot by three foot area in the yard. Then, dig a hole about two feet deep in the center of the area. Next, stand a 2X4 or a 3/4 inch pipe up in the hole and cover it with dirt. After that is done, tie several cotton lines from the top and stake them to the ground in a circular pattern around the pipe or pole. Plant seeds at the base of the lines and the vines will grow up the lines. With this method plants such as climbing cucumbers, flowers, squash, beans, and even some types of spinach can easily be grown.
Tiered Planters
Tiered planters look like pyramids with different levels and each level allows for planting several plants. Several different types of plants can be grown in one of these planters at the same time. They are excellent for small areas and can be located on sidewalks or patios. Rollers can be placed on the bottom and they can then be easily moved.
Abundant Garden Plants
Plants that are abundant producers will benefit a garden with limited space. The leaf lettuces are practical because the individual leaves can be picked and more will grow in its place. Greens are good as well as Swiss chard, mustard, and spinach. Like the lettuce, a few leaves can be picked at a time and more will grow.
Radishes are easy to grow and quick to mature, and give a quick, replenishable vegetable that adds spice to salads. The small tomatoes like Cherry and Roma are excellent producers and are great in hanging baskets. Zucchini and Yellow Crookneck squash grow well and supply a bountiful supply of tasty vegetables.
All the methods above are excellent for helping to grow small gardens where little space is available. Each method could be used individually to create a uniform style garden or a combination could be used to make a nice garden with a less uniform style. A good idea is to plan the garden first by looking at the area that is available and then determine what method fits for the plants that are desired.
If you’re looking for ocean crafts and activities to capture your child’s interest, the round up below is definitely a great place to start!
The ocean is such a magical place. Explaining to your child that over 80% of our oceans remain unexplored can be mind blowing for them. Put that in perspective by showing them how much of their room is the amount of ocean that’s been explored. It’s a subject that many children find fascinating. And why not? It’s a realm that continues to astound the world’s greatest scientists.
Ocean Creatures
Our oceans are filled with creatures that children love. Dolphins, stingrays, sharks, fish, octopi, and the beloved narwhal all call the ocean home. What child isn’t going to be wowed by the narwhal? It’s the unicorn of the sea and it’s believed that narwhal horns are tied to the legends of unicorns. It’s the stuff of fantasy that children long for, yet it holds a bit of truth. The narwhal is certainly a majestic creature.
Fun Ocean Crafts And Activities For The Family
If your child loves the ocean, they will love these crafts. It might be creating a shark puppet, ocean slime, Nail Polish Dipped Marbled Seashell Decor, or even an ocean diorama. There are so many fun crafts to choose from. You can also use these crafts as a learning experience and teach your child about the different creatures found in the ocean.
Educational Crafts And Activities
Remember, educational stuff doesn’t have to be boring for your child. You can use fun crafts to teach your child about different subjects. Crafts are also a great way to continue to explore a subject that your child finds interesting. Whether it’s the ocean, dinosaurs, or even robots, you can find crafts that will be fun and educational for your child.
12 Ocean Crafts and Activities for Kids
Is your child currently fascinated with ocean life? Try some of these crafts. There are several great ones to choose from.
This Bantha Milk Cocktail is very similar in colour and taste to the Blue Milk sold at Disney Star Wars: Galaxy’s Edge, except we added alcohol for a more grown-up drink. We also share below a non-alcoholic recipe of the Bantha Milk.
A long time ago in a galaxy far, far away…
Those words always give me goosebumps. Especially followed by the symphonic fanfare that always precludes one of the most recognizable film scores of all time. The only thing better than watching George Lucas’s epic space opera is becoming a part of it when you enter the outer rim planet of Batuu. This galactic outpost is also known as Star Wars: Galaxy’s Edge and many lucky guests will have a chance to experience it again at Disneyland when it finally reopens just in time for May 4th. Imagine chugging blue Bantha Milk in the First Order occupied region of Black Spire, or chomping on a pod roasted Ronto Wrap before picking up some rare antiquities from the local Hammerhead Dok Ondar.
Where Does Bantha Milk Come From?
The story is that an Aqualish dairy farmer named Bubo Wamba came to Batuu to set up a milk stand in Black Spire’s Market to sell Blue Milk also known as bantha milk, a refreshing blue beverage. Banthas are large, furry, desert-dwelling mammals that produce a sweet train of blue milk. Blue Milk of Tatooine is the famous beverage Luke Skywalker drinks in the Star Wars: A New Hope movie.
Where To Get Blue Milk At Galaxy’s Edge
Of course, with the opening of Star Wars: Galaxy’s Edge at both Disneyland and Walt Disney World, voyagers visiting Batuu can now purchase the delicious Bantha Blue Milk at the Milk Stand.
May the 4th Be With You Star Wars Cocktail
May 4th has long been the chosen day for Star Wars fans to spread their love of the influential franchise. Although many of us still won’t get to be at the most immersive Star Wars experience on the planet, we can still celebrate in our own way, especially by bringing a little bit of the Disney parks home with us. I am partial to the original trilogy, so I have to partake in some blue milk from my favourite wooly Tatooine quadruped, the Bantha.
Who Shot First?
The recipe I have for this tasty 8 oz Bantha Milk cocktail contains 4 oz of alcohol. It’s a frothy and creamy concoction containing coconut rum, Disaronno, and Blue Curacao mixed with milk and heavy cream with just a touch of vanilla. If you love Star Wars, you can indulge in this beverage while you watch your favourite episodes. Just don’t drink this and attempt the Kessel Run.
How To Make A Nonalcoholic Bantha Milk (Mocktail)
Of course, you can also make an alcohol-free version of the Bantha Milk by using 4 oz of blue Cool-Aid, Hawaiian Punch Berry Blue Blast, or Berry Blue Typhoon Hawaiian Punch and serving it with a sugar cookie on top. The non-alcoholic Star Wars Bantha Milk is kid-friendly and great for Star Wars birthday parties or celebrations.
Bantha Milk Cocktail Recipe
Serving – 1 glass
Ingredients
1 oz. (30 ml) Coconut Rum
1 oz. (30 ml) Disaronno (or Amaretto)
2 oz. (60 ml) Blue Curacao
2 oz. (60 ml) Milk
2 oz (60 ml) Heavy Cream (35%)
1/2 tsp. vanilla extract
4 ice cubes
Equipment Needed
Shaker
Serving Glass
How To Make Bantha Milk Cocktail
Add ice to shaker and pour other ingredients over. Shake well to mix for about 20 to 30 seconds. Strain mix into serving glass. Drink immediately.
I hope you enjoyed my Bantha Milk Cocktail Recipe as much as I did! If you make it, please share your photos with us on Facebook or Twitter! Also, check out all of our other recipes!
BANTHA MILK COCKTAIL RECIPE
Lyne Proulx
The recipe I have for this tasty 8 oz Bantha Milk cocktail contains 4 oz of alcohol. This Blue Milk is a frothy and creamy concoction!
Add ice to shaker and pour other ingredients over.
Shake well to mix for about 20 to 30 seconds.
Strain mix into serving glass.
Drink immediately.
Notes
Non-Alcoholic Bantha Milk Recipe
You can also make an alcohol-free version of the Bantha Milk by using 4 oz of blue Cool-Aid, Hawaiian Punch Berry Blue Blast, or Berry Blue Typhoon Hawaiian Punch and serving it with a sugar cookie on top.
A good charcuterie board can be the most satisfying appetizer and even a meal. Charcuterie boards tend to include a variety of cheeses, meats, fruits, and bread or crackers. What I’ve put together is a very special Valentine’s Day charcuterie board. It has a beautiful presentation and lots of quality ingredients for your special occasion.
Best charcuterie board to buy
When purchasing a board for your charcuterie, you should look at the size, and if you want it in wood or marble.
Size: There are many sizes available to purchase, so choose accordingly to the amount of people eating. Small size for 2 persons, medium for 3-4 persons, and large for 5-6 persons.
Wood: I prefer the look of a wood board. Ideal choose woods made of maple, cherry, olive, and acacia. It’s best to choose a board that resists water penetration and will not absorb stains or odours.
Marble: A marble board is firm and impermeable and has a smooth look to display your food.
Plate/Tray: If you don’t want to invest in a board, you can use a tray or plate as long as it’s food safe, you are fine.
What to put on a charcuterie board
What is on a charcuterie board? In addition to incorporating my heart hot cocoa bombs into this DIY charcuterie board, there are additional ways to display the ingredients on this board. The charcuterie board presentation is very important. As a gift, the more visually appealing the charcuterie board is, the better. There are a couple of fun twists to this personalized charcuterie board that makes it a better gift. It’s perfect to celebrate Mother’s Day, Father’s Day, Valentine’s Day, or a birthday! One of the things I do to make this board extra special is make a rose out of salami.
The final enhancement I add to this simple charcuterie board are the fantastic cheeses, rice crackers, and a ramekin of honey. I include the honey specifically for pairing with the Manchego cheese. Read on for more information about these ingredients and tutorials.
Add Jars And Ramekins
Jars and ramekins add dimension to the board.
Size: Add jam jars and ramekins that are small, so they won’t look too bulky on the board.
Design: Try to have the same design for jars or ramekins to stay consistent.
Use Small Utensils
You can usually purchase small utensils at the dollar store.
Knives or butter knives: Used for cutting pâtés, cheeses, or meats.
Forks: Used for picking up meats, fruits, and cheeses.
Spoons: Used in jars or ramekins and picking up nuts.
Picking Ingredients For The Charcuterie Board
How to make a charcuterie board for beginners? When making a charcuterie board, try to think about the visual aspects and make it appealing. Ideally, you also want to make the board look full and colourful. Think about colours, textures, and pairings that complement each other. Choose food that have vibrant colours such as strawberries, cherries, grapes, and raspberries for bright reds, and grapes, cucumbers, and herb garnishes for bright greens. Also, use ingredients that vary in colours and sizes and create contrast and dimension by piling on the food.
How Much Meat and Cheese To Include On The Charcuterie Board
If you are serving the charcuterie board to your guests as an appetizers, usually it’s 2 oz of cheese and 1 oz of meat per person. If you are serving it as a meal, you will want to make it at least 6 oz of cheese and 4 oz of meat per person.
What Food To Include on a charcuterie board
Include both hard and soft cheeses ranging from mellow to sharp, and you can add a variety of cheeses from different milk sources such as cow, goat, or sheep. As far as cured meats, you can use soft or hard. Soft meats like prosciutto and salami are greats for making a rose, while the hard meats that need to be sliced make a great presentation. You can also add fruits, jams, olives, nuts, dried fruits, chocolates, crackers, breads, and more!
Perfect Food Pairings For A Charcuterie Board
Now that you have the basic knowledge on how to build a DIY charcuterie board, how about some food pairing ideas to create delicious appetizers?
Gouda and pepper jam topped with an Marcona almond.
Brie, drizzle of honey, and a blackberry on top of a fig and olive crisp.
Cheddar, drizzle of honey, and dried apricot on top of a cracker
Brie, candied pecan, drizzle of honey on top of a fig and olive crisp.
Salami and gouda on a cracker.
Soppressata Salami with Havarti cheese on a cracker.
Emmental cheese, salami, and a cornichon on a piece of baguette.
Beverages To Pair with a Charcuterie Board
Your guests will need to have either a beer, wine, and non-alcoholic beverages to accompany their charcuterie plates. Of course, my first choice is wine as it pairs perfectly with cheese and chocolate!
Beer
Focus on three styles of beers to eat with the charcuterie.
Ale: The oldest style of beer and the most common to serve. It comes in brown ale or pale ale.
Porter: A type of beer known for its dark black colour and roasted malt aroma. It might be fruity or dry in flavour.
Lager: This beer is usually light and crisp taste that is mellow and smooth. It also can be from dark to pale and malty to sweet depending on the country of origin.
Wine
Hearty reds such as Pinot Noir work well with charcuterie pairings. An Italian sparkling wines such as Proseccos and Lambruscos reset the palate, as can off-dry Rieslings.
Safe choices are sparkling wines such as Proseccos and Lambruscos, light-bodied white wines such as a sweet Riesling and Sauvingnon Blanc, and fruit forward light-bodied reds like a Pinot Noir can pair with most cheeses and charcuterie.
Non-Alcoholic Beverages
Sparkling water comes in different flavours and, I find, is the best refreshing choice. Second, would be mineral water with a slice of lime or lemon.
Heart Jam Brie Wheel, Salami Rose Tutorial, and Chocolate Dipped Strawberries
One of the things I do to make this Valentine’s charcuterie board extra special is make a rose out of salami. You can follow my tutorial to learn how to do this. I dip the strawberries in chocolate, which I don’t have to tell you is nothing short of sensational. Don’t forget to prepare the Heart Jam Brie Cheese for that special centrepiece! Following the tutorial for these three techniques will enhance not only the visual aspect of your board, but add layers of complexity to the composition of the board itself.
How To Make a Heart Jam Brie Wheel Cheese
Ingredients
For a special heart jam Brie Cheese, you will need:
1 Brie Cheese
1 Tbsp Jam (raspberry or strawberry)
Equipment Needed
Knife
Cutting board
Heart cookie cutter
Instructions
Place the Brie cheese in the freezer for at least 30 minutes, so it’s firmer and easier to cut.
Place cheese on a cutting board, use a sharp knife, and cut the brie in half crosswise.
Take the top cheese piece and place it on the cutting board. Use a small heart cookie cutter to cut a heart in the center of the brie. Remove the heart cheese and keep as a decoration for the charcuterie board.
Place the top brie on the bottom one and fill the empty heart with your favourite jam. I used strawberry jam. Add to the center of the charcuterie board.
Heart Jam Brie Wheel Cheese
Lyne Proulx
The Heart Jam Brie Cheese is the perfect centrepiece for a charcuterie board or to serve on a cheese board.
Place the Brie cheese in the freezer for at least 30 minutes, so it’s firmer and easier to cut.
Place cheese on a cutting board, use a sharp knife, and cut the brie in half crosswise.
Take the top cheese piece and place it on the cutting board. Use a small heart cookie cutter to cut a heart in the center of the brie. Remove the heart cheese and keep as a decoration for the charcuterie board.
Place the top brie on the bottom one and fill the empty heart with your favourite jam. I used strawberry jam. Add to the center of the charcuterie board.
When you are preparing a charcuterie board, it’s always eye catching to make salami roses or salami flowers as appetizers and display them in the center or to the side of the board. This salami rose tutorial is so simple and easy to do and, best of all, you don’t need any glass to make them or even toothpicks to secure the rose.
Ingredients
About 12 -16 Genoa Salami slices (or salami of your choice)
Fresh sage
Equipment Needed
Cutting board or plate
How To Make a Salami Rose
Easy steps to make a beautiful salami rose:
Choose 8 slices of salami.
Fold each salami in half to make a half circle shape, then lay them in an overlapping line. The salami should overlap about a third over the next slice. The straight part of each salami should be in line with the straight part of the next one.
Roll them up starting at one end into a tight roll if you want your salami to look like a bud or semi-tight for a looser salami rosette.
After the roll, flip the salami rose around to sit straight. Add 4 slices of salami folded in half on each side of the meat rose with the straight part facing the rose. Take 1 half folded salami slice and wrap one side of the rose, then repeat with the other 3. For a bigger rose, you can add another 4 more slices. The straight part should be at the bottom of the salami rosette.
Finally, arrange the salami petals to a looser fit. You can slightly pull on each piece of salami to make it look more like a rose. Add fresh sage around the salami rose to make it look like leaves and help secure the rose.
Tips
If you really want to secure the meat rose, you can push a toothpick straight at the bottom of the rose flower made from cured meat to hold it together. If you have the salami rose set tightly beside other meats, cheese, or fruits, it will hold together nicely.
SALAMI ROSE TUTORIAL
Lyne Proulx
When you are preparing a charcuterie board, it’s always eye catching to make salami roses or salami flowers as appetizers and display them in the center or to the side of the board. This salami rose tutorial is so simple and easy to do and, best of all, you don’t need any glass to make them or even toothpicks to secure the rose.
Fold each salami in half to make a half circle shape, then lay them in an overlapping line. The salami should overlap about a third over the next slice. The straight part of each salami should be in line with the straight part of the next one.
Roll them up starting at one end into a tight roll if you want your salami to look like a bud or semi-tight for a looser salami rosette.
After the roll, flip the salami rose around to sit straight. Add 4 slices of salami folded in half on each side of the meat rose with the straight part facing the rose. Take 1 half folded salami slice and wrap one side of the rose, then repeat with the other 3. For a bigger rose, you can add another 4 more slices. The straight part should be at the bottom of the salami rosette.
Finally, arrange the salami petals to a looser fit. You can slightly pull on each piece of salami to make it look more like a rose. Add fresh sage around the salami rose to make it look like leaves and help secure the rose.
Notes
If you really want to secure the meat rose, you can push a toothpick straight at the bottom of the rose flower made from cured meat to hold it together. If you have the salami rose set tightly beside other meats, cheese, or fruits, it will hold together nicely.
These delicious chocolate dipped strawberries for Valentine’s Day are perfect treats for a charcuterie board, to add to cakes for decorations, or to serve on their own for dessert.
Ingredients
1 cup medium-large strawberries (8-10 strawberries)
1/2 cup milk, dark or semisweet chocolate chips or white vanilla baking chips
1/2 teaspoon shortening or vegetable oil
Equipment Needed
Parchment paper
Cookie Sheet
How To Make Chocolate Covered Strawberries
Start by gently rinsing the strawberries and dry them on a clean kitchen towel or paper towels. Strawberries must be completely dry before dipping them as any water will cause the chocolate to seize up.
Line a cookie sheet with waxed paper.
In a small saucepan, melt chocolate chips and shortening over low heat, and stir frequently. Remove from heat. You can also place the chocolate chips and shortening in a microwavable safe bowl in microwave in 30 second intervals until melted.
Dip the lower half of each strawberry one at a time into the chocolate mixture and allow excess melted chocolate to drip back into the saucepan or microwavable safe bowl. You can hold them by the green leaves or stems in to melted chocolate.
Place each strawberry on the parchment/waxed paper. Refrigerate uncovered for at least 30 minutes or until chocolate is firm.
Store the homemade chocolate dipped strawberries in a plastic or glass container covered in the refrigerator until ready to serve, so chocolate does not soften. If you used oil, the chocolate will soften more quickly at room temperature.
CHOCOLATE DIPPED STRAWBERRIES RECIPE
Lyne Proulx
These delicious chocolate dipped strawberries are perfect treats for a charcuterie board, to add to cakes for decorations, or to serve on their own for dessert.
1/2cupmilk chocolate chipsor semisweet chocolate chips or white vanilla baking chips
1/2teaspoonshortening or vegetable oil
Instructions
Start by gently rinsing the strawberries and dry them on a clean kitchen towel or paper towels. Strawberries must be completely dry before dipping them as any water will cause the chocolate to seize up.
Line a cookie sheet with waxed paper.
In a small saucepan, melt chocolate chips and shortening over low heat, and stir frequently. Remove from heat. You can also place the chocolate chips and shortening in a microwavable safe bowl in microwave in 30 second intervals until melted.
Dip the lower half of each strawberry one at a time into the chocolate mixture and allow excess melted chocolate to drip back into the saucepan or microwavable safe bowl. You can hold them by the green leaves or stems in to melted chocolate.
Place each strawberry on the parchment/waxed paper. Refrigerate uncovered for at least 30 minutes or until chocolate is firm.
Store the strawberries in a plastic or glass container covered in the refrigerator until ready to serve, so chocolate does not soften. If you used oil, the chocolate will soften more quickly at room temperature.
This Mother’s Day, treat mom to a beautifully crafted charcuterie board with love made from home. Give it to your Valentine as well, or make it for a special anniversary or birthday dinner. Part of this board is garnished with the incredible heart hot chocolate bombs. You can get so many great uses from heart-shaped silicone molds because they so nicely enhance the presentation of any romantic or heartfelt gift.
Charcuterie board shopping list
Cheeses used: Brie wheel, Asiago, Manchego
Meats used: Kalbassa Sausage, Cognac country style pâté, salami, prosciutto
Fruits (washed) used: strawberries, raspberries, blueberries, and grapes
Honey for pairing with the Manchego cheese
Crackers for charcuterie board: Laiki rice crackers, but choose your favourite crackers.
Fresh sage or rosemary
Chocolates
Heart Donuts
Heart Hot Chocolate Bombs
Jams or bread (optional)
Equipment Needed
Charcuterie board: cheese board, cutting board, or plate
1 small ramekin
Cutting board
Knives (for pairing and one for cutting cheese)
Metal heart cookie cutters for brie and pâté (small, medium or large)
Tiny spoon for the honey
Tiny forks for picking up the meats, fruits, and cheeses
Small knives for cutting pâtés, cheeses, or meats
How To Set A Charcuterie Board
Let’s have a look at these charcuterie board tips and tricks and build the most delicious and creative charcuterie board for special occasions!
1. Jars and Ramekins
First of all, start by placing down round items such as jars and ramekins that are filled with jams, preserves, olives, pickles, honey. The number and size will depend on the size of your board. Make sure to place any food that has an oil or water base in the ramekins as this will help avoid other foods getting soggy.
2. Large Items
Place large items next on the charcuterie board such as grapes or larger items of fruit.
3. Cheese For Charcuterie Board
Place the cheese on the board from largest to smallest by starting with the blocks and wedges and finish with the slices. You can choose 1 hard, 1 semi soft, and 1 soft cheeses. Blue cheese, goat cheese, aged cheddar, Gouda, cheese curds, Boursin, Smoked mozzarella, Brie wheel, Havarti, Asiago, and Manchego are some great choices. I decided to make a heart jam Brie wheel cheese the centrepiece of my charcuterie board.
Cut firm cheese in triangles and line up side by side, one side slightly on top of the other, or stack one after the other in opposite directions. I like to line up the hard cheese on the edge of the board. If you place a block or a wedge that is not sliced, place a butter knife by it to help dig in. For soft cheeses, wedge a small knife or butter knife in them for serving.
4. Charcuterie Board Meats
After the jars, large pieces, and cheese are in place, use these anchors as guides to place your meat.
This will make it easier to create and add the salami rose. Charcuterie board meat ideas can include cured meat like Genoa salami, Nola salami, Peppered salami, Soppressata, and Prosciutto are great choices for a charcuterie. It’s best to slice and fold the cured meats. Prosciutto is so thin that I just rolled it or drop it like a ribbon on the board. For Genoa salami, you can make a salami rose or fold them into quarters and fan them out like a deck of cards. Hard cured meat like Kalbassa Sausage should be sliced into thin rounds. Cut the pâté using a large metal heart cookie cutter.
5. Fillers
Now is the time to start filling the gaps on your charcuterie board! Start with fruits, nuts, and crackers. Berries are an obvious colourful choice. If you have any anchors open, stack or lean your crackers up against. Dried fruits such as apricots and oranges are easy and accessible year round. You can also add my favourite food such as heart hot chocolate bombs, chocolate pieces, and chocolate dipped strawberries!
6. Garnish
Last, but not least, garnish with fresh herbs such as sage or rosemary. It adds a pop of colour and a beautiful aesthetic. You can also add edible flowers.
Charcuterie Board themes
For a Christmas charcuterie board, you can sprinkle the dipped berries with finely crushed peppermint candy, and add Christmas candy and chocolates.
For a Valentines charcuterie board, you can sprinkle the dipped berries with red sprinkles or heart shaped sprinkles. You can also use white chocolate chips and add red food colouring to make red icing.
Charcuterie Board Tips
If you are adding bread, like a sliced French baguette, you can put it along the edge of the board and/or make sure it does not touch any fruits as it will get soggy. The same applies to crackers, donuts, and cookies.
Using a wide array of colours makes the board pop.
If you are adding goat cheese to the charcuterie board, use a cheese wire slicer cutter to cut it as this will help to make a smooth cut.
Pair foods that go well together side by site like cheese and crackers.
Lay grapes upside down to hide the stem.
I hope you enjoyed on tips and tricks on how to make a charcuterie board for Valentine’s Day, a Heart Jam Brie Cheese, the Salami Rose Tutorial, and the Chocolate Dipped Strawberries Recipe. If you make any of them, make sure to share with us on Facebook or Twitter! Also, check out this St. Patrick’s Day Charcuterie Board for an Irish celebration with friends and family!
Valentine’s Day Charcuterie Board
Lyne Proulx
Charcuterie boards tend to include a variety of cheeses, meats, fruits, and bread or crackers. What I've put together is a very special charcuterie board for Valentine's Day.
Charcuterie board: cheese board, cutting board, or plate
1 small ramekin
Cutting board
Knives (for pairing and one for cutting cheese)
Metal heart cookie cutters for brie and pâté (small, medium or large)
Tiny spoon for the honey
Tiny forks for picking up the meats, fruits, and cheeses
Small knives for cutting pâtés, cheeses, or meats
Ingredients
1Cheeses used: Brie wheelAsiago, Manchego
1Meats used: Kalbassa SausageCognac country style pâté, salami, prosciutto
Fruits (washed)strawberries, raspberries, blueberries, and grapes
Honey for pairing with the Manchego cheese
Crackers used: Laiki rice crackerschoose your favourite crackers
Fresh sage or rosemary
Chocolates
Heart Donuts or Donuts
Heart Hot Chocolate Bombs
Instructions
JARS AND RAMEKINS
First of all, start by placing down round items such as jars and ramekins that are filled with jams, preserves, olives, pickles, honey. The number and size will depend on the size of your board. Make sure to place any food that has an oil or water base in the ramekins as this will help avoid other foods getting soggy.
LARGE ITEMS
Place large items next on the charcuterie board such as grapes or larger items of fruit.
CHEESE FOR THE CHARCUTERIE BOARD
Place the cheese on the board from largest to smallest by starting with the blocks and wedges and finish with the slices. You can choose 1 hard, 1 semi soft, and 1 soft cheeses. Blue cheese, goat cheese, aged cheddar, Gouda, cheese curds, Boursin, Smoked mozzarella, Brie wheel, Havarti, Asiago, and Manchego are some great choices. I decided to make a heart jam Brie wheel cheese the centrepiece of my charcuterie board.
Cut firm cheese in triangles and line up side by side, one side slightly on top of the other, or stack one after the other in opposite directions. I like to line up the hard cheese on the edge of the board. If you place a block or a wedge that is not sliced, place a butter knife by it to help dig in. For soft cheeses, wedge a small knife or butter knife in them for serving.
CHEESE FOR THE CHARCUTERIE BOARD
After the jars, large pieces, and cheese are in place, use these anchors as guides to place your meat. This will make it easier to create and add the salami rose. You can use any cured meat that you like to put on the charcuterie board. Genoa salami, Nola salami, Peppered salami, Soppressata, and Prosciutto are great choices for a charcuterie. It’s best to slice and fold the cured meats. Prosciutto is so thin that I just rolled it or drop it like a ribbon on the board. For Genoa salami, you can make a salami rose or fold them into quarters and fan them out like a deck of cards. Hard cured meat like Kalbassa Sausage should be sliced into thin rounds. Cut the pâté using a large metal heart cookie cutter.
FILLERS
Now is the time to start filling the gaps on your charcuterie board! Start with fruits, nuts, and crackers. Berries are an obvious colourful choice. If you have any anchors open, stack or lean your crackers up against. Dried fruits such as apricots and oranges are easy and accessible year round. You can also add my favourite food such as heart hot chocolate bombs, chocolate pieces, and chocolate dipped strawberries!
GARNISH
Last, but not least, garnish with fresh herbs such as sage or rosemary. It adds a pop of colour and a beautiful aesthetic. You can also add edible flowers.
Notes
CHARCUTERIE BOARD TIPS
For a Christmas Charcuterie Board, you can sprinkle the dipped berries with finely crushed peppermint candy, and add Christmas candy and chocolates.
For a Valentine’s Day Charcuterie Board, you can sprinkle the dipped berries with red sprinkles or heart shaped sprinkles. You can also use white chocolate chips and add red food colouring to make red icing.
If you are adding bread, like a sliced French baguette, you can put it along the edge of the board and/or make sure it does not touch any fruits as it will get soggy. The same applies to crackers, donuts, and cookies.
Using a wide array of colours makes the board pop.
If you are adding goat cheese to the charcuterie board, use a cheese wire slicer cutter to cut it as this will help to make a smooth cut.
Pair foods that go well together side by site like cheese and crackers.
Lay grapes upside down to hide the stem.
Keyword Charcuterie Board, Charcuterie Board With Love, Cheese board, heart hot chocolate bombs, How To Make A Charcuterie board, Meat board
What do you have planned to gift mom on Mother’s Day that will make her feel special? Let’s have a look at the top 10 Mother’s Day gift ideas that you can purchase in Ottawa.
Mother’s Day is dedicated to some of the hardest working and most patient people in the world. Moms are always there for you no matter what. They work hard to take care of their kids and to point you in the right direction so you can have a good start in life. Your mom will always be there when you need her for as long as she can.
Top 10 Mother’s Day Gift Ideas
Mother’s Day is a wonderful holiday that honours moms for all the things they do for their families all year. This is a great time to show your appreciation for your mom or the mother of your kids by making the whole day about her. We have came up with some unique gift ideas for Mother’s Day that she can do in Ottawa!
1. Restaurants
Take her out to lunch at local restaurant in Ottawa, just the two of you. She’ll love spending this quality time with you catching up on things. Tell her how much she means to you. Nothing beats giving your mom a hug and saying, “I love you” and “I’m thankful you’re my mom”. If you can’t spend a meal together on Mother’s Day, you can eat a virtual meal together via Zoom or Skype. You can also pay for take out food and have it delivered to her.
2. Online Classes
An ideal Mother’s Day gift is to purchase online classes that you can do together. Many single or weekly programs are now offered via Zoom including fitness, meditation, Reiki, arts and crafts, and cooking. It’s a fun and exciting way to spend time virtually with mom.
3. Staycation Getaway
Gift mom for Mother’s day with a staycation getaway in Ottawa, so she doesn’t have to cook and clean for a day or two.
4. Streaming Services
Purchase a monthly or yearly subscription-based streaming service such as Netflix or Crave. She can spend some quiet and relaxing time at home watching TV shows and movies without commercials.
5. For The Outdoorsy Mom
For moms that love the great outdoors, gift her with a gift card from a sports store. She can purchase apparels to wear when she goes out for a nature hike or walk through her neighbourhood.
6. Homemade gift idea for mother’s day: DIY Spa
Stop by and spend the day doing the things she wants to do. This is a great opportunity for you to talk and get to know your mom better as a person, not just the woman who took care of you growing up. Bring a DIY spa package of body scrubs, lavender vanilla soaps, facial scrubs, rose petal bath bombs, and scented bath salts, so she can pamper herself and have a relaxing day!
7. Virtual Local Events
If you can see your mom on Mother’s Day, take part together in a virtual event. You can view many online shows, musicians, and cultural groups via Zoom. Some are free while others will ask for donations or a fee. You can visit websites like Eventbrite to see what is happening in your area. Grab a glass of wine during the event and chat with mom via text, DM, or the telephone!
8. Support Local Businesses
Support a local Ottawa business such as a bakery, nursery, greenhouse, or florist by gifting mom with pastries, a Mother’s Day cake, flowers, plants, or shrubs.
9. Mother’s day gift ideas for hard to buy Moms
Again, if you can be by your mom’s side on Mother’s day, spend time just the two of you or with family members doing a virtual secret theme trivia night, a virtual escape room, or throwing a memorable virtual bash by gifting mom with one of these fun experiences. Tell her how much she means to you by sending her a quote engraved in a bracelet or heart necklace. The words you choose will be a constant reminder of your love. These unique suggestions are also ideal for Mother’s Day gift ideas for those hard to buy moms.
10. Massage Session
Gift mom for Mother’s Day with 1 hour massage session with a registered massage therapist. This will help her relieve all the stress and anxiety that accumulated in her body during these difficult pandemic times.
These top 10 Mother’s Day gift ideas offer a unique way to spend time with your mom. The best gifts are not always something you can buy. What you do or purchase is not as important as taking the time to call her or be with her virtually on Mother’s day! Sometimes, sharing your time and companionship is what mom really wants. Talk, laugh and spend time together not just on Mother’s Day, but all year long. She will cherish these memories for a lifetime and so will you!
Are you looking for a way to embellish your needlework or other fabric crafts? Simple felt flowers can be a beautiful addition to a number of handcrafted items. Best of all, this is the type of craft that you can enjoy doing on a rainy day. Just get your supplies, turn the TV on, and enjoy your afternoon doing something you love. This DIY felt flower no-sew craft can be made by kids and adults.
Creative Felt Flower Craft
Something else that is great about this craft is that you can be as creative as you want. There are so many different colours of felt in craft stores. Of course, if you want to save money, you can find a number of colours in your local Dollar Tree or other discount stores that sell crafts. Also, don’t forget that you can often find craft supplies in thrift stores for really cheap. Not to mention that you could easily use your scrap felt to make this project. In fact, it’s a wonderful way to use up those leftovers.
Make Money Selling Craft
If you’re looking for an easy craft that you could resell at craft fairs or on Etsy, this would be a great craft. It will take some time, but once you get the hang of making these, you’ll be able to make several in no time. People who love to embellish their own crafts will love buying these.
Flower Craft For Kids
This would also be a fun craft for kids to do. Let them choose the colours of felt they want to use. You could also put other supplies out instead of pearls. Rhinestones would be beautiful in the middle of the flowers. Just have fun and be creative. These felt flowers also make great gift ideas for Easter, Mother’s Day, or to welcome spring!
9 Felt Craft Ideas For The Family
If you are looking for more easy DIY felt craft ideas, you can make one of these:
If you’re new to felt crafting, this is a great craft to start with. It’s an easy and fun felt craft that allows for creativity. Best of all, you won’t have to spend a lot of money gathering the supplies you need. You can also use different coloured felt fabrics and beads for more variations. Plus, it even includes a printable felt flower template to make it even easier for you to craft!
List of Supplies
Felt fabric (green, fushia, black, yellow or other colours)
Select a color for the felt fabric and cut it into a round shape. Cutting the felt fabric into a round shape makes it easier to trace the spiral pattern from the template on it.
Step 2:
You can skip to step 3 if you are using the template. You can also do a free hand cutting of the pattern. Cut the round felt into a spiral pattern if you’re going for the free hand cutting and then cut the scallop pattern along the border. Start cutting the scallop pattern from the outer edge of the spiral felt.
Step 3:
If you want to use the template, simply print and cutout the spiral pattern from template, and trace the template pattern on the round cutout felt and cut accordingly.
Step 4:
Use 2 different coloured felt fabrics to trace the 2 other fringed patterns from the template. I used yellow felt for the large fringed pattern and black felt for the small fringed pattern.
Step 5:
Take the spiral cutout pattern from step-3 and start to roll it from the outer edge. Keep coiling the spiral pattern until reaching the center.
Step 6:
Apply a small amount of fabric glue on the center part of the pattern once done coiling.
Step 7:
Glue the coiled pattern with the center to secure it. You can use fabric glue or hot glue as you wish.
Step 8:
Take the black fringed felt piece and roll it. Now take the yellow fringed pattern and roll it around the black rolled fringe.
Step 9:
Apply a small amount of glue at the bottom of the rolled fringed pieces and place them in the centre of the spiral flower. Push the fringed pieces inside the center of the spiral flower, making sure it touches the center of the flower.
Step 10:
Finally, glue a small faux pearl bead into the center of the fringed centrepiece.
I hope you enjoyed my Felt Flower Craft With Printable Template as much as I did! If you make it, please share your photos with us on Facebook or Twitter! Also, check out all of our other crafts!
Felt Flower Craft With Printable Template
Yield: 1 Felt Flower
Prep Time: 10 minutes
Active Time: 20 minutes
Total Time: 30 minutes
Difficulty: Easy
Estimated Cost: Under $5
This DIY felt flower no-sew craft can be made by kids and adults. These felt flowers also make great gift ideas for Easter or Mother's Day.
No Ratings
Materials
Felt fabric (green, fushia, black, yellow or other colours)
Select a colour for the felt fabric and cut it into a round shape. Cutting the felt fabric into a round shape makes it easier to trace the spiral pattern from the template on it.
STEP 2:
You can skip to step 3 if you are using the template. You can also do a free hand cutting of the pattern. Cut the round felt into a spiral pattern if you’re going for the free hand cutting and then cut the scallop pattern along the border. Start cutting the scallop pattern from the outer edge of the spiral felt.
STEP 3:
If you want to use the template, simply print and cutout the spiral pattern from template, and trace the template pattern on the round cutout felt and cut accordingly.
STEP 4:
Use 2 different coloured felt fabrics to trace the 2 other fringed patterns from the template. I used yellow felt for the large fringed pattern and black felt for the small fringed pattern.
STEP 5:
Take the spiral cutout pattern from step-3 and start to roll it from the outer edge. Keep coiling the spiral pattern until reaching the center.
STEP 6:
Apply a small amount of fabric glue on the center part of the pattern once done coiling.
STEP 7:
Glue the coiled pattern with the center to secure it. You can use fabric glue or hot glue as you wish.
STEP 8:
Take the black fringed felt piece and roll it. Now take the yellow fringed pattern and roll it around the black rolled fringe.
STEP 9:
Apply a small amount of glue at the bottom of the rolled fringed pieces and place them in the centre of the spiral flower. Push the fringed pieces inside the center of the spiral flower, making sure it touches the center of the flower.
STEP 10:
Finally, glue a small faux pearl bead into the center of the fringed centrepiece.
Many people are experiencing financial strain amid soaring job loss, and boredom likely began to seep in months ago. If you’re looking to keep yourself occupied and need work, there are many types of Ecommerce businesses you can launch from home, and it’s not even hard to do.
Launching a Solo Career Online
The internet connects people in powerful ways, giving excellent opportunities to podcasters, musicians, writers, and others. If you have a talent that others want to be a part of, digital tools let you share it online by yourself.
You can perform music, teach lessons, or exclaim on any topic you like! You don’t need to have a professional studio to release music or interviews with high-quality audio, and you can make a beautiful website without having the resources of a publishing house.
Print on demand businesses have become a go-to way for many creatives to parlay their passions into income. Once you have an online presence carved out, you can start a print on demand business by selling merchandise to augment what you make in ad money. Industry-leading companies make the process as simple as possible.
First, choose from hundreds of products you want to be printed, like a mug, smartphone cover, or clothes. Anyone can start designing and selling their own custom products with print-on-demand dropshipping. There are no upfront costs since there’s only a charge after the sale is complete.
All you need to do is link up with one company integrated with popular marketplaces like Etsy or Shopify, and you can sit back and track sales and manage your brand. The print-on-demand company will also oversee customer service or product fulfillment.
Believe in Yourself
Once you have the necessary equipment and you’ve found a company that handles the grunt work of on-demand print, you’ll need to depend on your talent and self-belief in your calling! If you’re a musician, don’t be shy to perform or create videos giving helpful lessons. You don’t need to be Jimi Hendrix to give people instructions they can use in their playing.
If you’re a politically-minded commentator, you should feel confident enough to describe your views in public. Bolster your points with credible reporting because there are lots of loud talking heads already, and the world could use more fact-gathering.
Some people come from communities that have been history under-represented in media and still are today. If this is you, your voice is even more necessary! Believe in yourself and tell your truth, and your readership will grow.
Sell Homemade Products
Can you make products from home that people will buy? Many people are making their own crafts or even beauty products like soap.
Whether you’ve always had a secret gift for putting things together, or you’re learning to build something from scratch, be resourceful and sell your own products online. Anyone can create a website that looks professional but isn’t very complicated on the back-end.
Market Unwanted Items
Why waste time and energy looking to design or find new stock to sell when you may already have it in your possession? Re-selling items online can be lucrative, depending on your wares and how you approach the marketing and reduces the clutter in your home.
So long as you really don’t need these things anymore, you may as well turn them into cash. Some things that may fetch a high price include old jewellery, handbags or purses, fashionable or trendy second-hand clothes, video games, collectibles, and more.
Make sure that you describe what you’re selling accurately, especially its condition. Take care you make the product look good in the picture, and write a sales blurb that will attract a buyer.
Buy and Grow an Existing Business
Not everybody has the desire or the ability to start an Ecommerce business from the ground up. If you see someone running a smart Ecommerce business and think you can take their concept even further, see if it’s for sale.
Buying an existing business gives you a head start, so survey what’s out there and see if there’s a company that’s the right fit.
Help Others Expand Online
Currently, there are businesses in limbo trying to adjust to constantly changing conditions on the ground. There could be businesses near you looking to shift online to combat struggling sales.
Maybe the solution isn’t to purchase a business for yourself but to help an existing one from the community remain viable. By learning how to get more followers on Instagram, you can gain a wider audience, improve your online presence, and boost your sales. In fact, many entrepreneurs have found creative ways to make money on Instagram by offering services, promoting products, or becoming brand ambassadors.
Amid the large and scary economic problems, people need to cling to hope while doing what they can to provide for themselves and their community. In the meantime, it’s good to know different ways to start an Ecommerce business from home.
A Mother’s Day gift should be something unique and special – but finding an original gift every year can be tough. If you’re struggling to find a gift worthy of your mom, why not take advantage of modern print technologies and create a touching photo gift that really is a complete one-off – a custom framed photo, for example? If you want to learn how to turn your own photos into wonderful Mother’s Day gifts, read on!
Do Photos Still Make Good Gifts?
Living in the digital age has changed our attitudes to photography – what was once something special has now become a constant in our lives. But at the same time, we’re printing fewer photos than ever – and the less common photo prints have become, the more they’ve taken on a new significance. Meanwhile, printing standards keep improving – now you can print photos on a wide range of materials, usually in fantastic quality.
And that might explain why custom photo gifts are more popular than ever. A custom print has the personal touch – perfect for showing how much you care on a special occasion like Mother’s Day. So just what options are available for custom photo gifts these days? Together with the printing specialists from BestCanvas.ca, we’ve put together a list of the most spectacular products on the market!
Framed Photos – Tell Your Story
Of course, framed photos can be seen in homes up and down the land, but do these simple decor items really work as gifts? They can work beautifully if your framed photo comes with a real professional finish.
A stylish frame with matting should come as standard, for example, and ideally the framing mat should be cut at an oblique angle– to give your picture breathing space and avoid throwing shadows across it. And there should also be a good-quality cover to protect your photos against daily wear and tear. These days one of most reliable materials you can use for a photo cover is acrylic glass, also known as Plexiglas.
And if you think a single framed photo might be underwhelming, why not go for two or three? A set of thematically linked prints is sure to wow your loved ones – their very own mini gallery wall. Use photo prints to tell a story that expresses your deepest feelings and you can rest assured that this gift will be cherished for years to come.
Canvas Prints: an Elegant Classic Updated
Canvas prints have been the dominant trend in the photo printing industry in recent years, and they now enjoy great popularity. But they still have a quirky, left field appeal compared to old fallbacks like photo posters. So what makes canvas prints so special? And more importantly, will they work as gifts?
The specialists at BestCanvas.ca note that canvas prints are a modern cousin to classic artworks. Painters have used canvas as a foundation since the 14th century, but nowadays it’s used for digital printing too. The fine-grained canvas surface softens digital images while retaining excellent print definition – and this contrast is part of the unique appeal of canvas prints. Note: they work particularly well with portraits, so if you’re thinking of printing some baby pictures for your mom, canvas might be the right choice!
Canvas prints come pre-stretched over an inner wooden frame and can be displayed without additional outer framing – indeed the product’s borderless edges and simple lines have their own classic charm. But a range of premium decor frames is available which will turn your print into a real knockout.
Metal Prints – Sleek and Glamorous
Looking for something extra special this Mother’s Day? Then you should consider metal prints. These exclusive prints will bring flair and sophistication to any interior, turning your photos into real works of art.
Metal prints are relatively new to the photo printing world – but they’ve won wide acclaim for their versatility and strength. Your photo is printed directly onto a composite metal panel – a lightweight black polyethylene core sandwiched between slim aluminum sheets. The panel comes in a borderless design, leaving visible the silvery edges of the metal sheets.
What photos work best with metal prints? Vivid colours contrast well with the restrained design of the metal substrate, so choose colourful shots with lively themes – family photoshoots in the great outdoors, or pictures capturing the bustling life of a modern city.
Print Your Photos and Save Money
One of the best things about photo gifts is that you can grow your collection over the years and create a gallery photo wall. And you’ll be pleasantly surprised by how accessible they are, with leading print companies like BestCanvas.ca offering top-quality products at bargain prices.
Want to see how you can bring your memories to life? You can visit them on BestCanvas.ca, as well as on their Facebook, Instagram, and YouTube pages!
Disclaimer: This article has been sponsored by BestCanvas.ca.
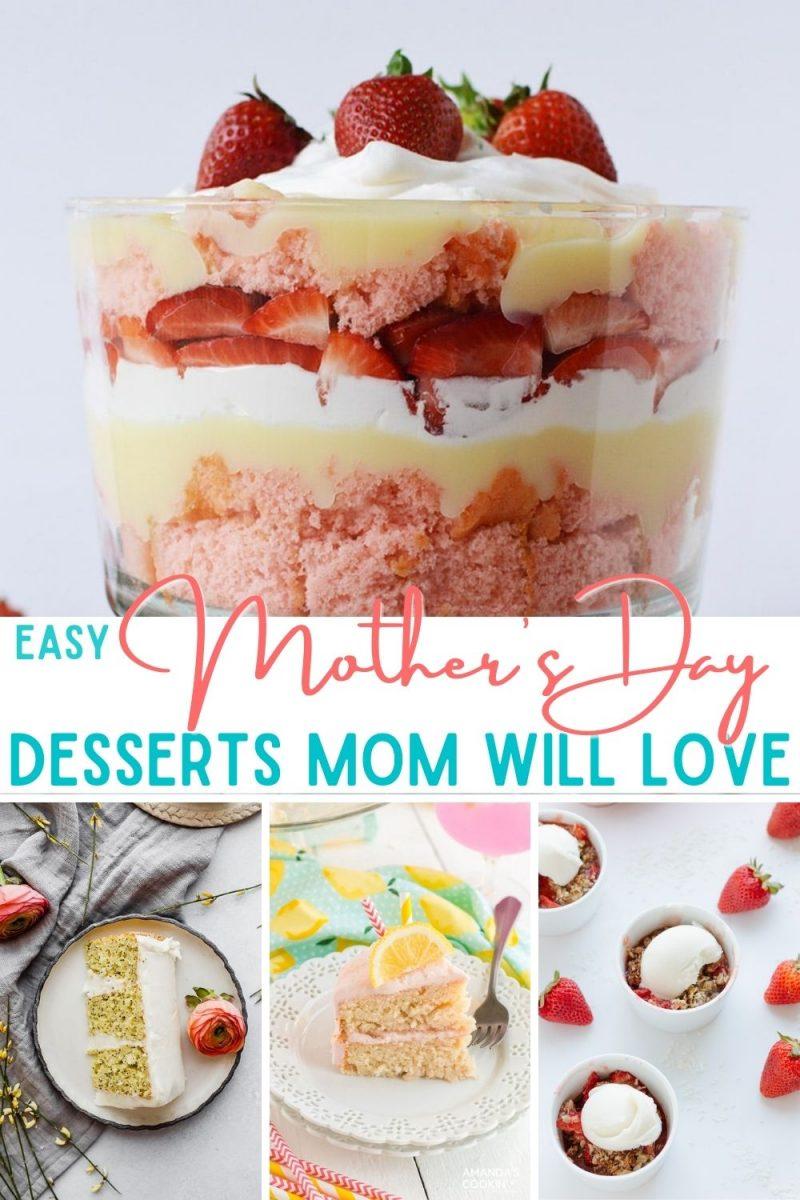
Celebrate mom with the family on her special day with these easy Mother’s Day desserts. Not only are these desserts easy to make, but they are also delicious!
Mother’s Day Desserts
Mother’s Day is all about family, good food, and celebrating mom. Mom will love these special treats as she enjoys her time with the people she loves most. Pair the desserts with an easy dinner that is specially made for mom and you have the perfect Mother’s Day.
Easy and delicious, this pink lemonade cake will be a delightful dessert that you can enjoy with mom on her special day.
3. Strawberry Coconut Crisp
Perfect for summer or for Mother’s Day, this coconut crisp is made with strawberries for a delicious dessert.
4. No Bake Raspberry Dulce de Leche Icebox Cake
Easy to make, this no bake raspberry icebox cake can be made ahead and is ready to enjoy when you are ready for dessert.
5. Lemon Poppy Seed Cake
The lemon poppy seed cake looks like it just came from that expensive bakery, but it is an easy Mother’s Day dessert that you can make at home.
6. Easy Chocolate Avocado Mousse
Easy and healthy, this delicious chocolate avocado mousse will make a delicious Mother’s Day dessert for your celebration.
7. Easy Cream Cheese Frosted Banana Bars
The fresh taste of bananas is what makes this delicious easy cream cheese frosted banana bars dessert the perfect dessert for Mother’s Day. Drizzled with a bit of caramel, the dessert is beautiful and tasty.
8. Strawberry Prosecco Scones
Full of flavour and easy to make, these heart shaped strawberry scones are the perfect way to show mom how much you care.
9. No Bake Mango Pie
This tasty mango pie is a no bake dessert that is full of flavour and will be a hit with any mango lover.
10. Salted Caramel and Chocolate Skillet Cookie
Topped with a salted caramel drizzle, this gooey chocolate chip cookie bake is an easy Mother’s Day dessert for the cookie loving mom.
11. Strawberry Rhubarb Cobbler
The perfect balance of strawberry and rhubarb flavours, this easy to make strawberry rhubarb cobbler is a delicious Mother’s Day treat.
12. Rose Raspberry Fool Cream Puffs
Another quick and easy dessert to make, these rose raspberry cream puffs are an impressive dessert to serve on Mother’s Day.
13. Mandarin Orange Cake
Beautiful and easy to make, this mandarin orange cake is a refreshing dessert that mom is sure to love.
14. Mini Lemon Cheesecakes
A delicious mini lemon cheesecake filling sits on a flavourful gingerbread snap crust and is topped with lemon custard and whipped cream to make this tasty treat.
15. Easy Ricotta Cake
This easy ricotta cake is layered with a moist butter cake and a creamy ricotta filling that is delicious and will make mom smile.
These easy Mother’s Day desserts require little to no effort and range in flavour, so you are sure to find at least one dessert to impress mom with.
Mother’s Day Recipe Ideas
If you are looking for more Mother’s Day recipe ideas, you can try one of these:
After a long winter mostly stuck indoors due to cold weather, why not take up a new spring hobby and go outside bird watching. These spring birding tips for beginners will come in handy and make you want to explore your neighbourhood and local parks in Ottawa.
We hear them before we see them, and even if we know absolutely nothing about birds, we can recognize that there are different bird songs in the air in the spring.
This is the time of the year when everyone’s attention turns to the outdoors, so it’s only natural that we should notice the wildlife too. The important thing about birding in the spring is that it is a migratory time of year, and birds may pass through your area, or nest in your back yard tree for a day or two and then move on. If you would like to know how to start bird watching, read on!
Etiquette Birding Tips
When bird watching in Ottawa, please follow birding etiquette as specified in the Ottawa Field-Naturalists’ Club (OFNC) code of conduct, as well as any rules posted at the sites. If you are looking for a location where birds where sighting, OFNC regularly gathers and shares recent sighting information. They also share a list of the best locations where you can go birding around Ottawa.
What You Need To Buy When Taking Up Birding
If you are planning on seriously taking up birding, you will first of all need to invest in two or three things: a good reference book with pictures, descriptions, and migration routes, and a good set of binoculars. It’s also a good idea to have a camera. A good camera with a zoom lens can be of enormous help in documenting your finds. It can also help with identifying a bird that you don’t recognize. You can get a good picture and classify it later.
Birding doesn’t have to be a scientific study or difficult. Bird watching for beginners should be enjoyable and fun. It’s a collection of sorts, only you check the species off your list instead of catching and collecting them.
Bird Feeders
Right at home, you can put up a couple of DIY bird feeders in your backyard. These should have been up all winter, but if they haven’t, then put them up early in the spring to catch the migratory birds as they make their way through your area. Add a suet feeder. These are wire cages that contain suet, laced often with seeds and dried berries. You can purchase the extra suet blocks at your home and garden store to refill your feeder.
Watch your feeders early in the morning and again, just before sunset. These are normally the peak feeding times.
Parks and reserves are set up in fields, woodlands, marshes, and along rivers and lakes. Of course, there will be a whole new variety of birds to look for in each environment. There are often bird platforms set up for viewing.
Out in the fields and woodlands, tread softly. Don’t make any more noise than you have too. This is definitely not the time to take Fido along for a walk.
Which Food To Bring To Feed Birds
You need to choose the proper and nutritious food when feeding birds. Contrary to belief, it’s best if you don’t feed the birds bread. You can shop at your local specialty stores that carry the best quality food options for the birds. It Ottawa, you can visit these 2 stores: Gilligallou and Wild Birds Unlimited.
What Kinds Of Birds To See In Ottawa
Many birds are found in urban parks, wooded areas, forested areas, backyard feeders, waterfront parks, rural fields, and ponds. You can see these kinds of birds in the Ottawa region:
This relaxing and healthy birding hobby gets you outside and into the fresh air, and it’s ageless. I hope you enjoyed our spring birding tips for beginners! And Remember… You are never too old or too young to enjoy bird watching!
Spring is a season full of vibrancy and it’s when the weather becomes warmer as the winter passes. It is also a perfect time of year to give your home a makeover, and brighten it up a little for summer. There are many ways you can makeover your home for spring with new decorating ideas: you want to think bright, flowery, shades of pastel, and the smell of the outdoors brought inside.
These tips we are mentioning below will also show you how to decorate your house for spring and refresh your home with a new spring look!
1. Clean Your Home
First, you should clean the entire home to make it bright and lively after the winter months. If you have dark drapes, put light ones up instead. Sheer drapes are particularly good for springtime. They provide light into the home, giving it an airy joyful feel.
2. Paint In Pastel Shades
After the walls are washed, you can spruce them up with some pastel shades of paint. You can even add a floral accent chair to bring a touch of the outside in to your home. Shades of pink, light yellow, and pale greens are ideal for the spring season.
3. Make Covers
Make some covers for your couches and chairs to match the drapes, if possible. If you can’t make them, either buy them, or add some springtime features to your existing covers. Flowers, butterflies, bugs, and anything else you can think of will go well with a spring make over.
4. Lighter Feel Rugs
If you have any thick rugs you used over winter, now is the perfect time to clean them and store them away. Go for a lighter feel and look for a spring rug. A cotton material would be ideal for spring.
5. Re-Arrange Furniture
Arrange your furniture so that the seating is pointing towards a window, seeing the outside to the garden is a good idea for spring. Also get rid of all the clutter, give away to charity anything you don’t want or need. Recycle old newspapers and magazines.
6. Add Plants and Flowers
Add some nice green plants and fresh flowers to your home. Sometimes this is all it takes to make over a room. The flowers will also provide a natural air freshener too.
7. Accessories Your Home
Accessorize your home. Small items such as pictures, ornaments, and dried flower arrangements can add a touch of elegance to any room. Clean your shelves and add plants, picture frames, or any other spring related objects you can think of.
8. New Bed Set
Invest in some a new bed set. You can make it if you’re handy at crafts, or buy if you’re not. In addition, you can also do what I suggested with the chair covers and make over some old ones. A canopy made from sheer material over the bed is also an excellent idea for a spring make over.
9. Spice Up The Dining Table
Spice up a dining table by adding a table runner, which has pastel shades. Get some new dinner plates with a floral theme, and put fresh flowers on the table.
10. Add Subdued Lighting
Another good way to do a makeover for spring is to add some subdued lighting. Recessed lighting is ideal, or a dimmer switch where you can set the mood whenever you like.
A makeover for your home is a great idea, but especially good during spring. A good old spring cleaning is what every house needs to give it a little spruce up after the winter. They key to spring make overs is to be bright and bold, while trying to bring outdoor themes indoors.
Heart hot chocolate bombs are my favourite among the ornamental edibles. I loved making my take on Valentine’s Day hot chocolate bombs using silicone heart molds. Now I’m so excited to use those molds again as Mother’s Day rolls around the corner. This recipe is interchangeable as a mid-February Valentine’s day treat, or as a gift to offer for Mother’s Day. There is nothing overtly romantic or sensual that would make interchanging this recipe between the two occasions awkward or embarrassing.
The Best Edible Decor
My favourite thing about hot chocolate bombs, besides how fun they are to melt, is the decorative aspect of them. They make great little details to keep in your kitchen seasonally. I especially like how they can make things more festive as celebrations change from Halloween to Mother’s Day. I think the best thing about these Mother’s Day heart hot chocolate bombs is that they provide an opportunity to reuse molds you got way back in February for Valentine’s Day. It saves money while also giving you more bang for your buck.
Making Your Heart Hot Chocolate Bombs
As with any hot chocolate bomb, heart hot chocolate bombs are made in two phases. The first phase is the craft phase. This is where you get to create the hot chocolate bombs and put them on display in a jar on your counter. Later you get to make the hot chocolate bomb by preparing it to drink. In that way, this is like a recipe and a craft.
Keep that in mind as you read the instructions for how to make these heart hot chocolate bombs, you have the option when making these hearts of taking the extra step to make pink hearts or to even make hearts that are half pink and half chocolate coloured. I like the pop of colour that the pink provides and it makes the gift more presentable.
The piping bag or Ziplock bag is essential to the final look of the Heart Hot Chocolate Bombs as you will drizzle melted chocolate over the hearts to add the finishing decorating touch.
Make the hearts using silicone molds. Each mold makes hearts that you need to adhere to each other. Use caution as you melt the rims of the hemispheres as the plate will be hot.
HOW TO STORE THE HOT COCOA BOMBS
Store your hot cocoa bombs in a plastic container at room temperature for up to 2 months.
3 options: All chocolate, all pink chocolate, or half pink and half chocolate hearts.
HOT CHOCOLATE BOMB SHELL INGREDIENTS
1 bag of white chocolate chips and more for decoration
1 bag of chocolate chips and more for decoration
Pink food colouring
Sprinkles for decorations
HOT COCOA FILLING
Mini marshmallows
8 tbs hot chocolate mix
OTHER INGREDIENTS NEEDED (FOR 1 HOT CHOCOLATE BOMB)
1 cup of hot milk (you can also use coconut milk or almond milk)
Whipped cream for topping (optional)
Sprinkles or chocolate chips for decorations (optional)
EQUIPMENT NEEDED
2 Microwavable bowls
2 Silicone heart hot chocolate bomb molds (I got mine on Amazon)
Ziplock bag or pastry bag with a small start tip
How To Make The Hot Chocolate Hearts
Place the bag of chocolate chips in a microwavable safe bowl in microwave in 30 second intervals until melted. Repeat the same for the white chocolate chips.
Pour 1 tbsp of chocolate into each chocolate mold. Use a spoon to swirl the chocolate around and coat the edges. Make sure to spoon the chocolate up the sides until it makes a thicker shell. Put the chocolate mold in the fridge for about 15-30 minutes or until it’s set. When the chocolate is set, remove from the refrigerator and gently pop them out of the mold. You should have 16 spheres.
Heat a plate in the microwave for 30 seconds and be careful as the plate might be hot. Carefully take the open side of the sphere and place it onto the plate to melt off the uneven edges to create a smooth edging.
Spoon 1 tbsp of the hot cocoa mix in 8 of the chocolate sphere and add marshmallows on top. Connect 1 empty half chocolate bomb to 1 half that is full of the mixture and seal together. As the melted chocolate hardens, it will seal.
Heat up the left over chocolate in the microwave for 30 seconds intervals until it’s soft again. Pour it in a Ziplock bag and cut a tiny piece at one of the ends or use a pasty bag with a tip. Drizzle the melted chocolate over top of the hot cocoa bomb and allow to dry. You can also use a spoon to drizzle instead of a bag.
HOW TO SERVE THE HEART HOT COCOA BOMBS
Heat the milk pot on the stove top or in a mug or clear glass for about 2 minutes in the microwave. Add 1 hot chocolate bomb and stir until smooth. Top hot chocolate with whipped cream. You can also add sprinkles, chocolate chips or drizzle more melted chocolate over the whipped cream.
I hope you enjoyed my Heart Hot Chocolate Bombs Recipe as much as I did! If you make it, please share your photos with us on Facebook or Twitter! Also, check out all of our other recipes!
Heart Hot Chocolate Bombs Recipe
Lyne Proulx
Heart hot chocolate bombs recipe is interchangeable as a mid-February Valentine's day treat, or as a gift to offer for Mother's Day. I love using silicone heart molds for special occasions.
2 Silicone heart hot chocolate bomb molds (I got mine on Amazon)
Ziplock bag or pastry bag with a small start tip
Ingredients
HOT CHOCOLATE BOMB SHELL INGREDIENTS
300gramswhite chocolate chips 1 bag of white chocolate chips and more for decoration
300 gramsSemi-Sweet chocolate chips 1 bag of chocolate chips and more for decoration
Pink food colouring
Sprinkles for decorations
HOT COCOA FILLING
1 cupMini marshmallows
8tbshot chocolate mix
OTHER INGREDIENTS NEEDED FOR 1 HOT CHOCOLATE BOMB
1cuphot milkyou can also use coconut milk or almond milk
Whipped cream for toppingoptional
Sprinkles or chocolate chips for decorationsoptional
Instructions
HOW TO MAKE THE HOT CHOCOLATE HEARTS
Place the bag of chocolate chips in a microwavable safe bowl in microwave in 30 second intervals until melted. Repeat the same for the white chocolate chips.
Pour 1 tbsp of melted chocolate into each chocolate mold. Use a spoon to swirl the chocolate around and coat the edges. Make sure to spoon the chocolate up the sides until it makes a thicker shell. Add more melted chocolate if needed.
Put the chocolate mold in the fridge for about 15-30 minutes or until it’s set.
When the chocolate is set, remove from the refrigerator and gently pop them out of the mold. You should have 16 spheres.
Heat a plate in the microwave for 30 seconds, and be careful as the plate might be hot.
Carefully take the open side of the sphere and place it onto the plate to melt off the uneven edges to create a smooth edging.
Spoon 1 tbsp of the hot cocoa mix in 8 of the chocolate sphere and add marshmallows on top.
Connect 1 empty half chocolate bomb to 1 half that is full of the mixture and seal together. As the melted chocolate hardens, it will seal.
Heat up the left over chocolate in the microwave for 30 seconds intervals until it’s soft again. Pour it in a Ziplock bag and cut a tiny piece at one of the ends or use a pasty bag with a tip. Drizzle the melted chocolate over top of the hot cocoa bomb and allow to dry. You can also use a spoon to drizzle instead of a bag.
HOW TO SERVE THE HEART HOT COCOA BOMBS
Heat the milk pot on the stove top or in a mug or clear glass for about 2 minutes in the microwave.
Add 1 hot chocolate bomb and stir until smooth.
Top hot chocolate with whipped cream.
You can also add sprinkles, chocolate chips or drizzle more melted chocolate over the whipped cream.
Notes
You have the option when making these hearts of taking the extra step to make pink hearts or to even make hearts that are half pink and half chocolate coloured. I like the pop of colour that the pink provides and it makes the gift more presentable.
2. HOW TO STORE THE HOT COCOA BOMBSStore your hot cocoa bombs in a plastic container at room temperature for up to 2 months.
Keyword heart hot chocolate bombs, Heart Hot Chocolate Bombs for Mother’s Day, Heart Hot Chocolate bombs for Valentine’s Day, heart hot cocoa bombs, Hot chocolate, Hot chocolate bombs
Lemon-flavoured foods like this zippy and bright lemon drop bundt cake are a seasonal favourite of mine. I love that burst of flavour and the spongy texture of cake that springs back when you press it.
Deep Eddy Lemon Icing for Lemon drop Bundt Cake
The thing I love most about this lemon bundt cake recipe is what makes it so unique among other assorted lemon-flavoured treats. It’s the icing made with Deep Eddy Lemon flavoured vodka. Vodka is often the best choice when it comes to adding some alcohol and flavouring to your favourite dishes. Put a little bit of extra kick into a cocktail, or add some punch to a delicious dessert. By making my Lemon Bundt cake with Deep Eddy Lemon vodka infused icing, I create a flavour that reminds me of a candy-like lemon drop martini. It’s just the right thing to turn this springtime cake into an extra special treat.
Lemon bundt cake recipe with glaze
This lemon drop bundt cake is the best-tasting lemon bundt cake there is, with or without the Deep Eddy Lemon icing. Make sure you use all-purpose flour and not cake flour for the perfect consistency. With real lemon juice and zest, coupled with the flavouring of Deep Eddy Lemon vodka, the lemon is going to absolutely saturate this incredible cake and you are going to love it. Just remember to leave your eggs out and let them come down to room temperature before you begin.
Recipe for lemon bundt cake
Prep Time: 10 min
Cook Time: 50 min
Yield: 8 people
Bundt Cake INGREDIENTS
1 1/2 cups all purpose flour
1/4 tsp. baking soda
1/2 tsp. baking powder
1/4 tsp. salt
1/2 cup butter softened
1 cup granulated sugar
3 eggs, room temp
1 tsp. vanilla
1 tbsp. Lemon juice
Zest from one lemon
1/3 cup sour cream
Lemon Glaze Ingredients
1 1/2 cups powdered sugar
1 Tbsp. lemon juice
3 Tbsp. Deep Eddy Lemon Flavoured Vodka
Equipment Needed
Bundt pan
Medium bowl
Small Bowl
Stand mixer
How To Make Lemon Bundt Cake
Preheat the oven to 350 degrees. Spray a bundt pan with non-stick baking spray.
In a medium sized bowl add the flour, baking soda, baking powder, and salt. Sift to combine.
In a bowl of a stand mixer, add the butter and sugar, and beat until creamy 1-2 minutes. Add in the eggs, vanilla, lemon juice, zest, and sour cream to the butter mixture and mix until combined. Add in the flour and mix until fully incorporated. Pour the batter evenly into your bundt pan.
Bake for 45-50 minutes or until golden brown. Remove from the oven and let cool.
Glaze for lemon bundt cake
In a small bowl add the powdered sugar, lemon juice, and liquor. Mix until combined.
Remove the bundt cake from the pan and place on a baking pan. Pour the glaze evenly onto the bundt cake.
Lemon Drop Bundt Cake Recipe
Lyne Proulx
This lemon drop bundt cake is the best tasting lemon bundt cake there is, with or without the Deep Eddy Lemon icing (but definitely with).
Preheat the oven to 350 degrees. Spray a bundt pan with non-stick baking spray.
In a medium sized bowl add the flour, baking soda, baking powder, and salt. Sift to combine.
In a bowl of a stand mixer, add the butter and sugar, and beat until creamy 1-2 minutes. Add in the eggs, vanilla, lemon juice, zest, and sour cream to the butter mixture and mix until combined. Add in the flour and mix until fully incorporated. Pour the batter evenly into your bundt pan.
Bake for 45-50 minutes or until golden brown. Remove from the oven and let cool.
HOW TO MAKE THE LEMON GLAZE
In a small bowl add the powdered sugar, lemon juice, and liquor. Mix until combined.
Remove the bundt cake from the pan and place on a baking pan. Pour the glaze evenly onto the bundt cake.
Lemon means freshness and so does spring. Maybe that’s why lemon is everywhere in the springtime, but I don’t want to look too far into it because I’m afraid it will suddenly go away. Nothing says springtime to me like an iced lemon bundt cake and I am so excited for the arrival of this vibrant time of year.
I hope you enjoyed this Lemon Drop Bundt Cake Recipe with Deep Eddy Lemon Flavoured Vodka. If you make it, make sure to share with us on Facebook or Twitter! Also, check out all of our other Recipes.
These 10 food choking hazards for babies and small children will help you be aware of the foods that are not ideal to feed young children. We also included food choking prevention tips and child safe feeding techniques to help avoid choking incidents.
Watching a small child choke is a terrifying experience. While all parents and caregivers should be trained in how to dislodge an item from a baby or small child’s windpipe, even a correctly-administered Heimlich maneuver does not always work. The best way to avoid a choking accident is to monitor a child’s food and behaviour at the table.
What is a choking hazard
A choking hazard is any object or piece of food that could be caught in a baby or toddler’s throat blocking their airway and making it impossible or difficult to breathe.
Foods to Avoid for Babies and Small Children
Children of four years and under are at risk from food choking hazards. It is common sense to remain with your child whenever they are eating. An unsupervised child can choke on foods that you may never have considered to be a risk. These are some of the most common choking hazards associated with babies, toddlers, and young children and food.
There are also a number of high risk choking foods that should be avoided when babies and small children are learning to eat, including hard foods, hard-to-chew foods, and globs of food.
The following is a list of top choking foods for babies and small children. Many of these foods, including candy, chips and hot dogs, have poor nutritional value anyway, and should be avoided.
1. Nuts
Most of us know that young children should not be given nuts, even peanuts. Nuts can cause allergies in children, but they also pose a choking hazard. The current recommended practice by the Canadian Paediatric Society is to safely introduce allergenic foods like peanuts or peanut butter between four and six month of age. Nuts can also easily become lodged in a child’s throat and block their airway.
2. Peanut butter
This is separate from nuts for one reason. Although peanut butter runs the risk of allergic reaction, it is also thick and cloying in texture. Peanut butter can get stuck in a child’s throat which causes clogging and blocked airways. Even small spoonfuls of peanut butter can be difficult for a child to swallow.
Food Choking Prevention Tips:
Spread peanut butter thinly across bread, and avoid letting toddlers eat it off the spoon.
Sticking to chunky peanut butter (as opposed to smooth) and whole wheat bread (as opposed to white) also helps avoid creating a molten mass of goo in a toddler’s mouth.
3. Small, round, or slippery foods
Because these foods don’t require much, if any, chewing, they are frequently swallowed whole. This can lead to the food lodging in the narrow parts of a child’s throat and blocking the airway. Foods that fall into this category include:
Whole olives
Grapes
Raisins and similar dried, small fruits
Small, soft fruits like cherries and blueberries
Seeds – Always ensure fruits are de-seeded and avoid giving your child seeds such as sunflower seeds.
Popcorn – Can be difficult to swallow and may also contain unpopped kernels that can cause a choking hazard
Hard candy – Small, hard sweets are not suitable for young children. Avoid them.
Food Choking Prevention Tips:
Cut whole olives or grapes into quarters for beginners and halves for more experienced toddlers. For very inexperienced eaters, peel the grape as well.
For Cherries, remove the pit and cut the cherry in halves or quarters.
Popcorn and chips have sharp edges and hard kernels can quickly lodge in a child’s throat.
Make sure to cut raisins in half until children are old enough to handle them whole.
Watch out for lollipops as well. Once the candy has been gnawed off the stick, a lollipop is as dangerous as any other hard candy.
4. Foods that are pliable
Pliable foods can mold themselves to the shape of a child’s throat and lodge there. Pliable foods might include:
Banana
Sausages
Hot dogs
Food Choking Prevention Tips:
Discs of cut up hot dogs are the perfect size to lodge in a child’s esophagus. Cut each disc in quarters or halves. Long, thin strips work well, too.
Never let a small child bite off of a whole hot dog.
5. Dry foods
Think about eating a dry, papery cracker or potato chips. Now imagine being a small child trying to cope with dry, papery foods that are hard to swallow. Foods that fall into this category include:
Potato chips
Pretzels
Crackers
Tortilla chips
Fruits and vegetables with tough, dry skins – For example, apples and carrots.
Food Choking Prevention Tips:
For raw apples, carrots and other hard fruits and vegetables, cut apples into pieces too small to block a child’s windpipe, or cook and puree them. Grate raw carrots or cook them first and cut into small, soft chunks. It’s best to cut all fruits and vegetables into strips rather than rounded pieces.
For hard cereal, don’t start out with the whole Cheerio – cut it in half for beginners. As the baby begins to master eating, parents can give a whole “o”.
6. Stringy foods
Another potential food choking hazard are celery and beans with strings, spaghetti, noodles, and any food that is long and thin.
7. Chewy and sticky foods
Avoid caramels, gummy type sweets and be careful when giving processed cheese, especially the sliced variety. Don’t offer cheese in the form of cubes as this can lodge in the throat, similar to the advice about rounded foods.
Food Choking Prevention Tips:
Don’t order double cheese on a toddler’s pizza. A wad of mozzarella cheese is difficult for a small child to chew and swallow.
Remove any stringy cheese from pasta dishes as well.
8. Food that is hard to chew
Avoid meat chunks, especially steak and similar tough meats. If a child can’t chew it, they will probably try to swallow it whole. This is an extremely common example of a regular choking hazard.
Food Choking Prevention Tips:
Stringy meats like steak are even a choking hazard for adults.
Puree meats or cut them into tiny, tiny bits.
Avoid fatty bits of meat.
9. Fish bones
A common sense item perhaps, but always check the fish you give to your children. Even in filleted fish, bones get missed.
Food Choking Prevention Tips:
Check the fish yourself to ensure there is no potential food choking hazard.
10. Bread
Bread can be surprisingly difficult for children to swallow. Most children enjoy bread, especially in easy-to-handle and eat sandwich form. Consider what bread you are offering. Some breads can be very rubbery and almost similar to the clogging effect of cheese, if swallowed in larger amounts and quickly.
Food Choking Prevention Tips:
A piece of bread appears safe, but a large glob of sticky, chewed up white bread is just as dangerous as a hard candy.
Choose whole wheat and whole grain breads to minimize the stickiness and monitor children well.
Encourage your child to chew bread well and offer plenty of fluids to help wash it down with.
Safe Feeding Techniques For Babies and Toddlers
Besides the actual foods offered to babies, there are some best practices to help avoid choking accidents. Monitor small children at all times while they are eating. It is dangerous to let a one-year-old eat his breakfast alone while mom is in the bathroom brushing her teeth, even if she’s only gone for a few minutes.
Seated Properly
Make sure toddlers are seated in an appropriate place while eating. A child running around with her snack can easily fall, causing her to inhale unexpectedly and aspirate her food causing a food choking hazard. A child who is eating while lying down is also in danger of inhaling food.
Safe Car Snacks
Choose safe car snacks for toddlers. It’s too difficult to properly monitor a snacking toddler while driving. Melt-in-the-mouth rice crackers may be appropriate for a toddler, but cookies that break into large chunks are not. Also, take special care for older babies in back-facing car seats. It may be a better idea to stop and feed a ten-month-old if he really needs to eat, or give him a drink instead.
Follow baby’s lead
As with other skills, babies and toddlers master eating at different times. Some one-year-olds may do great with raisins, but some aren’t quite ready. Be aware of the child’s level of feeding mastery, and take extra care when providing care to someone else’s child.
Eating, like potty-training, talking and other milestones, is a learned skill. Help keep it fun and safe, and babies and toddlers will learn to enjoy learning to eat properly in their own time.
These food safety tips for infants and toddlers is excellent advice for all children. Encouraging slow, careful eating and chewing is a good way to prevent a lot of food choking hazards. If your child should present with choking, know what to do.
Anyone can make beautiful homemade spring wreaths and decorations for the home using straw, twigs, or florists’ oasis, some foliage, flowers, and small figures of birds, rabbits, fairies, etc. to add additional seasonal interest. Spring is an ideal time to chase away the winter blues and welcome the warmer weather using the colours of early blossoms to create some interesting wreaths.
Ideas for Homemade Spring Wreaths
Wreaths can be used throughout the year to create beautiful and seasonal decorations for doors, mantle pieces, and tables. Add extra interest with small figurines.
Bird’s Nest Wreath
Create a haven for a wooden, porcelain, or pottery bird by making a bird’s nest wreath with plenty of greenery, and some branches.
Cover a straw or twig wreath with plenty of green leaves, such as ivy or another evergreen leaf like bay laurel.
Add some flowers – fresh silk or good quality plastic flowers of apple, pear, apricot or quince blossoms.
In the bow of the wreath, attach the small birds’ nest so it’s sheltered by the foliage and the birds are peering out through the blossoms.
Easter Wreath
Make an easy Easter themed wreath for a front door decoration:
By covering a straw wreath with some light bright green foliage or moss.
Add plenty of bright cheerful coloured early spring flowers such as tulips, daffodils, narcissus, and forsythia.
In the bow of the wreath, set a small rabbit of plastic, pottery, wood, or porcelain, complete with a bag of eggs.
Fairy Wreath
Try making this beautiful delicate DIY spring wreath – it’s ideal for sun rooms or protected garden areas.
Take a straw wreath, and use delicate green and brown moss to cover the wreath. Tease out the moss and foliage to create a cloud like effect.
Use flowers with tiny blossoms such as white baby’s breath, or the blue forget-me-nots to make colour accents.
Place a small fairy figure in the bow of the wreath.
Finish with some dainty lily of the valley blossoms over the fairy’s head.
If using real flowers, replace them when they have faded. Or use artificial flowers, and add some drops of essential oil to perfume the wreath.
Flowers and Coloured Twig Wreath
This DIY spring twig wreath makes a dramatic statement on a front door or as a table decoration. If the wreath is going to lie flat on a table, candles of a complementary or contrasting colour can also be added.
Use long coloured twigs or canes – red, white or yellow – a metre or so long, depending on the size of the table or door.
Bundle the canes loosely together in the centre, and tie, then spread the top and bottom out in a fan formation.
Use plasticine or crumpled paper to keep the canes in place. Then in the centre, completely covering the centre tie, make a circle of flowers of choice – bright and bold is the idea here.
Pussy Willow Wreath
This is one of the easiest spring wreaths to make, as it uses just pussy willow twigs and slender branches. The Salix caprea is recognised in March and April when the lovely silky smooth grey/white catkins appear, later exploding with yellow dusty flowers.
To make this spring wreath:
A straw or oasis wreath is required, as well as plenty of twigs of the willow, with the catkins just appearing.
Weave the twigs through the wreath until it’s completely covered.
The wreath will be subtle greys, whites and light greens.
If extra colour is required, just add some fronds of brightly yellow flowering forsythia or a brightly coloured ribbon.
12 DIY Spring Wreaths For The Home
These are homemade and easy spring wreath craft ideas for you to make for your home decor.
Providing your children with nutritious meals is an instinct for most parents. A parent’s daily concern is to ensure that they consume fruit, vegetables and other nutrients properly. However, how often do we consider the cookware and kitchen tools with which we make our children’s meals? And the materials used to make their plates, bowls, and sippy cups?
By purchasing easy-to-clean plastic products, we’re subjecting children to potentially harmful materials in the kitchen. When warmed, either from food, the microwave or when washed, many plastics, such as melamine, can feasibly omit toxic chemicals.
Perhaps, you’ve heard about BPA-free plastic products — the plastics made without bisphenol A, which is an industrial chemical found in polycarbonate plastics. Research shows that cooking or dining products made with BPA can infect food or drink. Certainly, there’s a great deal of concern about how it effects children. BPA exposure in babies and children can cause depression, impact hormonal development including the thyroid, and can cause an increased risk of cancer in later life.
While plastics are not easy to evade when buying kitchen equipment or dining utensils for kids, there’re some materials which are better than others.
Here’s a list of substitute materials that you can use to cook for and serve your kids in safe hands:
Eco-friendly Bamboo
These plates and cups resemble plastic, especially when they come in bright colours but are actually made from bamboo fibres. Anti-microbial and anti-bacterial, bamboo is biodegradable and recyclable, and at the same time, it doesn’t absorb any smells or moisture. Also, it’s stronger than oak! Products made of bamboo can be thrown around by clumsy kids — without harming to the spoons, your floor, or your child!
The one downside is the short lifespan. When put in the dishwasher machine, bamboo with wear down quicker than washed by hand so it’s only usable for a year or so. It’s not suitable for the microwave as the heat can break down the material’s binding resin, as well.
Cooking stuffs made from bamboo are safe and organic to use. Be careful to choose the products which don’t add melamine as a necessary concern, however.
100% Food-grade Silicone
Silicone utensils took off a few years ago on account of their durability. As it’s light-weight, bendable and impossible to break, everyone had to have the latest silicone baking set and flexible spatula, all in a range of different colours. Since food-grade silicone is hypoallergenic, easy to clean and hygienic, it’s a safe to use and fun inclusion in the catering market — especially because the babies love the eye-catching colours. Moreover, many plates and trays come with suction pads making the utensils impossible for your babies to throw around!
Not only it’s suitable for your babies to eat off, but you can also cook with silicone utensils; they’re safe at high temperatures, meaning the products can be used in the microwave. They’re also dishwasher-safe, non-porous, and don’t retain food odours and colours. The soft material prevents scratching your pans and the flexible cupcake trays make baking with your children easier.
Wood With Non-toxic Varnish
As durable and strong, wood is a cheap go-to material for most of our kitchen tools. It has been our favourite kitchen product throughout centuries of cookery as it’s natural, biodegradable and soft to use in pans. That isn’t to say it is perfect, as well. While wood doesn’t release chemicals, it has porous structure — or means odours are often absorbed, and it can easily stain. Wood products soaks up water and should not be washed in the dishwasher because they can become water-logged or crack in the intense heat. Additionally, wood splinters and shards can break off.
For food safety, recommended woods for culinary duties are olive, teak and maple. These’re dense and sturdy — less possible to crack, splinter or absorb water. To maintain them, using a food-grade mineral oil for preventing liquid absorption that can preserve their lifetime.
For this reason, wood utensils and eating equipment are an eco-friendly alternative to silicone. They’re biodegrade when your children are ready for adult-sized utensils, too.
Stainless-steel
Stainless-steel is a fusion of various metals melted down to create a durable, easy to clean, and corrosion resistant material. It’s impervious to absorbing odours and stains and low maintenance as requiring little care.
While stainless-steel products are unusual, we have learned that they’re much safer than plastics and are increasingly available on the market these days. For example, stainless-steel baby bottles, which include silicone sleeves for easier grip in little hands, are both lightweight and dishwasher-safe for convenient cleaning. As this metal is durable, they can drop it on the floor without causing damage. Absolutely, the only downside is that: stainless-steel foodstuffs can’t be microwaved!
As known, stainless-steel is an incredibly popular material for cooking utensils So, you can have a peace of mind that saucepans and frying pans, cooking gadgets, utensils and cutlery for older children to hold are all suitable and safe. Yet, for another level of protection, ensure to use no-metal tools, like wooden or plastic, with multi-ply clad stainless-steel pots and pans — deep scratches can expose the aluminum or cooper core of the pans and can possibly leach into food.
I hope that this list is helpful and reassuring for concerned parents. Nowadays, there’re many companies that only want to provide the safest options for our children — not only these products are healthier alternatives to the traditional chemical-leaching plastics, they’re superior replacements, in many ways.
The eco-friendly character of bamboo and wood-based utensils are reliable upgrader — Say, though your children grow up and their interests change, you won’t be stuck with piles of poisonous plastic. Stainless-steel stuffs have a long lifetime that are helpful to save money in the long run because you can further adapt your baby’s sippy bottle into a drink holder for a confident young lady or man! Food-grade silicone can also give your children their own first taste of cookery as grippy bases and silicone handles make the experience easier and more enjoyable for them.
So, let’s explore these safe and fantastic options!
Cleaning the yard always goes better if you have an actual list to follow, and incorporate the labor of family into the project. In this way, everyone pitches in to get the work done faster, and a sense of ownership of the yard is spread evenly throughout the family. You will find below tips for cleaning the yard in the spring and fall seasons.
How To Clean The Yard In The Spring
After a winter spent mostly indoors with the family fighting off the effect of cabin fever, the thoughts of attacking the tasks on a spring cleaning checklist can seem like a trip to the Bahamas. The importance of spring cleaning as applied to the yard is usually forgotten until the weeds begin to sprout and the neighbours begin to point at your property as they pass by, usually giggling like small children.
A proper spring cleaning for your yard should not only encompass the yard itself, but include the exterior of the home and any other aspect of exterior “grooming” that can make your yard appear as a location that tells the world that a caring individual owns it.
Lawn And Plant Beds
Yard spring cleaning should begin with making certain that the lawn and plant beds are cared for in a fashion that will enable excellent growth. Spring is an excellent time to aerate, seed, and lightly fertilize the lawn, and is also a great time to transplant greenery before it has a chance to return to life and take hold in its present location.
Flower and plant beds need fertilized as well, and spring is the appropriate time to plant after any threat of frost has subsided. The yard should be cleaned up by removing any leaves or tree branches that have fallen over the winter, and shrubs that may have become misshapen due to the weight of snow can be trimmed or tied in a more aesthetically pleasing manner.
Cleaning The Exterior Of The Home, Lawn Furniture, Driveway, And Ornaments
Spring cleaning your yard should include cleaning the exterior of the home using backyard cleaning tools such as a power washer or garden hose, and windows and gutters should be cleaned. Driveways should either be washed if they are concrete or weeded is they are made of gravel. Garden and lawn furniture and ornaments fit in this category also, as they often need a good cleaning after a harsh winter. Any surfaces that require a fresh coat of paint should be addressed on a warm and sunny spring day also.
Spring Cleaning Gardening Equipment
Spring cleaning for the yard should also apply to gardening equipment, by examining each piece to ensure that it is either operating properly or can be repaired and restored to it’s former glory. A great way to do this is to actually test each gardening tool, and jettison each one that is worn beyond repair.
Cleaning The Yard In The Fall
As the year starts to wind down, it is time to start fall clean up in your yard. How much work will be requires is determined to a large extent by where you live, the size of your yard and the amount of landscaping you have.
The obvious way to make fall clean up easy is to hire a yard cleaning services to do it for you. In these tough economic times, there are many people looking for work. If you can afford to do it, you can sit back and feel good about giving someone a job while having your fall yard cleanup done for you. If this is not possible, then it is time to recruit your family.
Here are a few tips to make the fall cleanup in your yard as easy as possible.
Inventory Of The Yard
Begin by doing an inventory of the yard. Are there items that need to be stored away for the coming winter? These items need to be moved to the basement, a shed, or garage. Be sure to remove any water and to remove any dirt before storing away.
Flowers
Look for dead annuals. It is time to get them out of the ground and throw the remains away. Any perennials can be cut back and prepared for the hibernation that takes place over the winter. Look for broken or damaged limbs and remove, better to take them down now than to have them fall over the winter. This is the time for pruning as well if you have roses in your yard.
Removing Leaves
The biggest task that must be dealt with in the yard every fall are the leaves that fall from the trees. While this shedding of leaves does not happen everywhere, it happens in enough areas to be something that is dreaded. There are several ways to attack removing leaves, which is the easier is debatable. Leaves do not fall all at once, they trickle down a few at a time until there is some sort of major rain or wind storm.
Some people prefer to rake and bag the leaves as they fall and others prefer to wait until the inevitable storm when all the leaves will finally come down to deal with the issue. The main thing that is important is to rake or blow the leaves when they are dry. This makes them much lighter and easier to deal with. Wet leaves stick to the ground, bushes, and to tree trunks making their removal difficult.
Fall cleanup is something that anyone with a yard has to deal with. It doesn’t have to be a hard job if you follow these few tips for getting the job done.
Designate a weekend for easy yard clean up and make it a fun time with the entire family. Have plenty of gloves, rakes, a leaf blower, a wheel barrow, and leaf bags. Give out assignments, as this is the best way to be efficient. Allowing children or teens to decide what they would like to do is most likely not going to result in much work getting done. Have realistic expectations and you can also offer a reward for assignments completed.
Keto broccoli cheddar soup tastes so good, you’ll want to add it to your weekly rotation!
Cheese, Heavy Cream, and Butter make this an ideal bowl of soup for Keto and it’s extra tasty, too. The broccoli gives it that dose of healthy greens while keeping carb counts low. That’s what it’s all about, right? There is nothing quite like the delicious combination of broccoli and cheddar. They are an under-appreciated flavour combo. The cheese makes the broccoli edible to even the pickiest eater and the broccoli adds some freshness and a little bit of crunch to the creamy mixture.
Stack the Flavors
The secret to this amazing Keto broccoli cheddar soup is building it up right. Like many of the best-tasting soups, it all starts with a saute. In this case, get some minced garlic and butter in a pan and let it spread its goodness as it cooks on medium heat for a hot minute. Then start adding the liquids that will reduce into the most amazing base for a tastier low carb broccoli cheddar soup than you could even imagine. I prefer to use chicken broth. There are other options, but chicken is the most Keto-friendly. Make sure you read the labels of any broth or stock you use. When you add the broccoli you can use frozen broccoli florets, but fresh broccoli will give you the best crunch and the heartiest texture.
Smooth or Chunky?
There are two great ways to enjoy this low-carb cheddar broccoli soup recipe and I include both here. It all depends on your preference. Lovers of smoother consistencies will enjoy the pureed version, while fans of chunkier soups will enjoy my original version. Which type are you? Leave a comment to let me know where you stand. If you find that the keto broccoli cheddar soup is runny (that can especially happen when you use frozen broccoli), you can try letting it reduce a little longer on the stove, or use xanthan gum to help thicken it up.
Issues With Clumping
If you are having issues with clumping during the cheese melting process in the Keto broccoli cheddar soup, you might want to try these tips!
Heat should be low when adding the cheese. If it’s too hot, the cheese can seize and clump.
Add only 1/2 cup of cheese at a time. If you dump it all at once, it will clump.
Stir all the time as you are adding the cheese.
The broccoli florets should be small. You don’t want the cheese to stick to larger pieces. You can use a food processor to make them smaller.
Grate a block of cheese or use pre-shredded cheese. Pre-grated cheese in a bag might be more resistant to melting and won’t incorporate as well. If this happens, you can puree the broccoli soup.
Puree the soup. If you are still having issues with clumping, simply put the broccoli cheddar soup in a blender at low speed.
FROZEN OR FRESH BROCCOLI
You can use fresh or frozen broccoli. The frozen broccoli might cook a little quicker once it thaws in the soup. When the fresh or frozen broccoli is soft and tender, it will be done simmering.
HOW TO MAKE THE BROCCOLI CHEDDAR SOUP THICKER
If you want to make this low carb soup thicker, you can try to:
Add more cheese. You can add more cheese and this will help to make the broccoli and cheddar soup thicker. It still might not be as thick as using a thickener.
Puree it. Puree the whole soup into a blender and it will get thicker from the broccoli. It still might not be as thick as using a thickener.
Add a low carb thickener. I use Xanthan gum as I like my soup to be really thick. Whisk a bit of the thickener with some water, then whisk the mixture into the soup. If you want the soup even more thicker, repeat the step above.
HOW TO CUSTOMIZE THE BROCCOLI CHEDDAR SOUP
This soup is is easy to customize by simply adding:
More veggies like onions, cauliflower, or bell peppers.
Cooked bacon bits.
Your favourite spices (the soup is salty enough with the broth and cheese, so avoid adding more spices with salt).
Shredded meat like chicken.
HOW TO STORE THE BROCCOLI CHEDDAR SOUP?
Refrigerator: You can store this healthy and gluten-free broccoli cheddar soup in a plastic container in the refrigerator for 5 days.
Freezer: First, cool the soup to room temperature, then freeze in a plastic or glass freezer safe container. When ready to eat, thaw it in the fridge completely, then cook it over low heat, stirring frequently to prevent curdling.
Keto Broccoli Cheddar Soup Recipe
Ingredients
1 tsp of butter
4 cloves garlic (minced)
3 cups broccoli (cut into small florets or use a food processor to chop in smaller pieces)
3 1/4 cups chicken broth (vegetable broth, or bone broth)
1 1/4 cup Heavy cream
3 cups cheddar cheese grated (white or yellow or both) (if you like strong cheese, you can use extra-sharp cheddar cheese) and reserve a small amount for garnishing bowls.
1/4 tsp of xanthan gum (optional – to thicken the soup)
How To Make The Keto Broccoli Cheddar Soup
In a large pot over medium heat, sauté garlic with butter for one minute.
Add the chopped broccoli, chicken broth, and heavy cream. Increase heat to bring to a boil and stir occasionally, then reduce heat and simmer for about 20 minutes, or until broccoli is tender.
At very low heat, add the shredded cheddar cheese gradually (1/2 cup at a time), stirring constantly, and continue to stir until melted. Remove from heat once all the cheese has melted.
Serve hot
If you prefer to puree the soup Or need to because of clumping
In a large pot over medium heat, sauté garlic with butter for one minute.
Add the chopped broccoli, chicken broth, and heavy cream. Increase heat to bring to a boil and stir occasionally, then reduce heat and simmer for 20 minutes, until broccoli is tender.
At very low heat, add the shredded cheddar cheese 1/2 cup at a time, stirring constantly, and continue to stir until melted.
Remove from heat.
Add the soup to a blender or use a hand blender and puree.
Serve hot
RECIPE NOTES
If you find the soup to be liquidy, whisk the thickener with some water, then whisk the mixture into the soup. Stir until the soup thickens. If you want the soup even more thicker, repeat the step above.
You can use fresh or frozen broccoli. The frozen broccoli might cook a little quicker once it thaws in the soup. Simmer until the fresh or frozen broccoli is soft and tender.
I hope you enjoyed this Keto Broccoli Cheddar Soup Recipe. If you make it, make sure to share with us on Facebook or Twitter! Also, check out all of our other Recipes.
Broccoli Cheddar Soup – Keto and Low-Carb Recipe
Lyne Proulx
With cheese, Heavy Cream and Butter, this Keto broccoli cheddar soup tastes so good, you'll want to add it to your weekly rotation.
3cupsbroccolicut into small florets or use a food processor to chop in smaller pieces
3 1/4cupschicken brothvegetable broth, or bone broth
1 1/4cupHeavy cream
3cupscheddar cheese gratedwhite or yellow or both (if you like strong cheese, you can use extra-sharp cheddar cheese) and reserve a small amount for garnishing bowls.
1/4tspof xanthan gumoptional – to thicken the soup
Instructions
In a large pot over medium heat, sauté garlic with butter for one minute.
Add the chopped broccoli, chicken broth, and heavy cream. Increase heat to bring to a boil and stir occasionally, then reduce heat and simmer for about 20 minutes, or until broccoli is tender.
At very low heat, add the shredded cheddar cheese gradually (1/2 cup at a time), stirring constantly, and continue to stir until melted. Remove from heat once all the cheese has melted.
Serve hot
IF YOU PREFER TO PUREE THE SOUP OR NEED TO BECAUSE OF CLUMPING
In a large pot over medium heat, sauté garlic with butter for one minute.
Add the chopped broccoli, chicken broth, and heavy cream. Increase heat to bring to a boil and stir occasionally, then reduce heat and simmer for 20 minutes, until broccoli is tender.
At very low heat, add the shredded cheddar cheese 1/2 cup at a time, stirring constantly, and continue to stir until melted.
Remove from heat.
Add the soup to a blender and puree.
Serve hot
Notes
If you find the soup to be liquidy, whisk the thickener with some water, then whisk the mixture into the soup. Stir until the soup thickens. If you want the soup even more thicker, repeat the step above.
You can use fresh or frozen broccoli. The frozen broccoli might cook a little quicker once it thaws in the soup. Simmer until the fresh or frozen broccoli is soft and tender.
If you suffer from incontinence, you may be familiar with the embarrassment of an unexpected accident.
Although urinary incontinence (UI) can feel isolating, it’s a fairly common condition. Approximately one third of older men, and half of all women, will experience bladder leakage problems in their lifetime. It tends to be more common in women, due to the stresses of pregnancy, childbirth, and menopause on the urinary tract and pelvic floor muscles, and can be an unwelcome surprise to many women post-pregnancy.
Luckily, there are ways that can help you to manage your UI symptoms and live your life confidently.
Speak to a medical professional
The prospect of seeking help for UI can be stressful—so much so that in a recent study of incontinent adults, 67% of women did not seek medical care for their symptoms.
It’s important to discuss your UI symptoms with a doctor, as they may help you to understand which type of UI you might have, and discuss treatment options to help you manage the condition; these may include things such as Kegel exercises, which have allegedly shown improvement in UI symptoms for middle-aged women.
The following are the five main types of incontinence to be aware of:
Stress incontinence is the most common bladder leakage problem in young and middle-aged women, and is characterized by unexpected urine leaks caused by pressure or muscle contractions on the bladder. This can be caused by weak pelvic floor muscles, and may present itself more frequently as a woman enters menopause. Triggers for stress incontinence include coughing, sneezing, and lifting heavy items.
Urge incontinence, also sometimes referred to as ‘overactive bladder’ or ‘OAB’, is characterized by a sudden urge to urinate, and failure to hold back urine until having reached a bathroom. This type of incontinence is common among people with chronic diseases such as diabetes, Parkinson’s disease, and multiple sclerosis.
Functional incontinence is more common among disabled or elderly people, who enjoy otherwise normal bladder control, but have barriers in terms of mobility or cognitive functionality that prevent them from getting to a bathroom in time.
Overflow incontinence occurs when a bladder does not fully empty, causing a person to experience frequent or constant urine dribbling.
Mixed incontinence occurs when a person shows symptoms of multiple types of incontinence.
Use the right products
One of your strongest allies in daily UI management is an assortment of purpose-built products designed to contain any bladder leaks as you go about your day.
For lighter, more frequent bladder leakage issues, incontinence underwear may be suitable for you. Designed to look and feel just like normal underwear, specialized incontinence underwear may be worn discreetly under any clothing—even workout leggings!
Incontinence underwear can hold a modest amount of liquid without leaking; check with individual suppliers as to the volume that their products can hold, to ensure that they’re suitable for your needs.
If you have larger bladder leaks, incontinence pads and pull-ups are a more robust option, able to handle considerable volumes of liquid.
Review your eating habits
Some foods, drinks, and medications may exacerbate the symptoms of UI by acting as diuretics, which increase your volume of urine and stimulate your bladder, causing you to urinate more frequently. If you consume a high amount of potentially diuretic products, consider adjusting your diet to help manage your UI symptoms. Carbonated drinks, sparkling water, alcohol, and caffeine products can all act as diuretics, as can artificial sweeteners, chocolates, and foods high in spice, sugar, or acid.
Make sure to discuss any changes to your medication with your GP, as they should be able to advise on the best course of action to take for you personally.
Plan your day
Being aware of your options can allow you to feel confident in your escape plan if you experience a bladder leak. Are there public restrooms? How far are they from your destination? Are there any chain restaurants who don’t limit bathrooms to customers only?
You might also consider limiting your liquid intake if you’re out and about for the day, to minimise the risk of a full bladder making your symptoms harder to control.
It’s important to prevent UI from affecting your personal relationships. Studies have reported that coital incontinence occurs in between 10% and 27% of incontinent women, with 43% of women who experience bladder leakage claiming that their sex lives have been affected by UI.
In conclusion
Urinary incontinence is a common issue, which—with the right know-how—is manageable in your daily life.
If you’re one of the many women living with UI (or know someone who is), there’s no reason to allow bladder leaks to control your life. By taking note of these simple tips and returning to them when you’re unsure, you stand a much better chance of managing your UI and having the freedom to live your life without interruption.
Whether you’re in the kitchen for you or a close friend, these gluten-free baking tips will help you navigate the road without wheat flour. Gluten-free baking can be really tricky since gluten is what gives dessert its structure. Follow these tips to simplify the process and have more success in the kitchen. Gluten-free desserts can be just as delicious as the real deal. It just takes a little bit of grit, determination, and lots of good music.
First of all, what is gluten?
Gluten is a protein found in wheat, rye, barley, and triticale – wheat being the most prevalent. It’s commonly found in bread, pasta, and cookies, but also hides in plenty of ingredients like soy sauce, sour candy, and seasonings. Some of the places it’s found are downright surprising.
Flour is one of the most essential ingredients for baking and thus can make gluten free baking quite the challenge. I was diagnosed with Celiac disease six years ago and now I avoid gluten like it’s a big red ant pile.
Read on for some great tips that I’ve learned on my gluten-free journey.
Don’t substitute flours unless you’re okay with a possible fail.
Always follow the recipe the first time.
Use a good gluten-free all purpose flour.
Check and recheck all the ingredients.
Experiment with your favourite dishes.
Keep an eye on the oven.
Utilize your freezer.
Try baking with quick cooking oats (gluten free of course!)
Xanthan gum is necessary for most recipes.
Join a facebook support group.
1. Gluten-free all purpose flour blends are just that – blends.
They contain flours, starches, and usually xanthan gum to create a flour that imitates the flour made from wheat. Each brand is different and some are much better than others. When you first start out, I recommend using the brand of flour the recipe calls for. This will minimize baking fails, which can be a bit depressing when you are making a significant lifestyle change.
2. This is similar to the point above, but more specific.
Unless you are a seasoned baker, avoid making substitutions for ingredients in a gluten-free recipe the first time around. This will do one of two things. For one, it will tell you if the recipe is delicious or not. And two, if you do decide to make it again with substitutions and it fails, you will know it’s not the recipe.
3. Gluten-free all purpose flour.
Find a delicious gluten-free all purpose flour you like the taste and texture of and go from there. As I said above, they’re all different, and even though grocery stores only stock a couple of brands there really are many to choose from. My personal favourite is Bob’s Red Mill 1:1 All Purpose Gluten Free Flour. Walmart, grocery and health food stores carry it, plus you can buy it on Amazon too. All of the gluten-free recipes on my site are currently made with this brand. You can also check out their Instagram page or website for more delicious recipes!
4. Remember to check all your ingredients for sneaky gluten.
When in doubt, look it up. Usually, brands will tell you on their websites if it contains any gluten and whether it’s made in a gluten free facility. Remember that oats should be labeled gluten-free since they’re processed around other gluten-producing grains.
5. You don’t have to throw all your old favourite recipes in the trash.
Several of my family recipes worked great with Bob’s Red Mills 1:1 All Purpose Flour in its place. Just remember not all of them will work and that’s okay. You won’t know if you don’t try!
6. Keep an eye on your treats in the oven.
Overbaked treats are never good, but especially in gluten-free baking where a good and fluffy texture is harder to achieve.
7. Most baked goods freeze well (with the exceptions of fried desserts).
I love to freeze all my baked goods so when I am in the mood for a treat I don’t always have to get in the kitchen. This is also great if you are meeting up with a friend at Starbucks or a coffee shop and want a sweet treat to go with your coffee. You get to eat something you enjoy with no risk of zero gluten-free options or worse getting glutened by cross-contamination.
8. Baking with gluten free quick-cooking oats.
If you find gluten-free all purpose flour has a strange taste, then you’ll dislike trying recipes with gluten-free quick-cooking oats in its place. This doesn’t work for all recipes, but quick cooking oats absorb more liquid than old fashioned oats and taste great in crisps, crumbles, and cookies. I do that in this triple berry crisp recipe and it tastes incredibly delicious.
9. Xanthan gum is necessary.
If you do purchase a gluten free all purpose flour, make sure it includes Xanthan gum. If it doesn’t, you will need to purchase it separately and make sure to add it to your recipes. It mimics gluten and provides structure to your treats.
10. There are several Facebook gluten free support groups.
In these groups, people share their favourite recipes and gluten-free brands and recipe books. The gluten-free lifestyle can be hard on the wallet. It’s always nice to know a brand tastes great before purchasing. It’s also great for emotional support, questions, and a community of like minded individuals who understand the struggle.
These tips to conquer gluten-free baking have helped me tremendously over the last six years and I hope they help you too. Happy Baking!
Carolyn Truett
Formerly a pastry chef, Carolyn is the writer and owner of Caramel and Cashews – a gluten free food blog that delivers tested gluten free recipes that taste delicious. She was diagnosed with Celiac Disease six years ago and since then has transferred her avid love of baking to a love of gluten-free baking. She is now determined to provide others who have Celiac disease or Gluten Intolerance with equally delicious treats.
Supporting your immune system is essential to maintaining good health. It might be an obvious statement to make, but there are lots of things you can do to strengthen your immunity, preventing potential illnesses and allowing you to live a healthier life. For our children, it’s even more important that they get everything their bodies need as their immune systems develop. So how can you boost your kids’ immunity, and what are the most effective ways to help them stay healthy?
How to Help Build-up Your Kids’ Immunity
Children need extra care to build up their immune systems as they grow up. Our young ones are more susceptible to infections because their immune systems haven’t yet been exposed to many viruses or overcome minor illnesses, from the common cold to flu.
They typically have fewer antibodies in their system and their bodies aren’t as capable of fighting off infections, whereas older people have more advanced immunity that’s been developed over their lifetimes.
What can parents do to protect their children and give them the best chance of staying fit, healthy and full of energy?
Toddlers need between 11-14 hours of sleep every day, and it’s best if they get at least 10-12 hours of this sleep at bedtime. As we get older, we typically require less sleep and find that sleep may be harder to achieve (especially after having children!), but sleep is absolutely essential to maintaining a healthy immune system.
Sleep gives the body a chance to cleanse and detoxify its various cells, remove waste products from our bloodstream, and filter out any toxins that build up in the body. Without sufficient sleep, the human body builds up a deficit that can only be recouped by getting some shut-eye. If the body doesn’t have a chance to maintain itself during sleep, illnesses are much more likely to occur.
2. Keep Their Minds and Bodies Active and Engaged
Your children depend on you for a great many things, not least to keep them entertained. Many parents face a significant challenge in keeping their children occupied, especially if you have lots of responsibilities or lead a busy lifestyle, as so many of us do. Even if you have very little spare time, engaging your kids in fun and interesting activities is a great way of keeping their minds stimulated and bodies active, positively impacting their wellbeing.
This is because physical movement activates the lymphatic system, the body’s primary system that protects us from infections and diseases. This movement increases lymphatic flow, helping to regulate the body’s functions.
Exciting activities will also help your children get more, higher-quality sleep. Without enough attention or enough playtime, we all know too well that kids can quickly become overtired, restless and are more prone to tantrums. This kind of stress — felt by both child and parent — can negatively affect your kids’ immune response, so it’s best avoided wherever possible and for the benefit of everyone in your family.
3. Serve-up More Fresh Fruit and Vegetables
Fresh fruits and vegetables contain high levels of vitamins, minerals, antioxidants and other essential nutrients that help support a healthy immune system. Getting your kids to eat fresh fruits might be easy because of their sweet taste, but getting them to eat vegetables can be more tricky, especially if you’ve got picky eaters or you lack the time to prepare nutritious meals from scratch. Try different kinds of fruit and veg to see what your kids enjoy, and explain to them that eating vegetables will make them big and strong. A little incentive can go a long way!
Certain fruits and vegetables contain carotenoids, which can be found in vegetables like carrots, broccoli, kale and collard greens, while fruits with high levels of carotenoids include nectarines, peaches, tangerines, tomatoes and watermelon. Carotenoids are important for supporting your kids’ immune systems because of their immunity-boosting properties that take the form of phytonutrients, which protect against chronic diseases — like cancer and heart disease — later in life.
4. Give Them a Daily Vitamin Supplement
Natural vitamin supplements for kids can fill in a range of nutritional gaps in children’s diets and give parents some peace of mind. High-quality multivitamins contain all of the essential vitamins, minerals and other nutrients children need to build up their immunity — including vitamins A, B, C, D and E, as well as zinc and iron — while vitamin-specific supplements can target individual areas of your child’s health.
While natural supplements shouldn’t replace healthy diets, plenty of playtime and enough sleep, one chewable vitamin sweet or one sachet of powdered vitamins can top-up your kids’ diets and compensate for anything they might lack, preventing the likelihood of illness and maintaining their health long into adulthood.
Helping Your Kids Develop Their Immune Systems
With so many factors to consider when trying to boost your kids’ immune systems, it can leave a lot of room for doubt. Are my kids getting enough fresh air and exercise? Do they get enough nutrition from their diet? Could they be getting more sleep? All of these important questions that parents need to ask themselves, but by following all of the steps above and practising good hygiene, you’ll be able to give your kids the best chance to grow up happy and healthy.
We all have fond memories of our childhood. Most of us have probably experienced the excitement of looking for the basket the Easter bunny left behind for us. We have gathered some of the best DIY Easter basket ideas and Easter basket filler ideas to make this holiday super fun for kids of all ages!
Where does the origin of the Easter basket lie? Does the Easter basket actually have any meaning with the true reason for the holiday? We will attempt to answer these questions and more.
The History of Easter
First on the agenda is the history of Easter. It is believed that the earliest Christians did not actually celebrate the resurrection of Christ on any one day, but several days during the season. This all changed when a group of Christians converted a group of Gentiles who would not give up their worship of the goddess of fertility-Eostre. The Christians gave in and decided to incorporate the doctrine of the resurrection. Hence Christians now have a single day of the year when they celebrate the resurrection of Christ: Easter.
Goddess Eostre
Legend has it that the fertility goddess Eostre carried a basket filled with eggs which are the symbol of fertility. It is said that people used to bring their own baskets to her temple and have them blessed. This would allow them to have a plentiful harvest. This is the earliest known occurrence of carrying a basket filled with eggs and is most likely when this tradition started.
Easter Baskets Blessed by Priests
In more recent times, the baskets were carried by Catholics on their way to church. The baskets were filled with their Easter feast, and the goal was to have the baskets blessed by the priest. This is about the extent of the Easter basket in Christianity though as there is nothing in the Bible that says anything about a basket.
The Gift of Easter Baskets
There is, however, no reasons to not give Easter baskets and both practicing Christians and non Christians tend to give Easter baskets. There really is nothing wrong with giving a gift. After all, when Christ died on the cross for our sins, that was a gift given to us. As such, Easter baskets are gifts from us to our children.
Easter Basket Craft
Easter is a wonderful holiday to celebrate the renewal the spring season brings and how to show your creative side. Why not make a cute basket with the kids as they await the Easter bunny? I’ll clue you into some new products and ideas to fill these baskets as well.
Easter Bunny Paper Bag
This Easter bunny craft is super simple and fun for kids to make. And you will feel good about repurposing your paper grocery bags as well. You will need supplies like these:
1 paper bag like lunch, grocery or craft bag
Pencil
Scissors
Pom-pom
Googly eyes
Cotton ball
Pipe cleaners
Glue
Markers/Crayons
How To make an Easter Bunny Basket
1. Take your flat grocery bag and draw a pair of rabbit ears with a pencil on the top open half of the bag.
2. Cut the ears out, leaving them attached to the bag.
3. Invite the children to give the bunny a face and use items like markers, plastic googly eyes, pom-pom for the nose, pipe-cleaner for the whiskers, and a cotton ball for the tail on the back of the bag.
4. Now the kids can leave their special bag on the table to get filled by the Easter Bunny or to use for an egg hunt.
You can also tie the Easter bunny paper bag basket with a ribbon or twine to store the candy, chocolate, and toys.
Eco-friendly Easter Basket Idea
Easter baskets are fun for children and parents alike. Environmentally conscious parents can use the tradition for some fun teaching and family time while learning how to decrease the holiday’s carbon footprint. Recycled materials, fair trade chocolate, and natural dyes are just a few ideas for an eco-friendly Easter.
Recycling
An Easter basket does not necessarily need to be a basket. However, many people can find traditional baskets stored away. Check through storage areas to find baskets or similar containers like decorative boxes or even bowls which can be re-used instead of buying new baskets.
Kids are usually more interested in the goodies inside than the basket itself. Recycling something from your home saves money, gas for the trip to the store and all of the energy that goes into making and transporting a new basket. This can be significant especially if the new basket comes from a distant country.
DIY Easter Basket Ideas
These are original and easy Easter basket craft ideas for you to make with your kids.
You will find below a list of crafts, recipes, and store bought items to fill your children’s Easter baskets. These are fun Easter basket stuffer ideas to put in your children’s DIY Easter baskets.
Easter toys
They are many fun toy eggs that you can include in your kid’s basket such as this Unicorn Growing Egg or this Magic Lizard Growing Egg. Submerge the egg in water and watch the hatching process commence. These eggs are recommended for ages 3 and up.
Crayola also has some great suggestions for Easter basket toys. Their Crayola Colour Wonder Mess-Free Mini Markers Classic are small enough to fit into a basket and for on the go; it fits into a cup holder in the car. The Crayola Color Wonder Markers only appear on Color Wonder paper and not on walls, carpets or car upholstery.
Adorable Bunny and Chick Wind Up Toys are fun for kids of all age and the ideal Easter gift. You can usually also purchase them at a Dollar Store, Amazon or big box chain store. These wind up toys are recommended for ages 3 and up.
Easy Easter basket filler ideas
Children do like things to eat, but there are many favourites other than candy. Of course coloured Easter eggs are a must for tradition. Think about fruit and packaged dried fruit snacks. Annie’s Bunny Grahams are adorable rabbit-shaped cookies the kids will enjoy.
Visit your local craft or dollar store for Easter related stickers, party favours, bottle of bubbles, and colouring books. And last but not least, include a new child’s spin toothbrush for good dental health and taking off some of the sweet treats that are part of this holiday that we sometimes can’t resist.
Eco-friendly Easter Filler Ideas
Easter can be fun and eco-friendly. With a little imagination and commitment, Easter basket fillers can also help the local economy and provide educational fun!
Easter Chocolate
Purchasing chocolate from local retailers supports the local economy and reduces energy use from transportation. Fair trade chocolate may be difficult to find, but ensures slave labor is not used in production.
Transportation can add to the carbon footprint of any product, so buying chocolate locally is good for the local economy and the environment. Hay or straw may be available for purchase at the same farms free range eggs are purchased. Consider this a natural alternative to plastic Easter grass.
Natural Easter Egg Dye
Dying Easter eggs can be educational and fun. Many traditional egg dyes can be made from natural sources. Producing these dyes is a good basis for a grade school science project.
How to make natural easter egg dyes
Boil a handful of the dye ingredient in about a cup of water. Boiling longer or soaking the egg longer will produce a more intense dye colour. Add the Easter decorated eggs to the basket when they are dry.
All natural easter egg dyes
Blue: Canned blueberries, boiled red cabbage or red grape juice.
Brown: Coffee, black walnut shells or black tea.
Green: Boiled spinach leaves.
Orange: Boiled yellow onion skins, paprika or carrots.
Red: Boiled red onions and skins, red beets and juice, canned cherries or raspberries. Less boiling or dying produces a pink colour.
Yellow: Boiled orange or lemon peels, celery seed, turmeric, cumin or green tea.
People from all walks of life give Easter baskets to their children. This is an acceptable practice. The giving of Easter baskets really has no root in Christianity, or the reason that we celebrate the holiday. It does not really matter why or when the Easter baskets were first given, all that matters with is that they are given freely.
We use cookies to ensure that we give you the best experience on our website. If you continue to use this site we will assume that you are happy with it.