National Truffle Day is celebrated on May 2nd. The chocolate truffle is a confection made from chocolate ganache center coated in chocolate, icing, and cocoa powder. The truffle may be filled with melted chocolate, caramel, cream, nuts, fruit, nougat, fudge, toffee, mint, marshmallow or liqueur. If you love truffles as much as I do, you will enjoy this truffles round-up from amazing bloggers! Let me know which one is your favourite. Enjoy!
The warm days of spring finally are upon us! The snow is gone, the birds are singing, and more time can be spent outdoors. One way I like to enjoy my time outdoors is by kicking back and relaxing with a sweet cold drink. Lemonade is one of my favourite drinks to sip on. I usually use sugar to make lemonade, but I was looking for a way to make lemonade that contained fewer calories. That is why I was happy to try Truvia® Natural Calorie-Free Sweeteners.
Truvia® is a naturally-sourced, calorie-free sweetener made from stevia leaf extract (the best tasting part of the stevia leaf). This extract is a key sweetening ingredient makes Trivia a great alternative to using artificial sweetener and sugar. Truvia can also be used to create drinks and food and is an ideal choice for diabetics or for people who are looking to lower the amount of sugar they intake in their diets.
When I received my products from Truvia®, I went straight to work on trying their recipe for lemonade. Truvia’s fresh-squeezed lemonade has a delicate balance of sweetness and tart that makes it a delicious ways to satisfy your springtime thirst. This version of lemonade has 96% fewer calories and 97% less sugar that the full sugar version.
Truvia’s fresh-squeezed lemonade Recipe
It was really easy to make! I only needed 3 Ingredients:
The directions were quick and easy to follow as well! I just had to do the following:
1. Combine the ingredients and stir to dissolve.
2. Serve over ice.
(This recipe yields 1 cup or 8 fl. oz)
Trivia® also provided some helpful flavour variations to their lemonade:
1. You can use club soda instead of water to create a sparkling lemonade
2. Substitute refrigerated 100% lemon juice form concentrate for fresh squeezed lemon juice for a great lemon flavour with a more dialed down tart taste.
After tasting Truvia’s version of lemonade, I had to produce this recipe to make enough for my whole family to enjoy! We really enjoyed sipping on Truvia’s lemonade while soaking up the sun in our backyard.
As I previously stated, Truvia can also be used in food. Truvia® Baking Blend is a mix of Truvia®calorie-free sweetener and sugar. Truvia® Baking Blend givesw a sugar-like taste in recipes, but has 75% fewer calories per serving then sugar. When using Truvia® Baking Blend, baked goods will have a sugar-like texture and moistness and will bake and brown like recipes that call for sugar. Truvia® Baking Blend is available in a 680g bag and has a closable, easy-to-use pour spout.
Truvia® Natural Calorie-Free Sweetener is also available in convenient single serve packets so you can take Truvia on-the-go for your snacks and favourite drinks!
My family enjoyed using Truvia® Natural Calorie-Free Sweetener! It made making lemonade quick and easy, and it is a great alternative to using sugar to reduce the amount of sugar we consume. Our spring has been made sweeter with Truvia®.
Curious about what else you can make using Truvia® Natural Calorie-Free Sweeteners? You can find them on their recipes page!
If you would like to have more information about Truvia®, you can visit their website. You can also connect with Truvia on their Facebook and Twitter pages!
It’s that time of year again when my daughter and I plan out our vegetable garden. It seems that each year we expand the garden a bit more, try to grow something different and plant something too early.
This year, we have decided to fill our vegetable garden with:
cherry tomatoes
ground cherries
mini cucumbers
watermelon
corn
radishes
sugar snap peas
carrots
garlic
While we grow most things from seed, I think this year we are going to buy already started tomato plants from our local gardening centre because we cannot seem to keep up with or give away enough tomatoes and we want to make room for more of what we really love, such as the ground cherries and sugar snap peas.
I should also mention that we have a perennial strawberry plant that produces more and more sweet strawberries with each passing year and also have a herb garden with lavender, chives and basil (I can never get enough basil!)
We buy our seeds online through Cubit’s Organics. I think this will be my fifth year buying seeds from this great little organic farm located in southern Ontario. I especially love their Goldie Ground Cherry seeds – you can’t find these little gems at very many garden centres and they are so fun to eat and to pick. One packet of seeds will give you at least two months worth of daily ground cherry harvesting!
We start some of our seeds inside – including our ground cherries, watermelon and usually our tomato seeds. Of course, the faster growing vegetables, such as beans, peas and radishes should be sowed directly in your garden – so we have a few weeks to wait for those ones. The good news is the instruction on when, where and how to plant seeds are typically on the back of every seed packet (tip: keep your seed packets together in a bag or container and store them someplace for future reference i.e., so you will know when to harvest your carrots).
New for us this year is growing garlic, and starting some plants from the seeds we saved from last year’s garden! I thought I would try a few radishes and corn inside (just to see) and they are sprouting, so we will definitely be planting the remainder of the seeds in the garden. My daughter was thrilled that the seeds we grew and preserved are actually growing new plants (I was too)!
I love the educational experience that comes along with gardening. My daughter gets so excited when a seed sprouts. This year we planted a few of her very own seeds that she could take care of in her bedroom. Her sunflower seeds have grown quite tall already and she is very proud of them. In addition to sunflowers, we have also started Morning Glories and pansies (we are hoping the containers we planted these in will be just full enough in time for Mother’s Day gifts!).
You don’t have to have a green thumb to be a gardener. You just have to have the desire to do it. Having your own vegetable garden is a great way to teach kids where food comes from and also makes them appreciate the time it takes to grow the carrots they may be hesitating to eat at suppertime. It is also a great way to get them to eat healthy – my daughter helps herself to whatever is ripe for the eating in the garden all summer long!
Do you garden? What do you grow and do you start them from seed? Leave a comment and let me know! Happy gardening!
Your kids will enjoy getting their hands sticky while making this No Bake Peanut Butter Balls recipe! This peanut butter balls recipe is very versatile and easily customizable to your own taste and likes.
At our household, every Sunday is devoted to cooking snacks and treats for the family to eat throughout the week. There is nothing like enjoying homemade cookies, muffins, brownies, and cupcakes! Not only does it leave a sweet aroma in the house, it’s also a perfect time to get together with the kids and bake as a family. Toddlers love to mimic their parents, so give them a plastic bowl and spoon to mix pretend batters or salads. Making these no bake peanut butter bites will be so much fun for everyone! If you like rocky road bars or ice cream, I am positive you will be a fan of this recipe!
Baking with the family
Once you feel they are ready to prepare real food involve them in simple cooking projects like whisking, rolling balls, stirring, and helping pour out a measuring cup. Even when my children were babies, I would put them in their high chair beside me when I was cooking and showing or describing to them what I was preparing for their meals or snacks.
The best part about cooking with my kids at an early age is that as teenagers they continue to help out in the kitchen by cooking meals or preparing snacks. For my daughter’s 20th birthday party, we made the recipe mentioned above for our guests to eat as snacks during the afternoon. When I showed her the recipe, she couldn’t wait to make them with me. Of course she loves all recipes made with chocolate and peanut butter, therefore I really did not have to convince her much to help prepare them.
Bonding with your kids in the Kitchen
Even her birthday cake was prepared with peanut butter and chocolate ice cream. We had a great time talking about her favourite TV shows while listening to the radio, and she even asked me what I wanted as a gift for Mother’s Day! The special bonding moments you make in the kitchen with your children are so precious!
Recipe for no bake peanut butter balls
These no bake energy balls are so easy to prepare and only takes about 15 minutes to make.
Ingredients
1/2 cup Kraft Extra Creamy Peanut Butter
1/4 cup honey
1 teaspoon vanilla extract
3/4 cup crisp rice cereal
1 cup large flake rolled oats
1/4 cup flaked coconuts
1/4 cup miniature marshmallows (cut in half)
3 tbsp semi-sweet chocolate chips
1/4 cup finely chopped lightly salted dry-roasted peanuts
How to make no bake peanut butter balls
1. MIX together all ingredients (except for the roasted peanuts) in a medium bowl until blended.
2. FORM mixture into 20 (1-inch) balls, using about 2 tbsp (press firmly when forming).
3. ROLL each ball in chopped peanuts, pressing to coat.
4. CHILL for 20 to 30 minutes. Enjoy these easy no bake energy bites!
I hope you enjoyed this recipe for no bake peanut butter balls as much as I did! If you make it, please share your photos with us on Facebook or Twitter! Also, check out all of our other recipes!
No Bake Peanut Butter Balls
Lyne Proulx
This No Bake Peanut Butter Balls recipe is very versatile, easily customizable, and only takes about 15 minutes to make.
As with learning to walk, learning to ride a bicycle can involve a lot of stumbling, tumbling and getting back up. But once you’ve mastered it, it can seem as if it’s something you have always known how to do. At Pedalheads® Bike Camps, the instructors aim to provide their participants with exactly that sensation. An initiative that started in 1995 in Point Grey, British Columbia, Pedalheads® has expanded to locations across British Columbia, Alberta, Ontario and Washington.
Pedalheads Bike Camps
From training wheels to trails, Pedalheads® has safe, fun and challenging bike camps for children ages 2–12. During the last 20 years we have taught over 120,000 children to ride, using our own Pedalheads® teaching method, combined with small classes and exceptional instructors. Our comprehensive program opens up a world of opportunities for a lifetime of cycling.
Children are led by a group of passionate instructors that are well-versed in bicycle safety, teaching and having fun! Many children return year after year — working their way through the various levels, while building confidence and lasting relationships. In fact, some participants have grown up and returned to Pedalheads® as instructors, managers and administrators because their experience with the program as a child was so wonderful.
While Pedalheads® Camps are well-known for their ability to get young children off of their training wheels, we also provide a number of other programs for more advanced riders that teach important road safety rules and trail-riding techniques so that participants always feel safe and confident in their daily biking activities. Safe biking habits come from consistent practice and these different levels allow children to continue working on these skills while also enjoying the challenge of progressing through the program.
Toddler Bike Camps (Age 2 +)
This camp is best suited for children who want to learn to ride but are not old enough for the Newbees level. These riders come with their trikes, ride-on toys, run bikes or bikes with training wheels and learn how to start, stop, steer and pedal as well as helmet and traffic safety
Half Day Bike Camps (Age 4 +)
Pedalheads® Half Day Camps feature two and a half hours of safety and bike proficiency instruction. From beginners in Level 1 to advanced riders in Level 8, we teach children the skills they need to succeed on the trails and on the streets.
All Day Bike Camps (Age 4 +)
Pedalheads® All Day Camps start with a two and a half hour level-appropriate Half Day Bike Camp and expands into a full day of bike-themed games and activities, plus an additional hour of extra riding practice.
Fast Facts About Pedalheads bike camps:
Neighbourhoods: Camps located in Alta Vista, Nepean and Kanata
Upcoming Summer Camp Dates: Camps are offered weekly from end of June to end of August. They offer both AM, PM and All-Day camps. For more details visit their website!
Specialities: Helping children get off their training wheels, teaching important bike safety tips such as what to look for in a helmet, helping advanced riders learn the rules of the road, and trail riding.
Getting Involved: Pedalheads is always looking for instructors and volunteers to help out! Check out their website or shoot them an email at info@pedalheads.com for more information.
Please check the website for schedule details and more information about their camps!
Cinnamon French Toast is ideal for breakfast or brunch as it’s so easy and fast to make before your family heads out for a busy day. They can also be prepared by your children, with supervision of course, for a special breakfast to mom and dad on their birthday, for Mother’s Day or for Father’s day. Who does not like a sweet breakfast in bed made with love! The best gift of all!
Cinnamon French Toasts
A French toast recipe is always a family favourite as it gets the kids in the kitchen cooking with mom and dad! Kids can mix up the batter and dunk the bread in. Depending on the age of the children, an adult may have to be on hand to put it in the frying pan, so no one gets burned.
Cinnamon French Toast Recipe
Ingredients
5 eggs
3/4 cup of milk
2 tablespoons melted butter, cooled to room temperature
2 tablespoons granulated sugar
1/8 teaspoon of nutmeg
1/2 teaspoon of cinnamon
1 teaspoon vanilla
8 slices of bread
oil or non-stick cooking spray for greasing the pan/griddle
Maple syrup, fresh fruits, whipped cream, powered sugar for serving
Cinnamon French Toast
Directions
In a bowl, whisk together the eggs, milk, butter, vanilla extract, cinnamon, nutmeg, and sugar.
Take your bread and dip it in the egg mixture on both sides.
Heat a skillet and pour enough vegetable oil or non-stick cooking spray to cover the bottom of the pan.
Place dipped bread – 2 at a time – in the skillet and brown on one side, then the other until golden brown.
Place on a serving plate and spread with butter immediately so it melts.
Add maple syrup, fresh fruits, and/or whipped cream on top or just sprinkled with powder sugar.
I hope you enjoyed my Cinnamon French Toast Recipe as much as I did! If you make it, please share your photos with us on Facebook or Twitter! Also, check out all of our other recipes and coffee recipes!
After a long day, what could be nicer than a homemade bath bomb? I know what you are thinking, making homemade bath bombs sounds like a lot of work. Especially after a long day. But, hear me out. This recipe is so easy to make! You probably have everything you need for this recipe at home already. This is just about as fuss free as making bath bombs gets!
Lavender Bath Bombs
Made with common pantry staples like corn starch, cream of tartar and coconut oil, these are so simple to make and they really make your skin feel luxuriously soft and silky. They are totally worth the effort! I used a simple muffin pan to shape mine, but there is no limit to the shapes you can form these bath bombs into.
I love the scent of lavender and I always try to keep a bottle of lavender essential oil on hand to help me relax, so that is the fragrance I went with for these. But, this is a versatile recipe; you can switch out the fragrance or the colour to suit your preferences.
Bath Bombs Gifts
Soaking in the tub after work is my favorite form of self care. I love feeling the tension melt away in the warm water. It gives me a chance to reflect on my day and relax. Whenever possible, I like to give self care gifts to my friends and family, and these DIY Luscious Lavender Bath Bombs are perfect for gifting without going broke! Be sure to bookmark or pin this post for later; you will certainly want to make these again closer to the holidays.
Bath Bomb Recipe Ideas
If you are looking for more bath bomb recipes, check out these reader favourites:
Select your favourite pure essential oils for the scent you’re looking for. And add food colouring to give each lavender bath bomb some colour.
Ingredients
4 ounces Cream of Tartar
4 ounces Corn Starch
8 ounces Baking Soda for your skin and the bath water
4 ounces Epsom Salts
3/4 tsp. Water
2 tsp. Lavender Essential Oil for scent
2 tsp. Coconut Oil
Food colouring to make purple coloured bombs
Equipment Needed
A mini muffin pan
A bowl
How to Make a Luscious Lavender Bath Bomb
How To Make Lavender Bath Bombs
In a large mixing bowl, mix all dry ingredients: baking soda, cream of tartar, cornstarch, and Epsom salts.
In a separate small bowl, mix all wet ingredients: water, lavender essential oil, coconut oil, and food colouring.
Mix wet and dry ingredients. Your mixture should resemble wet sand. Adding the food colouring helps you figure out if you combined all the ingredients well. An even colour means a good mix! When you squeeze some in your fist, it should hold together. If it doesn’t, add water—just a few drops at a time until a desired consistency is reached.
Tightly pack mixture down into your mold.
Let it dry for 24 hours. Do not remove your lavender bath bombs from the mold until the mixture is completely dry.
Recommendations
To make your bath bombs extra special, add dried flowers, non-toxic glitter, and/or sugar cake decorations
I hope you enjoyed my DIY Lavender Bath Bomb Recipe! If you make it, make sure to share with us on Facebook or Twitter! Also, check out all of our other crafts.
DIY Lavender Bath Bombs
Lyne Proulx
Fragrant bath bombs make bathing so much enjoyable. Lavender Bath Bombs are perfect for gift giving to that special someone in your life!
8ouncesBaking Soda for your skin and the bath water
4ouncesCream of Tartar
4ouncesCorn Starch
4ouncesEpsom Salts
3/4tsp.Water
2tsp.Lavender Essential Oil for scent
2tsp.Coconut Oil
Food colouring to make purple coloured bombs
Instructions
In a large mixing bowl, mix all dry ingredients: baking soda, cream of tartar, cornstarch, and Epsom salts.
In a separate small bowl, mix all wet ingredients: water, lavender essential oil, coconut oil, and food colouring.
Mix wet and dry ingredients. Your mixture should resemble wet sand. Adding the food colouring helps you figure out if you combined all the ingredients well. An even colour means a good mix! When you squeeze some in your fist, it should hold together. If it doesn’t, add water—just a few drops at a time until a desired consistency is reached.
Tightly pack mixture down into your mold.
Let it dry for 24 hours. Do not remove your bath bombs from the mold until the mixture is completely dry.
Notes
Recommendations To make your bath bombs extra special, add dried flowers, non-toxic glitter, and/or sugar cake decorations
If you are looking for a simple and fun flower craft for kids that also makes a great gift, then you will enjoy this construction flower craft. I got the idea from the back of a package of Crayola construction paper. These construction paper flowers are easy to make and are fun for all ages; and the best part is that they don’t have to be perfect – they are unique and individual flowers just like the people making them.
Construction Paper Flowers
Construction Paper Flowers Craft
Materials needed:
Three pieces of construction paper: green for the stem and leaves; and any other two colours (these will form the flower; we used blue and red)
Glue
A pen or pencil
Scissors
Supply to make Construction Paper Flowers Craft
How To Make The Construction Paper Flowers (one flower)
Vertically cut two strips of green paper the length of the construction paper and about 1 cm or so in width (you can get a paper trimmer here that will make the cutting easier).
Cut five strips (about 1 cm wide) of one other colour of paper (these will be your flower’s petals).
Finally, using your third colour of construction paper strip, cut one more 1cm.
Take a piece of the green paper and twirl it around the end of your pen or pencil.
Then carefully take the rolled up paper off the end and pinch one side of the paper. Place a dab of glue under the top flap to secure it to the paper, then gently let it loosen up a little so that it resembles a leaf. Do the same to the other piece of green construction paper.
How to make Construction Paper Flowers Craft
Repeat step five with the five strips of construction paper that you have set aside for your flower’s petals.
Repeat step five again for the colour you set aside for the centre of your flower OR cut a circle shape (see photo for example). The circle is an easier way to attach the petals together and is less frustrating for younger children.
Take the piece of green construction paper that you had set aside for the stem and fold it in half.
Place all the pieces on the stem with glue – holding each one in place for a few seconds until the glue sets.
Lay the flower down until the glue is completely dry and then find a vase to display your work!
Construction Paper Flowers Craft
I would love to see some pictures of this completed kids craft! Have fun, use fun colours and remember that it’s okay for each paper craft flower to look different – that’s just how a real flower garden grows!
Construction Paper Flowers Craft For Kids
Yield: 1 flower
Prep Time: 10 minutes
Active Time: 20 minutes
Total Time: 30 minutes
Difficulty: Easy
Estimated Cost: Under $5
These construction paper flowers are easy to make and are fun for all ages; and the best part is that they don’t have to be perfect – they are unique and individual flowers just as the people making them.
No Ratings
Materials
Three pieces of construction paper: green for the stem and leaves; and any other two colours (these will form the flower; we used blue and red)
Glue
A pen or pencil
Tools
Scissors
Instructions
1. Vertically cut two strips of green paper the length of the construction paper and about 1 cm or so in width (you can get a paper trimmer here that will make the cutting easier.)
2. Cut five strips (about 1 cm wide) of one other colour of paper (these will be your flower’s petals)
3. Finally, using your third colour of construction paper, cut one more 1cm strip
4. Take a piece of the green paper and twirl it around the end of your pen or pencil.
5. Then carefully take the rolled up paper off the end and pinch one side of the paper. Place a dab of glue under the top flap to secure it to the paper, then gently let it loosen up a little so that it resembles a leaf. Do the same to the other piece of green construction paper.
6. Repeat step five with the five strips of construction paper that you have set aside for your flower’s petals.
7. Repeat step five again for the colour you set aside for the centre of your flower OR cut a circle shape (see photo for example). The circle is an easier way to attach the petals together and is less frustrating for younger children.
8. Take the piece of green construction paper that you had set aside for the stem and fold it in half.
9. Place all the pieces on the stem with glue – holding each one in place for a few seconds until the glue sets.
10. Lay the flower down until the glue is completely dry and then find a vase to display your work!
As a parent, one of the things you always have to be mindful of is the health of your children. An important area of health parents should take care of is their child’s oral health care. Is oral health important? Good oral health care is important to anyone’s well-being. Not being proactive on your child’s oral health care could lead to your child developing issues within their mouth or to their physical, mental and social well-being.
Here are some helpful tips for best oral health care to be proactive in your child’s health.
1. Clean Those “Pearly Whites”
Brushing your teeth and flossing in between your teeth is the first line of defense in maintaining your oral health. Teeth should be brushed for about 2-3 minutes at least two times daily. Brushing and flossing your teeth and using mouthwash can help to prevent tooth decay and gum disease. This step in oral healthcare does not have to seem boring or as though it is a chore.
Where your children are concerned, there are a few things that can make brushing your teeth with your kids more fun. You can make up games to play that are based around brushing your teeth. You can play their favourite music or you can also make up a song to sing to help your kids learn how long they should be brushing certain areas of their mouths. Even having your child pick out their own oral healthcare items could make cleaning their teeth more fun.
Toothbrushes and toothpaste
2. Eating Well
Having your family eat a well-balanced diet is a great way to maintain your oral health. Eating foods that include whole grains, fruits and vegetables and lean meats helps to maintain healthy teeth and your family’s overall health. You can get your child excited about eating a well-balanced diet by getting them involved with making meals or packing their lunch and picking some of the healthy foods and snacks they will be bringing to eat at school.
If they are too young to help make meals or to pack their lunches, you can make their meals or lunches look interesting. You can make faces out of the food you use, or give them food or snacks that are very colourful or in a certain pattern. Certain items can even be made into fun shapes by using cookie cutters. The possibilities in making healthy foods fun for children are endless!
3. Gear Up When Playing Sports
Playing sports can get a bit more physical than you or your child can realize. Elbows, knees, balls or other objects can accidentally hit you or your child’s face, resulting in damage to their mouth. One of the best ways to prevent injuries to your mouth is to wear a mouth guard to protect your teeth. Mouth guards buffer some of the impact you receive from getting hit in the mouth and having to get your teeth repaired.
4. Cut Out Other Risks That Can Cause Oral Health Issues
There are other factors that can cause a person to have oral health issues. Some of these factors are stress, smoking and using drugs. These factors can affect your mouth and body physically or mentally by reducing your body’s ability to heal itself, allowing for illnesses to occur. Oral cancer, gum disease or other illness or condition can result if these factors are active in your life.
5. Visit Your Dentist Regularly
Making regular visits to your dental clinic helps to keep oral health issues at bay. Dentists can see if there may be issues developing in your mouth that can cause oral health issues, or can see if there is something else that could be happening in your body by checking your mouth regularly. By making these regular visits, dentists can also advise you as to what needs to be done about potential issues before they get worse.
Tips to Maintain Good Oral Health Care
Now that you have these helpful hints on how to maintain oral health care, you can try them all out for yourself and your family! If you have not done so already, you should make an appointment to your dentist to have you and your family make sure you have no oral health issues, or to help take care of issues that may have arisen. If you do not have a dentist, you can check out a listing of the Ontario Dental Association or the Canadian Dental Association to see which dentist is closest to you to make an appointment!
What other tips and hints do you have to maintain the oral healthcare of your family? Comment below!
Is it Spring? Really? I think I must be dreaming! This winter seemed to be one of the longest I can remember but the weather is getting beautiful and the sun is shining, it must be Spring. It’s time to open up those windows that have been closed for the last six months… or longer, let in the crisp cool air and start cleaning. Spring is actually a time that I enjoy cleaning. but after this exceptionally long winter, spring cleaning seems a little daunting. I have found that using these few tips to help clean the smart way gets the job done in a breeze.
Spring cleaning list
5 Tips To Spring Clean The Smart Way
Let’s get organized
Organizing and planning before you start cleaning will save you a lot of time. Make sure you have everything you need before hand. Don’t start windows only to run out of window cleaner mid job. You’ll get off track and the cleaning drags on. So, gather up your garbage bags, rags, cleaners, yard tools and anything you’ll be using to clean. Run to the store to stock up before hand.
Good bye clutter
Before you even start to clean, take the time to de-clutter and get rid of all the junk you may be hording. The best way to deal with this overwhelming job is to do a room a day. It’s really worth the trouble and makes the cleaning process go a lot easier. So, get yourself three bins or bags, one for each: storage, donate and trash. This is a great time to donate those clothes you haven’t worn since high school, throw away toys with missing pieces and pack away your winter clothes until next year, hopefully.
Get your clean on!
Here’s how I go about my Spring cleaning. I start with all the jobs I don’t really like, well that would be most of them, but the fridge (you know those science experiments? need I say more) and the oven are my least favourites. Get those appliances clean first, oh by the way, I clean my dishwasher up too. You can’t believe how much better it feels to have the appliance spic and span.
5 Tips to Spring Clean The Smart Way
Do you Spring clean your bathroom?
Next, attack the bathrooms. Bathrooms shouldn’t be a big job, hopefully you aren’t waiting until Spring to clean them, that’s kind of yuck! Your vanity, drawers and towel closet should be done already with the purge you did. You did de-clutter the bathrooms too right?
Windows are such a pain
Windows are time-consuming but if you’re like me and wipe them off time to time (thanks to little handprints), then it’s not so bad. Scrub those tracks and polish that glass until it sparkles! Don’t forget the window treatments! We use windshield washer fluid for outside of the windows, does an amazing job!
The easy stuff are things I clean regularly like the floors and walls. They can’t wait for a major clean up to get done so they don’t take so much time. Once I have my indoor space complete, I get outside and work on the deck, windows and yard.
Woman holding cleaning supplies
Keep it simple, don’t panic if you don’t get it all done, there’s always next Spring …. and who wants to worry so much about cleaning when it’s so nice outside 🙂
Do you have any tips to help Spring clean the smart way?
Here is a picture of five pounds of muscle versus one 5 pounds of fat. Amazing, isn’t it? My big question to you is: which would you rather have?
fat vs muscle
Many of us already know the benefits of strength training. Wonderful things like improved posture, increased metabolism, potential decreased risk of injury, increased bone density and increased strength are just a few of the side effects. I think many women feel that they have to be in a gym setting lifting heavy weights in order to strength train. I’d like to use this space to bust a few myths if I may…
Many of my clients tell me they don’t want to lift weights because they don’t want to get big muscles. Please refer back to the picture above. My friends, muscle is very dense and will actually take up less space, hence giving you a smaller appearance. You will not get big by strength training (please repeat this 3x).
5 Pounds of Muscle vs 5 Pounds of Fat
Please take another look at the picture. The muscle and fat are very different cells. One cannot be turned into another. You cannot convert fat to muscle or muscle to fat. You have a certain number of fat cells (these are determined in utero, during the first year of life and during adolescence – hence the importance for our children to be eating healthy as well as eating healthy during the prenatal period. Once these number of cells are determine, they can either get bigger or smaller, not disappear.
Nutrition is very important when it comes to fat loss and changing your aesthetics. I do not recommend any sort of diet. If you can pick it, kill it, grow it, dig it or harvest it and it can spoil, chances are it’s great for you. If it comes in a box, contains ingredients you can’t pronounce, is fluorescent in colour and takes months to spoil, chances are it’s not an ideal food. Eating healthy is healthy. Ketosis, zero carbs, shakes all day and low calorie diets are not healthy. Eating healthy is healthy.
So how do we go about this? If you’re stuck and need some guidance, hire a professional. Joining a class can also help with motivation. Starting with a few exercises every other day or so can have huge payoffs. A few push ups, some squats and some planks and presto, a strength workout! Consistency is key, even if you’re doing a handful of exercises, you will see results when doing them regularly.
Here is a great clip of some exercises you can do with your baby as a weight:
Here is a video of a few exercises you can even do with items found in your kitchen
There is nothing quite like an Easter Peeps. This timeless candy has been a favourite for many years. This year why not take a sweet treat to share, like an Easter cupcake and take it to the next level of seasonal delight by adding a Peeps to the top? Everyone will love this Peeps Marshmallow Cupcake Recipe.
My kids have always loved to help make goodies for holidays, and Easter is no exception! We have so many great cupcake recipes on the site that are tried and tested in our kitchen. This Peeps Marshmallow Cupcake recipe has become a tradition over the years that we all look forward to.
Creamy Icing
Made with cream cheese and heavy cream, the icing on this Easter cupcake is nothing short of dreamy. Finishing the decorating is as easy as adding a peep chick and a little dusting of sugar to create a cute as could be cupcake that is just right for Easter dessert.
Cupcakes with marshmallow
This Peeps cupcakes recipe is awesome for the Easter season because it uses marshmallows in the batter. You can use the standard white marshmallow, or live seasonally and go all out with Peeps! The texture of the batter will be a little unusual, but it is so good.
If you are short on time, you can use a box cake mix, or even use some standard undecorated cupcakes from the bakery, as the decoration is the star of the recipe.
These cupcakes with Peeps are adorable to prepare with your kids for Easter! Just need to add pink sanding sugar and peeps to finish them off!
CUPCAKES INGREDIENTS
1 1/4 cups flour
1 1/4 tsp baking powder
1/2 tsp baking soda
1/2 tsp salt
2 large eggs- room temp.
3/4 cup sugar
1 1/2 tsp pure vanilla extract
1/2 cup vegetable oil
1/2 cup whole milk
1 cup marshmallows
FROSTING INGREDIENTS
1 (8 oz) pkg cream cheese, at room temp
1.5 cups powdered sugar
1.5 cups cold heavy whipping cream
½ tsp vanilla extract
DECORATION INGREDIENTS
Sanding sugar in Pink
Peeps in pink or Yellow
HOW TO MAKE THE EASTER PEEP CUPCAKES
Preheat the oven to 350 °F and line a cupcake/muffin pan with cupcake liners.
In a medium bowl, whisk together 1 1/4 cups flour , 1 1/4 tsp baking powder, 1/2 tsp baking soda and 1/2 tsp salt. Set flour mix aside.
In the bowl of an electric mixer, beat 2 eggs with the whisk attachment on medium speed (15-20 seconds). Add 3/4 cup sugar and continue to beat on medium speed (30 seconds). Add vanilla and oil and beat on medium speed (1 minute). Reduce mixer speed to medium/low and slowly add about half of the flour mixture. Now add half of the milk, then the rest of the flour mix and the rest of the milk. Beat until just combined and smooth, scraping down the sides of the mixing bowl. Add the marshmallows and fold into the mix. Pour batter into a lined muffin pan.and fill to about 3/4 full.
Bake for 12 -14 minutes at 350 °F. Let them cool in the pan for a couple minutes, then remove.
FROSTING DIRECTIONS
Cooking Tip: For best results with whipped cream, freeze your mixing bowl and whisk attachment 10-15 minutes before using. Also keep the heavy whipping cream refrigerated until ready to use.
Whip the cream on high speed (1-2 minutes) until fluffy.
In a second mixing bowl, beat cream cheese and powdered sugar (start on low speed unless you want to be standing in a cloud of powdered sugar), then beat in ½ tsp vanilla extract. Fold the whipped cream into the cream cheese mix. Keep it covered in the fridge until ready to use on these cupcakes.
DECORATING DIRECTIONS
Hold the cupcake in one hand and grasp the pastry bag in the other. Make sure you have twisted the top of the pastry bag moving ALL icing towards the bottom. You can also use a chip clip to secure the open part of the pastry bag is closed.
Now start on the rim of the cupcake and begin to squeeze the icing onto the cupcake in one movement ice the cupcake all the way around and move to start the second layer by placing the icing on the inner ring of the layer you just did. Complete the process till you closed the gap. Now twist the icing on the top to make a peak. Similar to how you would get frozen yogurt.
Take your freshly iced cupcake and dip it in the bowl of sanding sugar lightly twisting to cover all areas.
I hope you enjoyed my Peeps Marshmallow Cupcakes! If you make this recipe, make sure to share with us on Facebook or Twitter! Also, check out all of our other Recipes.
Peeps Marshmallow Cupcakes
Lyne Proulx
These Peeps Marshmallow Cupcakes are adorable to prepare with your kids for Easter! The icing is so deliciously creamy!
Preheat the oven to 350 °F and line a cupcake/muffin pan with cupcake liners.
In a medium bowl, whisk together 1 1/4 cups flour , 1 1/4 tsp baking powder, 1/2 tsp baking soda and 1/2 tsp salt.
Set flour mix aside.
In the bowl of an electric mixer, beat 2 eggs with the whisk attachment on medium speed (15-20 seconds).
Add 3/4 cup sugar and continue to beat on medium speed (30 seconds)
Add vanilla and oil and beat on medium speed (1 minute)
Reduce mixer speed to medium/low and slowly add about half of the flour mixture.
Now add half of the milk, then the rest of the flour mix and the rest of the milk.
Beat until just combined and smooth, scraping down the sides of the mixing bowl
Add the marshmallows and fold into the mix
Pour batter into a lined muffin pan and fill to about 3/4 full
Bake for 12 -14 minutes at 350 °F.
Let them cool in the pan for a couple minutes, then remove
FROSTING DIRECTIONS
Cooks Tip: For best results with whipped cream, freeze your mixing bowl and whisk attachment 10-15 minutes before using. Also keep the heavy whipping cream refrigerated until ready to use.
Whip the cream on high speed (1-2 minutes) until fluffy.
In a second mixing bowl, beat cream cheese and powdered sugar (start on low speed unless you want to be standing in a cloud of powdered sugar), then beat in ½ tsp vanilla extract
Fold the whipped cream into the cream cheese mix. Keep it covered in the fridge until ready to use on these cupcakes.
DECORATION DIRECTIONS
Hold the cupcake in one hand and grasp the pastry bag in the other.
Make sure you have twisted the top of the pastry bag moving ALL icing towards the bottom. You can also use a chip clip to secure the open part of the pastry bag is closed.
Now start on the rim of the cupcake and begin to squeeze the icing onto the cupcake in one movement ice the cupcake all the way around and move to start the second layer by placing the icing on the inner ring of the layer you just did. Complete the process till you closed the gap.
Now twist the icing on the top to make a peak. Similar to how you would get frozen yogurt
Take your freshly iced cupcake and dip it in the bowl of sanding sugar lightly twisting to cover all areas.
Notes
Cooking Tip: For best results with whipped cream, freeze your mixing bowl and whisk attachment 10-15 minutes before using. Also keep the heavy whipping cream refrigerated until ready to use.If you are short on time, you can use a box cake mix, or even use some standard undecorated cupcakes from the bakery, as the decoration is the star of the recipe.
Ringworm is not actually a worm! It is a fungal infection of the skin known as a ‘tinea’ infection, commonly contracted from close contact with others such as at day cares, swimming pools and the gym.
Tinea can occur anywhere on the body and starts off as red, raised, very itchy bumps. Then it becomes dry and scaly as it heals from the inside out creating the appearance of a bright red ring, hence the common name ringworm.
Essential oils bottles
How can you prevent a tinea infection?
1. Keep skin clean and dry. Be sure to towel off thoroughly after a shower and to change wet, sweaty clothing as soon as you can. Tinea thrives in dark, warm and moist environments.
2. Minimize sugar intake. Often internal imbalance of yeast can manifest as tinea outwardly on the skin. Sugar feeds the tinea and supports its growth.
3. Support a healthy immune system through a diet high in fruits and vegetables, ensuring your child has adequate sleep and exercise. A strong immune system will deal with tinea exposure before it has a chance to manifest as ringworm.
Once my child has a tinea infection what can I do?
1. Avoid direct contact with others as much as possible to avoid the spread of tinea.
Tea tree oil
2. Mix 2-3 drops of tea tree essential oil into 1 tbsp of coconut or olive oil. Apply 2-3 times per day until the rash disappears and store the remainder in the fridge to use as needed. Tea tree is anti-microbial, meaning it has the ability to kill fungus, bacteria and viruses.
3. Botanical tinctures of echinacea and goldenseal help support your child’s immune system so it can deal with the tinea infection. Botanical tinctures are available at health food stores, be sure to use as directed based on your child’s age and weight.
Garlic and onions
4. Eat more raw garlic, raw onions and oregano. These are natural anti-microbials and support the immune system to balance yeast levels from the inside out.
5. Incorporate omega-3 containing foods to the diet for their anti-inflammatory and skin healing properties. Small fish such as anchovies, sardines and herring are super packed with omega-3 fatty acids. Or you could add a tablespoon of chia seeds, hemp hearts or freshly ground flaxseeds into your child’s cereal, oatmeal or smoothie for a plant based omega-3 boost.
Natural Remedies for Ringworm
Feel free to share your experience or tips for other natural methods for resolving tinea!
Easter is such a sweet time of the year! From the decorations, to the time with family and of course, we can’t forget all of the sweet candy to be enjoyed. If you are looking for something different and easy to share this year, you are going to love this Easter White Chocolate Bark recipe.
Easter White Chocolate Bark
Easter Bark Candy
This recipe has a lot going for it. It is the perfect last minute treat to share. It requires minimal ingredients and no baking. And it has a lot of visual appeal. It looks exactly like an Easter goodie should! It is colourful, sweet, and has loads of Easter candy in it such has chewy jelly beans for a one of a kind treat!
Can You Freeze Chocolate Bark
Yes, you can definitely freeze chocolate bark. Cut the bark into pieces and wrap each one in parchment paper or cling wrap. Next, add the bark to a large Ziplock freezer bag and store in the freezer for up to 4 months.
White Chocolate Bark Ideas
This recipe for white chocolate bark couldn’t be easier to make. This white bark chocolate is also awesome to share! All you have to do is melt some white chocolate, sprinkle some candy in, and break it apart when it has dried. Talk about a fuss free way to spread Easter cheer!
This Easter bark is loved by all ages! It has creamy white chocolate as the base, which everyone loves, and the chewy, fruity jelly beans add a great texture to the treat. You will love the way the white chocolate bark looks when it is dried, as it is reminiscent of stained glass. It is so pretty!
To make Easter Bunny Bark you’ll need:
Bark Ingredients
20 ounces of white chocolate (white melting wafers)
Lots of Easter candy like jelly beans, M&M’s, or any candy in pastel colours
How To Melt White Chocolate Bark
Begin by roughly chopping the larger pieces of candy.
When melting the chocolate, you can melt them in a microwave or in a double broiler. If using a microwave start at 30 seconds stir and repeat until fully melted. When using stove top keep temp. at medium range make sure you are stirring constantly.
Line an 9 x 11 pan with parchment paper. Pour melted chocolate onto parchment paper and spread.
How To Make Easter Bark
Now comes the FUN part. Begin placing Easter candy in the white chocolate. Let the Easter Bark sit for several hours until it hardens. Make sure it’s totally hard before cutting. Transfer bark to a cutting board. Cut the bark into pieces.
Make a batch to share with your loved ones this Easter!
I hope you enjoyed my Easter White Chocolate Bark Recipe! If you make it, make sure to share with us on Facebook or Twitter! Also, check out all of our other Recipes.
EASTER WHITE CHOCOLATE BARK RECIPE
Lyne Proulx
If you are looking for something different and easy to share this year, you are going to love this White Chocolate Easter Bark recipe.
Lots of Easter candy like M&M’s, jelly beans, or any candy in pastel colours
Instructions
Begin by roughly chopping the larger pieces of candy.
Line an 9 x 11 pan with parchment paper.
When melting the chocolate, you can melt them in a microwave or in a double broiler. If using a microwave start at 30 seconds stir and repeat until fully melted. When using stove top keep temp. at medium range make sure you are stirring constantly.
Pour melted chocolate onto parchment paper and spread.
Now comes the FUN part. Begin placing Easter candy in the white chocolate.
Let the Easter Bark sit for several hours until it hardens.
Make sure it’s totally hard before cutting.
Transfer bark to a cutting board.
Cut the bark into pieces.
Nutrition
Serving: 8people
Keyword bark, candy bark, Easter bark, Easter White Chocolate Bark, White chocolate bark
Winters seem to feel longer than normal these days, just when we think the snow is done and gone we see flurries in the sky. During this time we long for the sunshine and warmer days of springtime. The stores are preparing for the upcoming Easter holiday and it reminds us it is time to start preparing for the Easter bunny. If you are looking to add a new recipe for Easter, why not start with these Peanut Butter Eggs.
Have you ever wanted to try to make a store bought chocolate treat you like? Well, I have. Sometimes they turn out just like the original and sometimes they don’t. This recipe for Peanut Butter eggs is one of those recipes that makes you think of Reese’s peanut butter egg. It has the right amount of creamy peanut butter and a nice coating of chocolate to make you think it was purchased and not homemade.
Peanut Butter Easter Eggs
This easy peanut butter eggs recipe can get a little messy with icing sugar and chocolate, not to mention forming the peanut butter dough mix into egg shapes. It is a recipe the entire family will enjoy making, decorating and of course eating, especially at Easter. If you don’t have an egg form to make the eggs, you will be getting your hands a bit messy shaping the dough into egg shapes. It doesn’t have to be perfectly oval, so don’t worry about perfecting the shape.
Once your eggs have been created and chilled, you can add some personal touches of sprinkles, putting names on them or you can just leave them plain. If you like Reese’s peanut butter eggs as much as we do, then you will want to make extras of our easy homemade peanut butter Easter eggs. If you need another easy Easter recipe why not check out these White Chocolate Dipped Oreo cookies.
Recipe for peanut butter eggs
I just love peanut butter eggs for Easter as they make great gifts for the entire family and the best part is that they are handmade from the heart! This recipe for peanut butter eggs is super easy to create with the kids, so you better wrap them fast or they won’t last for long! They are ideal for an Easter egg hunt!
Ingredients
1 cup peanut butter
1⁄4 cup butter
1 teaspoon vanilla extract
1 1⁄2 cup powdered sugar
10 oz. dark cocoa melting wafers or dark chocolate chips
How To Make Peanut Butter Easter Eggs
1. Melt peanut butter and butter for 1 minute in microwave. Stir until blended.
2. Add vanilla and powdered sugar, mix well.
3. Divide mixture into 10 portions and form each into an egg shape. Place eggs on a parchment lined baking sheet and place in freezer for 15 minutes.
4. Melt chocolate in microwave by heating for 30 seconds. Stir and repeat the process until chocolate is melted and smooth.
5. Using a fork, dip the peanut butter eggs into chocolate and flip to cover completely. Lift with fork and gently tap on edge of the bowl – allowing excess chocolate to drip off.
6. Place back on parchment paper and refrigerate the peanut butter eggs for 10 minutes.
I hope you enjoyed this recipe for Peanut Butter Eggs. If you make it, make sure to share with us on Facebook or Twitter! Also, check out all of our other Recipes.
Peanut Butter Eggs
Lyne Proulx
This recipe for peanut butter eggs is super easy to make with the kids. These copycat Reese's eggs are ideal for an Easter egg hunt!
10oz.dark chocolate chipsor dark chocolate melting wafers
Instructions
Melt peanut butter and butter for 1 minute in a microwaveable bowl in the microwave. Stir until blended.
Add vanilla and powdered sugar, mix well.
Divide mixture into 10 portions and form each into an egg shape. Place eggs on a parchment lined baking sheet and place in freezer for 15 minutes.
Melt chocolate in a microwaveable bowl in the microwave by heating for 30 seconds. Stir and repeat the process until chocolate is melted and smooth.
Using a fork, dip peanut butter eggs into chocolate and flip to cover completely. Lift with fork and gently tap on edge of the bowl – allowing excess chocolate to drip off.
Place back on parchment paper and refrigerate the peanut butter eggs for 10 minutes.
This Cadbury Creme Egg Cupcakes recipe is a fun Easter dessert to make for your guests.
Cadbury Creme Eggs are a nice treat to have once or twice a year even though they are sold all year round now. To me, these cupcakes with Cadbury creme eggs inside are a delicious Easter treat, so I don’t eat them all year round.
The Easter Bunny
Have you ever wondered why the Easter Bunny brings us chocolate eggs and not an Easter Chicken? We know rabbits don’t lay eggs, so why a bunny and not a chick? It’s hard to really say as there are a few stories. Easter is a religious holiday but some traditions are more pagan traditions. Spring represents new life and rebirth, which was represented by eggs. Jesus rose from the dead around this time so the eggs came to represent the event.
The Easter Bunny dates back centuries, he is like the Santa Claus of springtime. He hops down the bunny trail leaving colourful eggs in baskets for kids to find indoors and outdoors. Want to make your own basket? Check out these Easter basket ideas for kids.
How to make cadbury creme egg cupcakes
If you are looking for a recipe for Easter cupcakes with Cadbury eggs look no further. This Cadbury Creme Egg cupcakes recipe has a layer of ganache and buttercream frosting making it the perfect chocolate lover’s delight. You can also make this chocolate cupcakes recipe with any other treats of your choosing.
Since this recipe is for creme egg filled cupcakes, you want to make sure the eggs are chilled before adding them to the batter. You will want to make sure the Cadbury cream egg is covered with batter to help preserve the egg and not have it completely melt. When you add the egg, lay it on its side so there is less to cover. Make sure the cupcake batter is fairly thick to keep the cream egg from moving about.
There is actually a Cadbury egg in each cupcake, so just add your favourite flavour. A batch will definitely not last long as these Easter cupcakes are extremely gooey and overloaded in sweetness! This Cadbury Creme Eggs cupcakes recipe will make a perfect treat for an Easter family gathering.
Chocolate Cupcakes Ingredients
1/2 cup unsalted butter, softened
1 1/4 cup granulated sugar
2 eggs, room temp
1 Tbsp vanilla extract
1 cup chocolate chips
2 cups flour
1 Tsp baking powder
1/4 Tbsp salt
3/4 cup cocoa powder
1/4 cup milk, whole
12 Cadbury Eggs
Directions
Preheat the oven to 350 degrees F. Prepare a cupcake tin with paper liners. In a microwave safe bowl, melt semi-sweet chocolate chips and 2 tablespoons of milk for about 1 minute, stirring half way. Stir until chocolate chips are melted. Set to the side
Cream the softened butter and sugar until light and fluffy. Now add the eggs and vanilla, and beat until combined. Take the cooled melted chocolate and add to the creamed butter.
Begin to whisk the dry ingredients in a separate bowl, flour, baking powder, salt, and chocolate cocoa. Add the dry mix into the wet ingredients slowly alternating with adding the milk while mixing with a hand or standing mixer. Scoop batter into prepared cupcake tin, filling a little up to 3/4 of the way
Heavenly Easter Cadbury Eggs Chocolate Cupcakes
Take your Cadbury eggs and place them in the centre pushing it downs the cake mix covers it. Bake for 23-26 minutes, checking by testing with a toothpick should be cake free. Allow to cool for 1 minute in the pan, then transfer to a cooling rack.
Chocolate Ganache Ingredients
1/4 cup heavy cream
1 1/4 cup chocolate chips
Chocolate Ganache Directions
In a microwave safe bowl, melt the chocolate chips with the heavy cream for about 1 minute, stirring half way. Stir until smooth and all chocolate chips have melted.
Dip the cupcake in the bowl of ganache lightly twisting in motion to cover the whole area. Allow the chocolate cupcakes to cool before frosting.
Chocolate buttercream ingredients
1 cup unsalted butter, softened
1 cup or cocoa powder
3 cups powdered sugar
3/4 cups heavy cream
How to make a chocolate buttercream frosting
Beat the softened butter on its own until smooth. Add coca chocolate and powdered sugar alternately with heavy cream until a smooth, thick texture. If frosting is too thick, add more heavy cream, if too thin, add more powdered sugar.
Use a piping bag fitted with a medium sized tip of your choice to frost, or cut the corner off a gallon size zip-top bag filled with the frosting.
How To Frost a cupcake
Place the cupcake on a flat surface in front of you. Grasp the pastry bag from the top pushing the frosting down as you slide your hand down the pastry bag. Once you start to see frosting come out of the dip twist the top of the pastry bag tight. Use a clip or a rubber band to secure the bag.
Now begin to frost the cupcake going around in one smooth motion do not stop! Once you have completed the first circle begin the second one onto the first one as shown below.
Continue this process until you have covered the whole area. Now make a small peak at the top similar to how you would serve frozen yogurt a wee little twist and bam there it is a perfect frosted cupcake like a pro!
Cupcake Toppings
Drizzle with fudge or caramel, you can also sprinkle with chocolate sprinkles or even more chocolate chips. The more the better!
I hope you enjoyed myCadbury Creme Egg Cupcakesrecipe! If you make it, make sure to share with us on Facebook or Twitter! Also, check out all of our other Recipes.
Cadbury Cream Egg Cupcakes Recipe
Lyne Proulx
This Cadbury Creme Egg cupcakes recipe has a layer of ganache and buttercream frosting making it the perfect Easter chocolate treat!
In a microwave safe bowl, melt semi-sweet chocolate chips and 2 tablespoons of milk for about 1 minute, stirring half way. Stir until chocolate chips are melted. Set to the side
Cream the softened butter and sugar until light and fluffy.
Now add the eggs and vanilla, and beat until combined.
Take the cooled melted chocolate and add to the creamed butter
Begin to whisk the dry ingredients in a separate bowl, flour, baking powder, salt, and chocolate cocoa.
Add the dry mix into the wet ingredients slowly alternating with adding the milk while mixing with a hand or standing mixer.
Scoop batter into prepared cupcake tin, filling a little up to 3/4 of the way
Take your Cadbury eggs and place them in the center pushing it downs the cake mix covers it
Bake for 23-26 minutes, checking doneness by testing with a toothpick should be cake free
Allow to cool for 1 minute in the pan, then transfer to a cooling rack.
Chocolate Ganache
In a microwave safe bowl, melt the chocolate chips with the heavy cream for about 1 minute, stirring half way.
Stir until smooth and all chocolate chips have melted.
Dip the cupcake in the bowl of ganache lightly twisting in motion to cover the whole area .
Allow the cupcakes to cool before frosting.
Chocolate Buttercream
Beat the softened butter on its own until smooth.
Add coca chocolate and powdered sugar alternately with heavy cream until a smooth, thick texture.
If frosting is too thick, add more heavy cream, if too thin, add more powdered sugar.
Use a piping bag fitted with a medium sized tip of your choice to frost, or cut the corner off a gallon size zip-top bag filled with the frosting.
How to Frost a cupcake
Place the cupcake on a flat surface in front of you. Grasp the pastry bag from the top pushing the frosting down as you slide your hand down the pastry bag. Once you start to see frosting come out of the dip twist the top of the pastry bag tight. Use a clip or a rubber band to secure the bag.
Now begin to frost the cupcake going around in one smooth motion do not stop!
Once you have completed the first circle begin the second one onto the first one as shown below.
Continue this process until you have covered the whole area. Now make a small peak at the top similar to how you would serve frozen yogurt a wee little twist and bam there it is a perfect frosted cupcake like a pro!
Toppings
Drizzle with fudge or caramel, you can also sprinkle with chocolate sprinkles or even more chocolate chips. The more the better!
We’ve all heard or been told the benefits exercising and running in particular has on our health, but for most of us it goes right over our heads and it’s always the same excuses “I don’t have time” or “I have to pick the children up from school and who will cook the dinner?”
If that sounds like you, here’s something that you have absolutely no excuse for. First of all, running is an exercise that can be done all year round. If you find yourself stuck in the house, there’s a solution! Home gyms are becoming an increasingly ever-popular trend with more and more people now investing in treadmills for their homes. If this sounds like a good idea to you but you’re not sure where to start, Treadmillreviews are a great resource to help you decide which one’s right for you.
Why is this important?
Studies from the University of Iowa showed that as little as 10 minutes a day of running can not only improve health issues such as cardiovascular diseases and cancer, but also increase life expectancy by up to 3-5 years. Sounds good, right?! This is only one of many benefits exercising has on our bodies. Here are a few more ways that running a few times a week can improve our health:
It keeps you in shape
We all know that one of the greatest benefits of exercising in general is that it keeps you fit and healthy, that’s obvious, and running is one of the most effective ways of doing this. Compared to most other forms of exercise, it’s been proven that running burns the most calories. And it doesn’t just stop there. Once you’re done with your morning jog, something known as “afterburn” begins to happen in your body, and this is the number of calories which are still being burnt off AFTER exercise. The great thing about running is that it doesn’t matter how fast or slow you are going, as long as you are pushing yourself as much as you can you will always reap the benefits from it.
It makes you happy
At first thought, running might be the last thing you’d think would make you happy. During, as you’re feeling the burn and soreness making its way through your body, maybe. After however, with hormones endorphins that are released in your body during exercise, you gain a euphoric feeling of not only accomplishment, but also happiness. Some of the best times to go for a run is after a hard, stressful day, or on days where you are feeling down and depressed. Exercise in general has also proven to help people cope with stress and anxiety, and acts as a form of relaxation. A further study conducted in 2012 in the Journal of Adolescent Health proved that “just 30 minutes of running during the week for three weeks boosted sleep quality, mood, and concentration during the day.”
It reduces chances of illness
As mentioned above, although running won’t cure illnesses such as cancer, it prevents your chances of attaining the disease. There is a proven correlation that the more regular you exercise, the lower the risk of being diagnosed with cancer and cardiovascular illnesses. Should you already have cancer, running has proven to improve quality of life while undergoing treatments such as chemotherapy.
It strengthens the body
Staying on the subject of improving our bodies, running has demonstrated that it strengthens important joints and bones, such as our knees in particular. Don’t listen to the warning signs that “running is bad for you knees”, science has proven it’s false. The more regularly you run, the more bone mass and bone density you gain which improves knee health. Running is particularly beneficial for people who suffer from arthritis in their knee joints, and also helps strengthen weak ankles too.
Mini Easter Egg Cakes are a super cute dessert to add to the menu over the Easter holiday. This recipe for Easter cakes uses a boxed cake mix and frosting making them easy and fun to create. This Easter recipe is one that everyone will love so you might want to make extras.
Think of these Easter treats like cookies, they are small so you can have more can have a few and not feel guilty. Remember it’s another holiday that is meant for delicious treats, we are allowed to overindulge.
Decorations for Easter Cakes
When it comes to Easter cakes there are so many colourful decorations and ways to decorate them once you have frosting on them. During this time of year, you will find all sorts of colourful candies like mini eggs, smarties, spring coloured sprinkles, and of course, you can make frosting to pipe onto the cakes in any design you like.
Decorating Easter eggs of any kind is always a fun way for the family to spend time together. Prepare a cake decorating station on the kitchen table, so that everyone has a spot to sit, chat, and enjoy the moments.
Since there will be extra cake after cutting out the egg shapes with an oval cookie cutter, you can use it to make little extra decorations for the cake tray. Perhaps roll them to look like grass or hay that would represent a nest. Maybe roll it into mini cake balls and add some frosting, they will look like tiny little eggs around the Egg Cakes.
Ideas for easter treats
You will probably have leftover sprinkles and candies, so make use of them in some other Easter goodies like these Chocolate Easter eggs stuffed with frosted Brownies. You can also eat the leftovers on their own; however I like to find more creative ways to use them up. These ideas for Easter treats will be definitely be enjoyed by your guests:
I am positive that you will enjoy eating these mouth-watering Easter Cakes! Notwithstanding the fact that your kids will think you are the best mom and cook in the world for making them! You can use your favourite cake box and frosting. A treat for kids of all ages!
Yields: 12 mini cakes depending on size of cookie cutter
Ingredients
1 box cake mix (and the ingredients it requires)
1 tub whipped frosting (and flavour you prefer)
24 oz white chocolate
Sprinkles
2 tbs of vegetable oil
Kitchen Tools
Egg cookie cutter
Bowl
3 circle cake pans
Wired racks
Microwaveable bowl
How to make easy easter cakes
Mix all the ingredients for the cake in a bowl as directed on the box.
Set aside and spray 3 circle cake pans with oil and then flour them.
Once floured, pour in 2 cups of cake batter to each pan.
Cook on 325 for 20-22 min or until a toothpick comes out clean.
Let cakes cool on wired racks for about 10 min.
Then run a knife around the edges and flip cake pans over so that cakes are resting on the wired rack.
You can continue onto the next step or refrigerate the cakes for about 15 min to make the cake easier to cut and handle.
Use egg cookie cutter and cut out the shapes.
Cut each egg shape in half and spread on the frosting.
Then place them back together.
Melt the chocolate with 2 tbs of vegetable oil in a microwaveable bowl in the microwave in 15 sec intervals or melt in a double broiler.
Pour melted chocolate over the cakes and use a knife to smooth the chocolate over the cake and sides.
Add sprinkles and then let the Easter egg cakes harden.
I hope you enjoyed my Easy Easter Cakes Recipe! If you make it, make sure to share with us on Facebook or Twitter! Also, check out all of our other Recipes
Easy Easter Cakes Recipe
You will enjoy making this recipe for Easter cakes ! They are easy to make since you are using a cake box and a tub of whipped frosting.
Digging up ideas for a construction themed birthday party? You can build a great party blueprint with these clever tips for decorations, themed refreshments and interactive party ideas shared by Jennifer Carver of Spaceships and Laser Beams. Get out your drafting pencil and jot down some of your favourites!
Birthday Party Details
Boys love to dig, build and even get their hands a little bit dirty, making a construction themed party a perfect choice. Before getting started on the party blueprints, take a virtual or actual visit to a construction site for inspiration. Make a list of some of the details you see that might make great props at your party. Some of the items may include: hard hats, safety vests, saw horses, tools (tool belt, hammer, saw, screw drivers, nails, etc…), wood, drafting tables, building materials and machinery.
Other elements that stand out may be caution tape and signage, construction cones, and even piles of dirt! Once you’ve filled a paper with inspiration, take a peek in your own home, garage and backyard and see which of these items you may already have on hand. Even raiding your child’s toy closet may reap huge dividends. Toy diggers and construction trucks can make wonderful props and centerpieces.
Yellow and Black Colour Theme
As you’ve probably noticed, many things pertaining to a construction scene tend to fall into a yellow and black colour palette (although a colour change could make for a unique and fun take on this theme). Build your party space around these colours. Consider making (or purchasing) your own “party construction zone” signs to decorate your space. Add caution tape and colour coordinating balloons. Use a sawhorse or sheet of raw wood as your refreshment table. Prop food and drinks up on toolboxes and wood planks for that construction zone feel.
Birthday Party Food
Speaking of food and drinks, think of creative ways to transform ordinary treats and snacks into construction themed nibbles. Chex Mix can be labeled “nuts and bolts” and served out of the back of a toy dump truck. Chocolate donuts become “digger wheels”. And how about making a cake look like a building site with crushed cookie dirt, Kit Kat bar “logs” and a toy construction truck perched on top? The ideas are endless!
Construction Themed Birthday Party Ideas
Activities for a construction themed party must involve building and wrecking. Favourites include a series of mini stations for the crew to rotate through. At the first station, they get outfitted in hard hats and safety vests (easily found at dollar stores). The next station could be a Lego tower building competition (who can build the tallest tower in 5 minutes?). Cardboard bricks could be knocked down in another station using a homemade wrecking ball (check the web for easy DIY tutorials on building your own).
For those who like getting dirty, put several construction trucks and shovels in a sandpit and let the kids go to town! The best part about these ideas? They are simple…and kids love them! Plus, chances are, you probably already own most of the materials that you will need to run these activities.
Ready to party now? Use these idea inspirations as your draft and you can build a fabulous construction themed birthday party with DIY invitations for one lucky guest of honour and his party crew!
Just as a LEGO masterpiece is made from imagination and a solid foundation, a great party is built on creative, well-planned details. If you’re hoping to build a fantastic Lego birthday party for your little LEGO lover, you’re in luck! Jennifer Carver, from Spaceships and Laser Beams, is here sharing her tips for some easy Lego party ideas that anyone can implement!
Building a great party starts with a few solid party basics such as a clever invitation, captivating décor and palate pleasing refreshments (we’ll save party activities and favours for another day).
House, tree and 1 character made of Lego.
Lego Birthday Party Invitation
Build excitement for your LEGO party by sending out a LEGO brick invitation. There are many ways to accomplish this. The first way is to create your own. Cut a piece of cardstock in half to create your brick base. Use a circle punch to cut out circles from the other half of your cardstock. Use 3-D foam pieces to attach the circles to your brick base. Voila, a Lego!
On the back of your LEGO invitation, attach the party details. Invite party guests to “come build” with you. A fun alternative is to fill a Ziploc bag with Legos and include a Lego inspired printable invitation inside. Or, how about tying a birthday tag with all of the party details to a big LEGO brick with twine? Then have fun hand delivering your invites door to door.
Lego Birthday Party Decorations
Create a LEGO birthday party atmosphere inspired by LEGOS! The easiest LEGO decoration idea of all is to round up LEGOS from your child’s toy closet to use for décor. Scatter a few bricks throughout the party space or have your Lego lover create some display pieces to showcase. Another fun idea is to fill apothecary jars with bricks to give pops of colour.
If you’re up for a little DIY project, make your own giant Legos to spruce up your party space. Gather boxes of varying sizes and cover them in inexpensive wrapping paper in basic LEGO colours. Spray paint foam discs to use as the top of the LEGOS (keep in mind that you will only need to add the foam discs to the LEGO bricks that will be on top of your LEGO brick displays). Stack the LEGO “bricks” to create a fun backdrop for a refreshment table and/or use as centerpieces on tables.
If you really love to get crafty, using yellow spray paint or a yellow cylinder shaped bucket, recreate the LEGO Man. You can add his facial features easily with a black marker or vinyl cut outs.
Create a LEGO garland by making a variety of colourful Lego bricks out of paper (as explained in the invitation idea) and string them on ribbon or twine. Using a LEGO inspired font found online, print out the guest of honour’s name in block letters to display as a focal point on a backdrop.
Portrait of little cute boy making towel with lego close up.
Lego Birthday Party Refreshments
While Pinterest is full of the most mind-blowing LEGO birthday party inspired cake pops, cookies and cakes you can definitely try to imitate, there are some simple refreshments that only require a couple ingredients and a few simple steps. Marshmallows, candy melts and an edible ink pen can be transformed into LEGO Man marshmallow pops. Insert a sucker stick into your marshmallow and dip in melted yellow candy melts. Allow your dipped marshmallow to dry before adding facial features with an edible marker.
If your child loves sugar cookies, create a batch of your favourite sugar cookie dough. Pull out rectangle and circle cookie cutters to create the parts of a LEGO cookie! Once baked and cooled, top the cookies with coloured frosting. Attach the small circle cookies to the larger rectangle base with a little bit of icing. Use your imagination to create many similar easy treats.
If you’re looking to add a few healthier options to your refreshment menu, your rectangle and circle cookie cutters can be used to create Lego shaped sandwiches, cheese and crackers, and even fruit. Watermelon works especially well.
Now that you have imaginative ideas to set the scene, you are ready to focus your efforts on actually building the LEGO birthday party! It’s going to be amazing!
Saint Patrick’s Day is such a fun holiday; it gives us a chance to spring out of the long winter. Plus, all of the fun food, drinks and parties are something to look forward to! If you are having a get together with friends and family this year, I have just the recipe for you. This Lime Shamrock Punch is perfect for serving your family or a crowd and everyone will love the vibrant colour this punch provides. It is so festive!
St. Patrick Lime Shamrock Punch (Mocktail)
2 Simple Ingredients To Make The Lime Punch
A party just isn’t a party without punch! While Saint Patrick’s Day is generally known for buckets of green beer, but for those of us that aren’t as wild, this Lime Shamrock Punch makes for the perfect mocktail. It is made with only 2 simple ingredients and is so refreshing; it is truly perfect for a kid’s party.
Lime Shamrock Punch Ingredients Alternative
I like to make this recipe with ginger ale, it adds just the right zip with the combination of lime sherbet. If you prefer you can use lemon lime soda; which is also a tasty alternative if that is what you have on hand. The sherbet keeps the St. Patrick’s Day punch perfectly chilled.
Easy Punch Recipe
This recipe is awesome for the holiday, but the flavour really works anytime of the year. I have served this at birthday parties and holiday gatherings to rave reviews. But, I have also been known to get a craving and plop a scoop of sherbet into a cold glass and top it off with soda on a warm day. Anytime is the right time for this easy punch!
1. Place Lime Sherbert into a punch bowl and pour in Ginger Ale.
I hope you enjoyed my St. Patrick Lime Shamrock Punch (Mocktail) Recipe as much as my family and myself did! If you make it, please share your photos with us on Facebook or Twitter! Also, check out all of our other Recipes!
Happy Saint Patrick’s Day!
St. Patrick Lime Shamrock Punch Recipe (Mocktail)
We enjoy preparing a super easy and fun Lime Shamrock Punch Recipe to celebrate St. Patrick's Day! You will want to drink it year round!
Saint Patrick’s Day is near and I have rounded up 25 of the best books for kids on the subject! This list is perfect for adding a few new seasonal titles to your library and learning all about rainbows, leprechauns and pots of gold!
25 St. Patrick’s Day Books for Kids
St. Patrick’s Craft ideas
Around St. Patrick’s Day, with so many delicious recipes to try, and so much festive green garb to wear, it is easy to get wrapped up in all of the good food and efforts to avoid getting pinched. But, there are so many fun ways to involve the kids! From fun and easy crafts like Edible Green Jello Playdough that gives kids a hands on dose of fun to a paper plate pot of gold craft that is perfect for hanging on the fridge.
This list of books pairs perfectly with an afternoon craft session; it has titles that are perfect for young readers! You will want to look on Amazon to grab a few digital copies for immediate Luck of the Irish reading fun, or head to your local library with the list to grab a few for an afternoon reading session!
St. Patrick’s Day Books for Kids
Even the most reluctant readers will enjoy these titles, and parents will love that these books give young readers introductions to the holiday and the fun things we associate with St. Patrick’s Day. Don’t be surprised if your little reader turns a little green with envy at the pots of gold they will encounter and the cute little leprechaun friends they will be introduced to with this reading list.
March is the perfect time to get in the kitchen and whip up something that honours the fun of St. Patrick’s Day! This Irish Apple Cake is just the recipe to try. It will become a family favorite for certain, and while it is the ideal dessert on March 17th, it is such a good cake that you will want to bake it year round.
Apple Cake Is So Flavourful
At my house, we love dessert! Cookies, pies and candies are always welcome here and I never bat an eye at a slice of cake. With that in mind, any time I can add fruit to the mix, I jump on it! This apple cake is moist and perfectly seasoned with ginger, allspice and nutmeg. While the apples certainly don’t make this cake ‘health food’, they do add a lot of flavour and texture! And a serving of fruit is always a good idea with your dessert.
Ingredients To Use
Granny smith apples are ideal to use in this recipe. They are perfect for baking. They have a great texture and a tartness that can really be enhanced with seasonings. These apples also keep their shape well and won’t turn to mush in the cake. If you don’t have granny smith, Honeycrisp is a great alternative apple for baking and retaining its shape in desserts. Be sure to use real butter in this recipe to give it a good flavour and consistency during the baking process. Margarine is not recommended for this recipe.
Irish Apple Cake Recipe
This Irish Apple Cake recipe is a family favourite, not only on St. Patrick’s day, but year round. A delicious moist St. Patrick’s day cake made with granny smith apples. Your family will request seconds!
Ingredients
3 cups all-purpose flour
1 Tbsp baking powder
1/2 tsp salt
1/4 tsp of ground ginger, nutmeg, and allspice
3/4 cup unsalted butter, cold, diced into small pieces
1 Cup and 2 Tbsp sugar, divided
1 1/2 lbs of granny smith apples (5 med)
3/4 cup milk
2 large eggs
1 tsp vanilla extract
1/2 tsp ground cinnamon
How To Make The Irish Apple Cake
Preheat oven to 375 degrees.
Butter and flour a 9-inch spring form pan then set aside.
In a large mixing bowl whisk together the flour, baking powder, salt, ginger, nutmeg and allspice for about 20 seconds.
Add the cut butter pieces and rub them into the mixture using your fingertips until it looks like fine crumbs.
Stir in 1 cup sugar.
Peel apples, slice in half, core and stem, layer apples on flat side, slice downward into pieces less than 1/4 inch thick.
Dice the apple pieces into smaller chunks ( about 2 or 3 chunks per slice).
Add the diced apples to the flour mixture.
Toss well to evenly coat, work to separate any apples that have stuck together.
In another bowl, whisk the milk, eggs and vanilla together until they are well combined.
Pour the milk mixture over the apple and flour mixture.
Wash your hands next then just toss until combined. Your batter will be slightly lumpy but that is okay …..just don’t over mix.
Pour your batter into the prepared baking dish, spreading into an even layer.
In a small stir 2 Tbsp sugar plus 1/2 tsp cinnamon to sprinkle evenly over the cake.
Bake the cake in a preheated oven 45-50 minutes until a toothpick inserted into centre comes out clean.
Now cool the cake for about 5 minutes on a wire rack.
Remove the ring from the spring form pan allowing the cake to cool to your desired temperature.
Drizzle with a caramel sauce and serve the St. Patrick’s day dessert with ice cream. Enjoy!
Irish Apple Cake
Lyne Proulx
This Irish Apple Cake recipe is a family favourite, not only on St. Patrick's Day, but year round. A delicious moist cake made with granny smith apples
I hope you enjoyed my this recipe for Irish Apple Cake as much as my family and myself did! If you make it, please share your photos with us on Facebook! Also, check out all of our other Recipes!
We use cookies to ensure that we give you the best experience on our website. If you continue to use this site we will assume that you are happy with it.


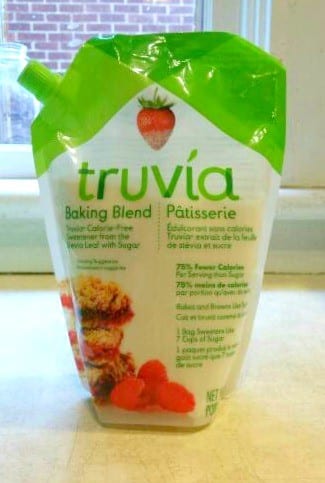


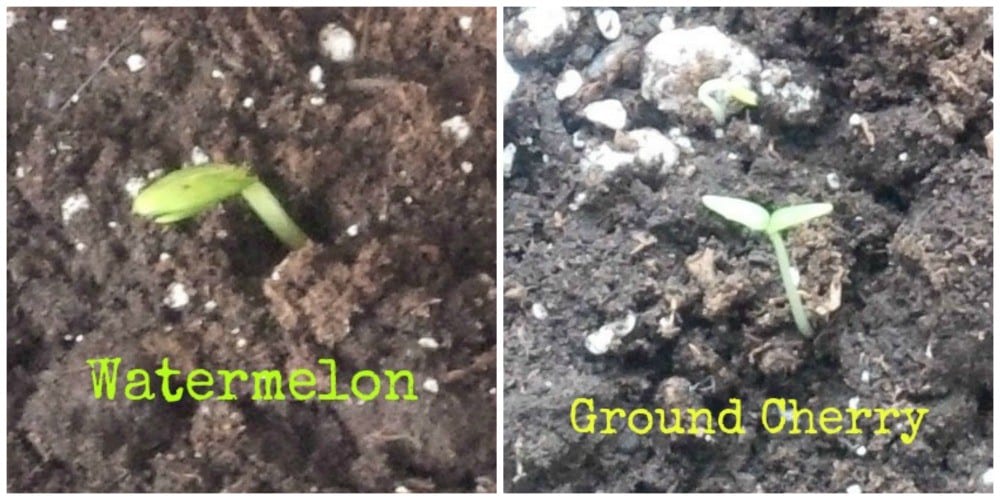


")


