Halloween is all about the treats for many kids, but they don’t always have to be store-bought. The best treats come from the heart and are handmade. If you have a party or school function then you will want to add these Halloween Oreo Bat truffles to the snack table. Make sure to make enough for seconds and maybe even a few extras if kids want to take one home. These halloween bat truffles will go fast so you don’t want to disappoint anyone by not having enough.
Halloween Bats
When it comes to Halloween we usually think of ghosts, goblins, witches, spiders and bats. In some cultures bats are considered a liminal creature; not quite a mammal, not quite a bird. It’s about the in-between-ness and that is a big part of Halloween. Some think they are weird and fit perfectly with the occasion. Whatever the reason, they are part of the celebration and can usually be found flying around trees with the witches.
Snacks using Oreos
Oreos seem to be a favourite cookie for many. Some like to dip them in milk or some like to pull them apart and eat the creamy inside first. How do you eat your Oreos? Did you know that there are so many ways to use Oreo cookies in recipes? This Halloween truffle recipe is just one way and these Oreo truffles are no-bake. If you love to spend time in the kitchen without the heat of the oven then these bat snacks will work nicely.
If you need more inspiration for your package of Oreo cookies then check out Thanksgiving Oreo Turkey Cookies or Valentine’s Day Chocolate dipped cookies. How cool are these Incredibles or Captain America treats? Any of these Oreo recipes will make for a fun treat that adults and kids of all ages will enjoy. You may want to buy Oreos just to make these snacks for the kids.
How to store truffles
Refrigerate the truffles in an airtight container for at least 10 minutes, so the chocolate sets. These Halloween bat Truffles must always be chilled and will stay fresh for up to 5 days in the refrigerator.
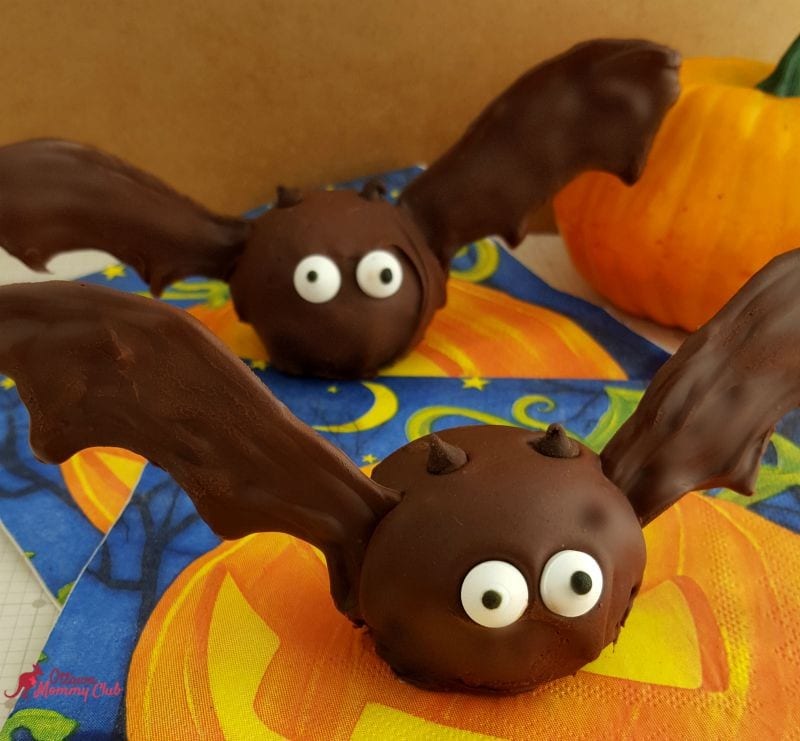
Halloween Oreo Bat Truffles

Oreo Truffles, do I need to say more! These adorable Halloween Oreo Bat Truffles will be one of your kids favourite this year. It’s tricky to get the wings on the balls, so just make sure while the coating around the ball is still wet to dip a bat wing interior edge into the chocolate and press gently into the side of the truffle.
Ingredients
- 1 8 oz. package of cream cheese, softened to room temperature
- 1 package of Oreos
- 1 – 300 grams Mini chocolate chips bag
- 12 oz. Semi-sweet chocolate chips
- 40 Edible eyes

Equipment Needed
- Parchment paper
- Ziplock bags
- Tape
- Scissors
- Printable bat wing stencil
Halloween Bat Truffles Directions
1. Process the Oreos (entire cookie including filling) in a food processor or blender. Pulse until crumbs are formed.

2. Using a hand-held or stand mixer fitted with a paddle attachment, beat the Oreo crumbs with cream cheese until combined. The mixture will be thick and sticky.
3. Using your hands, roll into 20-25 balls. Place balls on a parchment paper lined backing sheet or a silicone mat-lined baking sheet. Freeze the truffles for at least 30 minutes. If they are not cold and solid, the melted chocolate will not coat the balls properly.

4. While the truffles are freezing, place the Bat Wing Stencil under a piece of parchment paper on a solid surface– taping it down to keep it in place.

5. Melt ½ cup of semi-sweet chocolate chips as directed on packaging.

6. Place melted chocolate into a Ziplock bag and use scissors to snip off one corner. Pipe the melted chocolate along the outside of each bat wing outline and completely fill in with chocolate. Place chocolate wings in freezer for 10 minutes to harden.

Click on bat stencil photo to make bigger and print.
7. Once the bat wings have hardened – place edible eyes, mini chocolate chips, frozen Oreo truffles and bat wings in one location, so they are quickly available for the next step.
8. Melt remaining semi-sweet chocolate chips as directed on packaging.
9. Working with one truffle at a time, completely coat the outside of each ball. To do this, simply drop each truffle into the chocolate, swirl it around with a fork and then pick it up using the fork’s prongs. Tap the fork on the edge of the bowl to allow the excess coating to drip off, and place on lined baking sheet. Working quickly while the coating is still wet, dip a bat wing interior edge into chocolate and press gently into the side of the truffle until it is secure. Do the same with the second bat wing. Press two eyes into the front of the truffle and two mini chocolate chips onto the top. Repeat this process until all truffles are used.


Halloween Oreo Bat Truffles
Equipment
- Parchment paper
- Ziplock bags
- Tape
- Scissors
Ingredients
- 1 8 oz. package of cream cheese softened to room temperature
- 1 package Oreos
- 300 gr Mini chocolate chips 1 bag
- 12 oz. Semi-sweet chocolate chips
- 40 Edible eyes
Instructions
- Process the Oreos (entire cookie including filling) in a food processor or blender. Pulse until crumbs are formed.
- Using a hand-held or stand mixer fitted with a paddle attachment, beat the Oreo crumbs with cream cheese until combined. The mixture will be thick and sticky.
- Using your hands, roll into 20-25 balls. Place balls on a parchment paper lined backing sheet or a silicone mat-lined baking sheet. Freeze the truffles for at least 30 minutes. If they are not cold and solid, the melted chocolate will not coat the balls properly.
- While the truffles are freezing, place the Bat Wing Stencil under a piece of parchment paper on a solid surface– taping it down to keep it in place.
- Melt ½ cup of semi-sweet chocolate chips as directed on packaging.
- Place melted chocolate into a Ziplock bag and use scissors to snip off one corner. Pipe the melted chocolate along the outside of each bat wing outline and completely fill in with chocolate. Place chocolate wings in freezer for 10 minutes to harden.
- Once the bat wings have hardened – place edible eyes, mini chocolate chips, frozen Oreo truffles and bat wings in one location, so they are quickly available for the next step.
- Melt remaining semi-sweet chocolate chips as directed on packaging.
- Working with one truffle at a time, completely coat the outside of each ball. To do this, simply drop each truffle into the chocolate, swirl it around with a fork and then pick it up using the fork’s prongs. Tap the fork on the edge of the bowl to allow the excess coating to drip off, and place on lined baking sheet. Working quickly while the coating is still wet, dip a bat wing interior edge into chocolate and press gently into the side of the truffle until it is secure. Do the same with the second bat wing. Press two eyes into the front of the truffle and two mini chocolate chips onto the top.
- Repeat this process until all truffles are used.
- Refrigerate the truffles for at least 10 minutes so the chocolate sets. Truffles must always be chilled and will stay fresh for up to 5 days in the refrigerator.
Notes
How to store truffles
Refrigerate the truffles in an airtight container for at least 10 minutes, so the chocolate sets. These Halloween bat Truffles must always be chilled and will stay fresh for up to 5 days in the refrigerator.Nutrition
I hope you enjoyed my Halloween Oreo Bat Truffles with free printable bat wing stencil as much as I did! For a Halloween bat craft idea, check out this Halloween Paper Plate Bat craft!