During the long weekend in September, my family and I headed to Toronto for back to school shopping, take in a Blue Jay’s game, and to visit a few attractions such as the Ripley’s Aquarium of Canada, the largest indoor aquarium in Canada. It’s conveniently located next to the CN Tower and the Rogers Center, and near the Toronto Convention Centre at 288 Bremner Boulevard. You will find below our review of Ripley’s Aquarium of Canada!
We opted to visit during a less busy time on Friday afternoon at 4 pm. I heard it can get very busy on weekends and holidays or during peek day time, so best to go early in the morning or after 4 pm to closing to avoid crowds. We spent 3 hours at the Ripley’s Aquarium and were impressed with the variety of fishes, sharks, green sea, turtles, jellies, rays, and more! The Aquarium is 12, 500 square-metre with more than 5.7 millions of water depicting marine and freshwater habitats and from around the world.
Educational Afternoon at the Ripley’s Aquarium of Canada
Ripley’s Aquarium is divided in 9 galleries:
1. Canadian Waters
The Canadian Waters Gallery offers 17 curated and diversify habitats, one as precious as the other.
2. Rainbow Reef
View Nemo and Dory, as the younger children at the Aquarium were calling them, and many others in the tropical waters of the Indo-Pacific region. This exhibit offers an interactive dive show every other hour to the delight of children of all ages!
3. Dangerous Lagoon
This exhibit is definitely the most spectacular and fun at Ripley’s Aquarium! You can view the sea creatures such has sharks, turtles, and fishes in the underwater tunnel using a slow moving walkway. They swim in the tunnel above you, so now how exciting is this!!
4. Discovery Centre
Now is the time to take part in some hands on experience by touching Horseshoe Crabs in the tank, pop-up into two cylinders including two underwater. You can see Clownfish, Palette Surgeonfish, and Horseshoe Crab. You can also stop for a bite to eat at the Ripley’s Café. They serve cold and hot food, snacks, and drinks.
5. The Gallery
The Gallery features delicate species like Red Lionfish, Electric Eel, Lined Seahorse, Weedy Sea Dragon, Archerfish, and a live coral exhibit.
6. Ray Bay
In the Ray Bay, you can explore the world of stingrays: Bonnethead shark, Cownose Ray, Southern Stingray, and Roughtail Stingray. It’s exciting to watch the diver give a daily show. You can join the interactive dive shows every two hours starting at 11:15 am. Not positive I would want to join him!
7. Planet Jellies
I could have stayed for hours watching the Jellies! The transfixing gallery is mesmerizing with its backlit and colour-changing displays. As you look up, the ceiling showcases translucent Moon Jellies! It’s so relaxing!
8. Life Support System
Wow, impressive! View behind the scene life support and filtration equipment used to maintain the Aquarium with real-time stats and information about the water quality and conditions.
9. Shoreline Gallery
Educators teach fun facts about the Whitespotted Bamboo Sharks, the Brownbanded Bamboo Sharks, the Southern Stingray, and the Cownose Rays in the Shoreline Gallery.
Did you know that you can spend the night at Ripley’s? You can explore the Aquarium, participate in educational experiences, and learn at the overnight reef adventure! You are provided with a snack, a breakfast, take home activity, and a chance to sleep in your sleeping bag overlooking the “Dangerous Lagoon” shark tunnel. The cost is $99/person plus taxes. The Aquarium also offers other specialty programming and events such as the Stingray Experience, Morning Yoga and Friday Night Jazz.
ADMISSION
Tickets can be purchased online for a specific day and time. I strongly recommend purchasing before as the wait time in line is significantly less in the ticket holder line.
The gift shop is located as you exit the Aquarium. Of course, it’s difficult not to leave without purchasing a sea creature and a t-shirt. They are so adorable!
We really enjoyed visiting the Ripley’s Aquarium of Canada. We loved learning about the different sea creatures, from fishes to sharks. The aquarium is very well laid out from informative and interactive exhibits to tanks and underwater tunnels. It’s definitely an attraction you want to bring the kids when staying in Toronto!
To find out more about the Ripley’s Aquarium of Canada, you can visit them on their website. You can also connect with them on their Facebook, Twitter and Instagram pages!
Disclaimer: I received complimentary tickets to Ripley’s Aquarium of Canada for the purpose of writing this review. All honest opinions are my own.
Christmas is only a few days away! Are you putting the finishing touches on your menu for the big day? I am! I am now down to deciding what drinks I will serve to my nearest and dearest at our gathering. This year, I have uncovered 10 Family Friendly Drinks for Christmas that are perfect for serving at a gift exchange, a holiday meal, or just when friends stop by to wish your family well!
Which of these 10 Family Friendly Drinks for Christmas do you think you would most enjoy? I think I would love the Orange Mocktails! My family will adore the Black & White Hot Chocolate!
It’s that time of year again: trees, presents, eggnog, and getting to leave work early to celebrate the special Christmas season with your loved ones. But what’s an office environment without a Christmas party that brings everyone together to celebrate the end of the year and all of the successes of the past year? It’s no wonder that work Christmas parties are so popular. After all, they’re a lot of fun and they’re a great way to close out the year and welcome the new one that’s ahead.
Despite how great a work Christmas party can be, though, there are some key things to consider while planning your big holiday bash so you can reduce the stress of the planning process and ensure everything will go as smoothly as possible.
Planning a Work Christmas Party
Photo credit: RHiNO NEAL via Foter.com / CC BY-NC-ND
Where will You Host the Event?
You can host your Christmas party at one of the many local venues available in your area. This is a great way to get everyone out of the office for a change. The fancier environment of a special venue will also encourage everyone to get dressed up and get out of their typical office attire for a while.
But whether you’re deciding upon where to have your holiday party in a city like LA, in Ottawa, or in any other city for that matter, you should also consider whether you can afford to rent out an outside venue – or if it would actually be better to just have a small party in your office itself. While it may not be as fancy, your employees may actually appreciate the more casual and laidback atmosphere.
Ultimately, when it comes to where you’ll host your Christmas party, it will really come down to budget and what your employees would actually prefer, as well as how much effort you want to put into it.
What Costs Can You Afford and What Is Your Overall Budget?
Like many things holiday related, party costs can be prohibitive at times. Therefore, it’s a really good idea to know your company’s holiday party budget before you even start making any plans.
If you don’t have vendors that you use regularly for company events, you probably don’t have an existing price list to go to for things like foods and drinks, décor, entertainment, etc. As a result, it’s highly recommended that you start shopping around for a venue and vendors early so you can get an idea of what kinds of services you can afford, and which ones might be better left for another time.
You Should Send Your Employees a Formal Invitation
Rather than just sending your employees a general, plain email about your upcoming Christmas party, you should make it a point to invest in some nice holiday party invitations that will get them really excited about the event and prove to them that it will be a special occasion after all.
If you have a tight budget, you don’t need to get the fanciest invitations out there. In fact, you can avoid expensive invitations and opt for really affordable options that can be found online, or you can purchase affordable blank templates that you can then print with the details of your event.
Photo credit: SaijaLehto via Foter.com / CC BY-NC-SA
Have a Special Theme
Rather than throwing a plain old holiday party, you should also consider incorporating a unique theme throughout your work Christmas party. Some of the more popular options include film inspired themes, vintage or retro themes that go back to the 1950s, ’60s, and ’70s, ballroom themes that are fancy and elegant, and winter wonderland themes that are perfect for enjoying the beauty that the season has to offer.
Be sure to infuse the theme throughout the venue that you select, whether you’re renting a space or using your own work environment. So, for example, you can bring the theme into the entrance of the space, in the foods and drinks that are offered, into the décor, and into the entertainment. For instance, if the party is a ’70s themed holiday party, you should be playing music from that era that people can dance to. And you can even go ahead and encourage your guests to dress according to the theme by suggesting it in their invitations.
Planning a holiday party for your entire staff can be a daunting task, but you can also make it a lot of fun. Once you have the major details in place, like your budget and venue, you can really let your imagination run wild with ideas for décor, theme, and entertainment.
Of all the sweet treats that I enjoy during the holiday season, fudge is the most soft and chocolaty snack I make for my family and guests. Some fudge recipes ask for careful temperature monitoring and lots of beating by hand to achieve the perfect texture, but this creamy fudge recipe relies on marshmallows to create a smooth and foolproof result. If you don’t like nuts, you can omit them.
Foolproof Creamy Fudge Recipe
Ingredients:
3 cups of semi-sweet chocolate chips
1 can of sweetened condensed milk ( I used Eagle Brand)
2 cups of miniature marshmallows
Dash of salt
1/2 cup to 1 cup of chopped nuts
1 1/2 teaspons vanilla extract
How To Make Creamy Fudge
In a heavy saucepan, over low heat, melt the chocolate chips with the marshmallows, the sweetened condensed milk and salt. Do not over cook.
Remove from heat and stir in vanilla and nuts.
Spread evenly into a waxed paper-lined 8 or 9 inch square pan.
Chill for at least 2-3 hours or until firm.
Turn fudge, peel off paper and cut into squares.
Store covered at room temperature.
I hope you enjoyed my Foolproof Creamy Fudgeas much as my family and I did. If you make it, make sure to share with us on Facebook or Twitter! Also, check out all of our other Recipes.
It is always great to go out for a bite to eat! There are so many places to choose from, that it can become daunting to choose the right place to dine and have a good time. If you want have a good time while noshing on some delicious dishes, consider checking out Jack Astor’s, Lansdowne! On my last visit to this location I was invited by Zomato, a food blogging review site, to try out some of the selections from their new tasting menu!
Before we sat down to eat, we were given a tour of the newest Jack Astor’s location in the Ottawa area. It is a large and gorgeous space right in the middle of the new Lansdowne Park complex. There were so many fun pieces to look at around the restaurant. What I did not know was that each Jack Astor’s had fun and unique pieces that can only be found at specific location. The art pieces were humorous to look at, and the collection of cameras was a favourite spot of mine to see.
We were then treated to a bit of flair behind the bar. Fun is being had wherever you look at Jack Astor’s!
Jack Astor’s, Lansdowne – Review
Once we returned to our table, we saw our tasting menu for the evening. There were so many different dishes we were going to be served. I was really excited to try what Jack Astor’s had in store for us!
These were the dishes that started off our evening:
• Garlic Pan Bread • Fresh Guacamole Served with Tortilla Chips • Board BBQ Chicken and Veggie Nachos
Since I have dined at Jack Astor’s on many occasions, I am no stranger to their Garlic Pan Bread. My fellow tasters and I had a ball eating this yummy treat! We also were diplomatic about who got the honour of eating the coveted center piece in each loaf. The Guacamole and Tortilla Chips were so good to eat. I do not usually eat guacamole, but the one I was served at Jack Astor’s was really good. The Board BBQ Chicken and Veggie Nachos were amazing! Served on individual plates, we got a very good portion size of this dish. The toppings were really fresh, and delicious. The veggie version was a great lighter alternative, but the BBQ chicken version was my favourite starter. It was zingy, crunchy and an all-around good dish.
Delicious food at Jack Astor’s, Lansdowne
I had to be careful to leave room from the Starter portion of this menu for the mains we were being served! There were a lot of them, and some of them (thankfully) were to be shared. We tried the following dishes:
• The Smiling Buddha Salad • Tuna Avocado Sandwich • Beef and Veggie Tacos • Holy Smoke BBQ Burger • Hold the Beef Burger
Though I could not eat the Smiling Buddha Salad, it looked incredible! The ingredients looked really fresh and complement each other well. The Tuna Avocado Sandwich was really good. I loved the sesame crusted Ahi tuna, the avocado and the chipotle mayo used. The sourdough bread as a great bread that did not allow for the sandwich to become soggy. The Beef and Chicken Tacos were fun to eat. They were big enough to hold all of their fixings well, yet small enough to wrap up and eat. The Holly Smoke BBQBurger is a favourite of mine. The smoky BBQ sauce mixed with pickled banana peppers, hickory mayo and crispy fried onions worked so well together, and the flavour had a bit of a kick, which I really enjoyed. I was not sure about the Hold the Beef Burger, but it tasted really nice. The goat cheese, pico de gallo and garlic lemon aioli was the flavour combination that won me over with this burger.
There was only one dessert served to us, but let me tell you, another dessert was not needed. It was Jack Astor’s My Cookie Ate Your Brownie dish served with a side of vanilla ice cream. It was a clever idea to combine two delectable treats into on mega dish! It is brownie engulfed by a huge chocolate chip cookie. I fell in love with this dessert. It was warm, sweet and gooey. This treat was also a full portion size, so you get your bang for your buck! I must confess that I assisted others at the table finish their portions because it was so good. This dish was my highlight of the night!
I really enjoyed my evening touring and eating at Jack Astor’s, Lansdowne. The atmosphere is casual, the unique items for display are fun to look at, and the new menu was really delicious to try! Thank you, Zomato – Ottawa for setting up the evening. I had a lot of fun! My family has been to this location on two previous trips, and we try to sit down in different sections to take in the whole restaurant. I cannot wait to go back and do a quick tour with them so they can see the location in its entirety before our meal is served. I also cannot wait to suggest to them what they should order to eat off of the new menu. It will continue to be a favourite spot for us to dine at and enjoy!
For more information about Jack Astor’s, Lansdowne, you can connect with them on their website, as well as on their Facebook, Twitter, Instagram and YouTube pages!
This Super Easy DIY Mason Jar Christmas Candle craft makes for an easy way to add to your holiday decor, without making too much effort or spending a fortune on premade decorations! It comes together easily, making it ideal for a quick, last minute crafting session, or a way to keep with a theme throughout the house on a budget.
What Supplies Do You Need
Made with fresh cranberries and floating candles, this mason jar Christmas craft is perfect for a last minute decoration. It requires basically no skill to assemble, and there is a good chance you probably will have all of the supplies on hand, as they are common holiday items. You can assemble it days before the holiday and it will stay fresh, or you can put it all together in minutes, right before your guests arrive.
This super easy DIY mason jar Christmas candle craft is also versatile; if you don’t have fresh cranberries or pine trimmings feel free to improvise with what you do have. Wooden beads, holiday scatter, and even water beads will work if you need to get creative. Fake flowers and greenery will also float in this craft if needed!
Easy Christmas Family Craft
This is a good Christmas craft to make with the kids. All ages can help in one way or another. Make this as I did, or put your own holiday spin on it. Using a floating candle is important, but if you don’t have one, you can take a tealight out of the metal cup, flip it over so that your wick is on the bottom and dribble a little wax from another candle over the bottom so that the little metal disc is completely covered. That should give you an easy diy floating candle in a pinch.
How To Make A DIY Mason Jar Christmas Candle
Materials:
One floating candle or simple tealight
3-4 fresh sprigs pine (or plastic)
1 cup fresh cranberries (or red plastic beads)
2ft length of twine
Water
Half gallon mason jar
Hot glue
Essential oils, optional
Directions:
Twist your length of twine around the top of the mason jar, covering the entire lip. Secure by tying, or by adding a small dab of hot glue.
Trim the ends off of your twine.
Fill the mason jar halfway with water.
Arrange the pine sprigs, as desired.
Fill the mason jar to the 3/4 full mark and then add the cranberries or beads, and nestle the floating candle securely in the cranberries.
You can add a few drops of your favourite essential oil (optional).
If you are planning to gift your jar, glue the twine instead to the lid and omit the water.
10 Christmas Crafts For Kids
While you are here, why not check out some of my other holiday craft ideas such as:
I hope you enjoyed my DIY Mason Jar Christmas Candle as much as I did! If you make it, please share your photos with us on Facebook or Twitter! Also, check out all of our crafts!
These Chai Snickerdoodle Holiday Cookies are perfect to serve during the holidays! These are so delicious and the white chocolate icing makes it a sweet cookie everyone will love.
How To Make Chai Snickerdoodle Holiday Cookies
Cookie Ingredients:
2 cup sugar
2 tsp ground cinnamon
1 tsp ground ginger
1/2 tsp ground allspice
1 cup butter, room temp
2 eggs, room temp
1 1/2 tsp vanilla
2 3/4 cup flour
2 tsp cream of tartar
1 tsp baking soda
1/8 tsp salt
Chocolate Ingredients:
1 bag of white chocolate wafers
Icing Ingredients:
2 egg whites
1 cup powder sugar
1/2 tsp cream of tartar
1 tsp vanilla
Green and red gel food colouring
Cookie Directions:
Preheat over to 350′
Combine the sugar, cinnamon, ginger, and all spice
Take out a half cup of the above sugar mixture and put it in a bowl set to the side for later
Cream the butter and the rest of the sugar mixture until it is light and fluffy.
Mix in the eggs and vanilla to the sugar mixture.
Sift the flour, cream of tartar, baking soda and salt in a separate bowl.
Add this dry mixture gradually to creamed sugar mixture and mix well.
Scoop the dough using a small ice cream scoop then; put these balls onto the lined cookie sheet.
Take each ball one at a time and roll each dough ball into the sugar mixture and place back on the lined cookie sheet
Place the dough balls at least 2 in. apart on the cookie sheets.
Bake at 350′ degrees for 10-13 minutes or until edges begin to brown.
Allow for the cookies to slightly cool while still on the cookie sheet.
Move to a wire rack to cool completely.
Chocolate Directions:
Using a double boiler melt the white chocolate, stirring constantly.
Icing Directions:
Separate the egg yolk from the whites. putting only the egg whites into a mixing bowl.
Stir in the sugar, cream of tarter and vanilla to the egg whites.
Beating on medium for 6 minutes.
If the icing has the appearance of soup or is yellow in colour add more powder sugar, 1 cup.
Divide the icing equally into two bowls.
In the 1st bowl add some of the green gel food colouring, stirring to blend in the colour.
In the 2nd bowl add some of the red gel food colouring, blend in all of the food colouring.
Scoop all of the green and red icing in individual piping bags with #2 tips.
Adding the Chocolate and Holly & Berries:
Dip half of each cookie into the melted white chocolate.
Allow to dry by laying the cookies on a cookie sheet lined with wax paper.
Using the green and red icing add the holly and berries to each cookie.
Begin by using the green icing to make the holly, refer to the picture of the cookies for further examples.
Allow the holly to dry for 30 seconds before making three small red dots with the red icing.
Allow for this to dry completely.
I hope you enjoyed this Chai Snickerdoodle Holiday Cookiesrecipeas much as I did! If you make it, please share your photos with us on Facebook or Twitter! Also, check out all of our other recipes!
With the hype that holidays usually bring, people always have the tendency to buy more and spend more without taking into account the consequences that their actions can bring. Saving money during the holidays is not an easy task!
Bells on a Christmas tree
Hence, it does not necessarily mean that because it is the holidays you have all the reason in this world to buy whatever you want and spend how much you want. Some people tell themselves that it’s just once a year, so better give what you have.
The problem is that giving something just for the spirit of the holidays does not mean you have to spend gold. You can still give something that will be deeply appreciated without having to spend more money.
Here’s how:
1. Make a budget and stick to it
The problem with most people is that they find making a budget relatively easy but sticking to it is doubly hard. So what’s the point of making a budget when you do not know how to conform to what you have stated in there?
Making and using your budget should always go hand in hand. Therefore, when you make your budget this holiday season, it is best that you follow the things that are written in it so that you would be able to save more money.
Girl looking an ornament
2. Live within your means
Of course, everybody would want to give gifts because that is what the holiday season calls for. However, it does not necessarily mean that you have to spend more than what you can afford.
The trick to saving more money is to always live within your means. Spending more than what you can afford will definitely bring more problems than you can afford to solve.
3. Personalize it!
As they say, it is the thought that counts. Hence, there are no better ways to show how much you have thought of those people this holiday season than making personalized gifts.
4. Shop and compare
It really pays to shop around and doubly better when you compare prices. You will never know which items are better priced than the others are when you do not compare their values. This really helps to save money.
The point here is that you should not be confined to one shopping portal. Try to look for other items, usually in thrift stores and consignment shops, where you can find the best items at a lower price.
4 Tips on Saving Money During the Holidays
Indeed, shopping for the holidays can be fun, but you don’t have to be spendthrift. Nowadays, you really just have to be practical to save money.
How to Make Money Selling Your Arts, Crafts and Vintage Goods
It has never been a better time to be a crafty or creative person looking to sell artwork or vintage items online. Numerous sites enable you to make money from home. And, while you have the luxury of being your own boss, it is hard work to make it work. Thankfully, most sites aim to make you successful — after all, they only get paid when you sell something.
Set of art tools on a white background.
No matter the methods you choose to sell your items, social media is a great way to showcase what you have to offer. Create a Pinterest board that links back to where you sell your items and post information about new goods on Twitter and Facebook. Or, if you work in a visual medium, post pictures of your products on Instagram.
Beyond the standard social media sites, the following sites make it easy to make money on your arts, crafts and vintage goods.
Handmade at Amazon
Currently, this service is by invitation only. Amazon offers invitations to applicants who meet their strict standards for selling handmade goods on their site. The application is rather detailed, but the opportunity to get in on the ground floor of this global service makes filling out the app worth the time. This service has a 12 per cent fee associated with each sale.
Etsy
This 10-year-old company is by far the best-known site for handmade and vintage items. Selling on the platform is simple, but it requires more marketing outreach and branding than most sites. Etsy’s Seller Handbook details the steps “store owners” need to take to be successful. Sellers have the option to use several currencies and languages on the site, too.
Flower cat statue
Novica
This site, which is operated in association with National Geographic, specialises in selling work from artisans and art collectives who don’t typically have access to a widespread audience. Think undeveloped countries and underrepresented populations. First Nations and rural artists who craft traditional products should strongly consider this site.
Society6
A great site to sell visual art, Society6 is extremely simple to use. You only need to upload images and let Society6 do the rest. Shoppers can purchase your art in various forms, which is then printed and shipped by Society6. The best part: you get the money and maintain full control of the rights to your work.
iCraft
This Toronto-based company sells products from around the world. All goods on iCraft are handmade, which means that vintage goods are not permitted. There is a 25 USD registration fee, which is about 33.41 CAD, and packages can be purchased for as little as 5 USD, or around 6.68 CAD.
How to Make Money on Your Arts, Crafts and Vintage Goods
Personal Website
To establish a commerce website, you may need to put in a little more upfront work and money, and you need to find creative ways to direct traffic to your site (hello, social media). However, a personal website is typically cheaper because you can avoid the fees associated with other commerce sites.
There are many sites available for you to sell your arts, crafts and vintage goods. Before choosing where to place your products, integrate a free accounting software for hassle-free accounting, invoicing and financial reports. This way you don’t have to waste your time and energy keeping your books in order because it does it all for you. That means you can concentrate on what is important: you arts and crafts.
Traveling has always been a passion of mine. No matter how far from my doorstep I go, I love getting away and have new experiences. One of the places I have never been to is Iceland. It is unlike any other destination in the world, so of course I would love to have the chance to go! Since my fiance and I have not picked out a locale for our post-nuptial getaway, Iceland is a place we have always wanted to visit. After doing some research, we came up with an Iceland holiday wish list of experiences we would love to try!
4 Iceland Experiences
Geothermal Helicopter Tour
I would love to see Iceland from another point of view, so taking a geothermal helicopter tour of Iceland would be really exciting! This adventure reveals Iceland’s subterranean energy as groups tour across Iceland’s landscape. We will go over geothermal hot springs, colour mountain ranges, power plants, lava fields and craters. The helicopter will then land away from the crowds to make a quick stop to check out the landscape we have just flown over. Our flight will end with an aerial tour of Reykjavik. I have never been in a helicopter, so this tour would be an exciting one to go on!
Best Value Glacier Hiking and Ice Climbing Tour (Dec-Sept)
I have never seen a glacier, so this tour would be one to remember! We would get to see Solheimajokull Glacier in South Iceland. While on this tour, there will be amazing ice and rock formations to explore. Some tourists are also able to do some glacier climbing! The tour will be led by professional guides with all of the equipment necessary to take on this adventure. On the way back, we would see the Skogafoss waterfall which is one the most beautiful within Iceland. This tour would be such an adventure to experience. Glacier climbing would be such a thrill to experience!
Iceland Ice Cave Tour by Vantnajökull Glacier (November-Mar)
I have been spelunking before, so going on a tour of caves of ice would be a whole new experience! We would explore a unique ice cave inside Vantnajökull National Park. During the summer, water runs underneath the glacier, forming caves. Since ice cave are a rare phenomenon that are naturally formed, local guides from the area go in search of new caves every year. Guides then inspect the structure and condition of these new caves before leading us through them. This tour is a once in a life time experience as the caves travelled through are not the same year after year. How could I say not want to go on this tour while in Iceland!
Blue Lagoon & Golden Circle Tour
I would want to go on this tour because I would want to have some down-time and see some of Iceland’s most popular sites. This trip begins with a swim in the mineral-rich Blue Lagoon geothermal spa. Tourists will then head back to Reykjavik towards the Golden Circle tour.
From here, the trip makes three stops. The first one is to Thingvellir National Park. It is a UNESCO World Heritage Site which sits on the Mid-Atlantic Ridge. I would be able to cross off another item on my bucket list because this ridge separates the two continents of North America and Europe!
We would then make a stop at another of Iceland’s beautiful waterfalls, the majestic Gullfoss, along the popular rafting river Hvita. This waterfall drops 32 meters into the river gorge and we will be close enough to feel its spray. I’m not afraid of heights, so this look would be an amazing one to see.
Our last stop on this tour will be the Geysir geothermal area where we will get to visit its hot pools and the hot springs Geysir and Strokkur. Geysir is no longer active, but Strokkur is still a sight to see, erupting every 4-8 minutes and reaching an average height of 15-20 meters, and can go as high as 40 meters! This tour seems like a lot of fun and a whirlwind experience without becoming too active. What a way to end off an amazing visit to Iceland!
These Iceland Holiday Wish List Experiences are just a taste of we can expect to experience if we book a trip to Iceland! It may be a colder destination than the rest of the places that have made our short list of places we would like to go, but it is majestic, exotic and full of rare experiences we will not be able to do and share anywhere else in the world! Besides, the cooler weather will allow for us to stay close and snuggle more! Whether you are traveling alone, as a couple or as a family, an Iceland holiday would be one to remember!
I was asked to share my Iceland holidays wish list by Guide to Iceland, but all opinions and views are my own.
This Rudolph Hot Cocoa with PrintableGift Tags makes for the perfect gift for groups this holiday season. Make a few dozen for the kids classes, teachers and bus drivers. Or keep a few on hand for unexpected holiday visitors. They are sure to bring a smile to everyone’s face!
This is such a cute and easy goodie to make with the kids this holiday. They will love the way this Rudolph hot cocoa treat turns out! Making the face of Rudolph is naturally the best part! Parents will appreciate how fuss free these are to make, and how economical they are. You may have most of the ingredients in your pantry. Combining craft time with making a gift for someone special is a recipe for a great time!
Rudolph Hot Cocoa Christmas Gift Idea
This year, more than ever, it is important for many families to keep their expenses down at the holidays, but at the same time, people need a little holiday cheer more than ever! These DIY Rudolph hot cocoa gifts are the perfect solution. You can make 1 for less than $5.
Free Gift Tag Printable
I have included a free printable gift tag that includes the instructions for making this Rudolph Hot Chocolate. Simply punch a small hole in the tag and thread it onto the bag of cocoa with a festive ribbon, for a picture perfect Christmas gift from the heart, that will warm anyone up! Just like a holiday hug!
If you are looking for more holiday crafts and recipes you can check out some of my favourites.
1. Pour hot cocoa mix into piping bag, pushing it all the way to the tip.
2. Cut off the top of the piping bag at approximately 2 inches above the top of the hot cocoa. Fold the excess two inches of the piping bag in and down – staple to close.
3. Put the bag of hot cocoa into another piping bag and flatten.
4. Layer in mini chocolate chips.
5. Add layer of marshmallows.
6. Cinch the top of the bag and tie on a ribbon.
7. Cut out a gift tag and punch a hole in the top. Weave the ribbon through the hole and knot it to hold the gift tag in place.
8. Wrap a pipe cleaner around the bag – just above the ribbon. Shape it into antlers.
9. Place wiggle eyes near the top of the hot cocoa mix and glue in place.
10. Glue a pom pom near the tip of the bag for Rudolph’s nose.
11. Trim off the excess piping bag above antlers.
There you have it, a hot chocolate craft you can give to friends and family!
To Print the tags, clink on the photo below and it will open as a PDF.
I hope you enjoyed this Rudolph Hot Cocoa Craft as much as I did! If you make it, please share your photos with us on Facebook or Twitter! Also, check out all of our other crafts!
Adorable Rudolph Hot Cocoa DIY With Printable Gift Tags
Yield: 1
Prep Time: 10 minutes
Active Time: 15 minutes
Total Time: 25 minutes
Difficulty: Easy
Estimated Cost: $5
This Adorable Rudolph Hot Cocoa DIY with PrintableGift Tags makes for the perfect gift for groups this holiday season. Make a few dozen for the kids classes, teachers and bus drivers. Or keep a few on hand for unexpected holiday visitors.
1. Pour hot cocoa mix into piping bag, pushing it all the way to the tip.
2. Cut off the top of the piping bag at approximately 2 inches above the top of the hot cocoa. Fold the excess two inches of the piping bag in and down – staple to close.
3. Put the bag of hot cocoa into another piping bag and flatten.
4. Layer in mini chocolate chips.
5. Add layer of marshmallows.
6. Cinch the top of the bag and tie on a ribbon.
7. Cut out a gift tag and punch a hole in the top. Weave the ribbon through the hole and knot it to hold the gift tag in place.
8. Wrap a pipe cleaner around the bag – just above the ribbon. Shape it into antlers.
9. Place wiggle eyes near the top of the hot cocoa mix and glue in place.
10. Glue a pom pom near the tip of the bag for Rudolph’s nose.
We’ve all been there before. You’re working against a deadline that seems to be months away. Then before you know it, you’re working against the clock on a Friday afternoon to get it done. When you’re at the wire, you can’t afford a glitchy laptop to work against you. If your business laptop takes longer to load larger programs, struggles to operate when multiple tasks are running simultaneously, or shuts down completely before you’ve managed to click ‘save’, then it’s time to update your computer to a notebook that can keep up with your workload and meet your deadlines.
The latest notebook technology can mean the difference between submitting your files on time and asking your superiors for an extension. But knowing which model can help you get the job done is vital. Not every notebook is capable of your work load, so don’t settle on the cheapest one or the first ones to catch your eye. Consider the various kinds that are available and compare their specs to those that you know you need. Some notebooks are better for general consumers, who only use their laptop for the Internet and Minesweeper. Other notebook users are architects, engineers, designers, or programmers, and their near-constant use of their laptops would put a strain on the average processor.
While the average consumer laptop is inexpensive and easy enough to find, they simply don’t have the features that a business class notebook has. These laptops require a powerful processor to provide effective and reliable performance. Your notebook should be a powerhouse with 4th Generation Intel® Core™i3, i5, or i7 processors so that programmes open and operate efficiently. 32 CH of DDR3L 1500 Memory and 500 GB HDD backs up this premium performance, allowing an enterprising individual like yourself to run a variety of your programmes, files, and applications simultaneously.
But performance isn’t your only priority when it comes to notebook computer to use at work. High-quality business notebooks should be complemented with longevity and mobility, so you can expect to consistently use your laptop for a long time, wherever work takes you! Long battery life and steady productivity is just as important as any processor or RAM.
More often than nought, you won’t be meeting your deadlines on your own. You rely on collaborating with your office mates to get your projects completed. You can make sharing ideas easier by ensuring your notebook has the ability to communicate with your teammates. HDMI, VGA, USB, and other ports should be available on your chosen notebook to allow you to connect with other laptops, data projectors, and TV screens.
If you’re tired of missing deadlines because of your notebook, turn to a laptop that can match your workload. Get a business class notebook that handles multiple applications that drain memory with ease, so you can finish projects with time to spare. Then you’re Friday afternoons will be yours.
My kids like fun toys and products that they can use that safe and can help solve a problem. It is also great to have products that are multi-purposed, so they can be used in more than one way around our home. That is why I was happy to review products from Chewigem™. I received a Bermuda Bangle in Torfino bracelet and a litecup in Blue to try with my family.
Chewigem™ is a line of non-toxic, fun and stylish products that helps users to sooth hand fidgeting, ease anxiety or sensory challenges or to fill an oral fixation in children, teens or adults. They come in many different products from bracelets and pendants to dog tags and Chubes necklaces for users to wear. Chewigem™ are made with FDA approved medical grade silicone which is free of lead, latex, BPA, PVC and phthalate. Chewigem™ has numerous colours and designs available to please everyone!
Chewigem™ also creates litecup. It is a glow in the dark no-spill cup that can also be used as a night-light. Meeting all FDA guidelines for food-safe plastics and being BPA and latex free, this cup allows for mess free drinking any time of the day or night. The patented circular valve cuts down on the amount of mess kids can cause from knocks, drops, tips and spills. The valve then seals itself when lips leave the cup, giving a natural drinking experience similar to a normal cup. litecup also includes a light-sensitive LED light unit that makes this cup softly glow in dim light to act as a comforting nightlight and to avoid fumbling at night when trying to seek the cup at night.
The litecup is also ideal for adults who want to carry a cup with them in their handbag, gym bag, or backpack. It is also great for carrying drinks along in your cup holder of your vehicle without worrying about your drink spilling while you travel. Finally, litecup can act as an excellent disability aid or independent living product for adult or children with health conditions that may affect their mobility, stability or vision.
Though none of my children are “chewers,” both of my younger kids love using the Bermuda Bangle. My son liked trying to squishing and twisting this bracelet out of shape, then was happy to see that he was not able to bend it out of shape. All of this work really helped him with his fine motor skills. My daughter loves jewellery, so she loves wearing it! She also enjoyed spinning it around her wrist. Since it is in the shape of a triangle, she had fun trying to figure out which end is up. They both had a lot of fun using, crushing and playing with their new bangle! It really kept them occupied and happy while they were playing with it.
My daughter loves using the litecup at night. From time to time, she wakes up with a cough in the middle of the night. Her father and I, blurry-eyed, are always fumbling around in the dark of our kids’ room to find the cup of water we have for her to drink so she could get back to sleep in the upper bunk of her bed. The gentle glow of the litecup makes it easier for us to find her drink without it jarring our vision. It is also great for my son at night. He is our resident night owl, and the litecup keeps him company at bedtime while he sings himself to sleep.
Overall, we enjoyed using the Bermuda Bangle and the litecup. Both items helped our kids improve physical and educational skills, kept them entertained when they used them, and they made them happy. People of all ages can benefit from using these products to make their lives easier in a fun and sleek way. They are also BPA free, so they are safe to use. They really have become staples in our home, and I am so happy to have them.
For details about Chewigem™, you can connect with them on their website as well as their Facebook, Twitter, Instagram, and Pinterest pages!
Disclaimer: I received products from Chewigem™ in order to write this review. The views expressed are my own.
When you first decide that you want to learn the guitar, you’ll be faced with plenty of questions. But you’ll ask yourself one before any other. You’ll have to decide whether you’ll start to learn the instrument on the acoustic or electric guitar. Though you may have a very straightforward answer, to some this isn’t an easy decision to make. There are advantages and drawbacks to both kinds, making it difficult to choose just one.
For those of you who count Mumford and Sons, Bob Dylan, and other folk roots artists as your favourite musicians, acoustic might be the route you want to take. It’s the perfect guitar for bedroom sessions and singalongs around the campfire. Its portability makes it the cheaper options, as you won’t need an amp or any wires to make a sound. An acoustic guitar relies on the strings’ reverberation within its wooden body. As a result, the tone of your notes will be lush and rounded by a richer sound that can be at times grungy and dirty or simple and pure.
If you prefer more head-banging than banjo-plucking in your music, you’re probably already leading towards the electric guitar. Brash, loud, and tinny, the electric guitar has the ‘oomph’ you need to get through more aggressive songs and solos. While it’s useless without an amp, once plugged in you can change the sound of its voice with a variety of cool peddles and distortions. Though this will ultimately end up costing your more (and make your outdoor kumbaya near impossible), it means you have the versatility to transform the tone, timbre, and dynamic of your guitar with the press of a button.
Even armed with this knowledge, it can be difficult to make the ultimate choice. As a full time metal head who likes to listen to bluegrass on the weekends, you might want to get both. If that’s in your budget, then that’s great. You should buy all of the guitars that you can. But if your finances make buying more than one guitar an impossibility, you’ve got quite the decision ahead of you. To make it easier on yourself, you should explore the range of sounds you can make on both the acoustic and electric guitars. Spend some time at your local guitar store to try out those makes and models you wouldn’t otherwise get to try at your friends’ houses. Usually a local store that’s been around for decades is one of the best sources for guitars in Canada. Not only will they have the selection of acoustic and electric guitars that you want, they’ll have the professional expertise to guide you through their collections.
Eventually, you’ll have to come to a decision. Whichever side you ultimately commit to, once you have your guitar you should make your practice a part of your daily routine. Add to that instruction from a professional guitar teacher (perhaps from the same store you purchased your guitar), and you’ll be the master of your instrument – whether that’s acoustic or electric!
How adorable is this printable letter that you can give your child to write to Santa!
Postal elves are busy helping Santa reply to each and every letter they receive in the North Pole. Santa answers letters in more than 30 languages, including Braille!
Canada Post has 3 simple rules when sending a letter to Santa:
Make sure to include your full return address. Santa may know where you live, but his postal elves need this information to deliver your letter!
Santa really loves to read about children’s favourite sports, jokes, school activities or family fun (even if Mom and Dad help with the writing). And, of course, he loves to get pictures and drawings from even his youngest pen pals!
Send your letter soon. Letters must be mailed by December 16 to receive a reply (it’s a long way to the North Pole and back!).
Santa’s address is:
SANTA CLAUS NORTH POLE H0H 0H0 CANADA
To print the letter, just click on it to make it bigger and print!
Celebrate Brownie day on December 8th by making some of these divine recipes! Serve them up with cream, ice cream, toasted nuts or any of your favourite little luxuries to make it a perfect moment!
Do your children love adventure? Do they like to learning about the world, solving puzzles and making crafts? Are you finding it hard to find the perfect for them this holiday season? My Amazing Pen Pal may just be the right gift to give this year! I was excited to be able to review one month of this service because my kids are born adventurous who love to solve clues and create fun projects. I also thought the family would enjoy this experience!
My Amazing Pen Pal is an interactive experience that lets children follow Greg, their guide on this journey, as he explores a new country every month. Children learn about that specific country’s people, customs, food, animals and things they do for enjoyment. This is accomplished through videos, the website, activities and crafts. Parents can choose from two membership packages (12-month and 3-month packages), starting at less than $20 per month. This experience is recommended for children ages 6-11.
• The Weekly Episodes – Greg finds himself in a new country each month, and explorers can follow his adventures by watching them each week. • The Adventure Website – Explorers can find new supplementary videos, photos, blogs posts, games and activities posted throughout the week to learn from and to enjoy! • The Monthly Packages – Once the final episode has aired at the end of each month, your child will receive a package in the mail that contains a 20-page activity book, crafts, recipes, stickers and a treasure that Greg found that month that he would like to share! • Unlimited Correspondence – children can contact Greg either through snail mail (with one prepaid envelope provided each month) or via email him whenever they want to see how he is doing or if they have a question for Greg about something in their monthly packages. Children even get a personal video from Greg on their birthday!
My family had an accelerated experience with My Amazing Pen Pal since we were conducting a review. All of the components of the first month were send to us at the same time. We were given this gorgeous treasure chest which contained everything we needed to begin our journeys with Greg as he travels around the world.
Right away, we were asked to crack codes and solve puzzles. These activities allowed for us to register ourselves on the My Amazing Pen Pal website and to be introduced to Greg through a series of videos. There were many more activities for my kids to do learn about Greg’s first stop on his adventures.
The other package we received held even more activities, as well as crafts, a recipe, treasure and many more goodies for my kids to work on and to learn from. We attempted to create a paper lantern, and went through the activity book. We had fun doing all of the activities given to us, and we learned more about how others live in lands far away.
My son also loved opening the mysteriously wrapped object Greg send us. We received a carved elephant. This was the perfect gift as my family love elephants.
The one small issue we had with this whole experience was with the paper lantern craft. All of the items needed for the craft were not listed in the area on the page that this was allocated for, but I had the foresight to read ahead and find all of the items I needed. The craft was easy to put together, and my kids had a blast putting it together! My daughter still has plans to add some extra touches to our new lantern so it will look even better.
Overall, my family loved following Greg on his adventures in My Amazing Pen Pal! We learned so much about a culture far away from our own, my kids solved clues and puzzles that made them think, and they got to do activities that challenged them and that they could take something away from. We loved our experience with Greg and are so happy we were able to see the world through Greg’s eyes and learn so much in so many different ways. It was really like going along with a friend on their travels!
To find out more about My Amazing Pen Pal, you can connect with them on website, as well as on their Facebook, Twitter, and Instagram pages!
Disclaimer: I received a membership and products from My Amazing Pen Pal in order to write this review. The opinions expressed are my own.
Montebello is located in the Papineau Regional County Municipality of Western Quebec in the Outaouais region. It’s about 45 minutes north-east of Ottawa. I had the pleasure of visiting this picturesque city with my family this summer and would like to share my 5 favourite tourist attractions in Montebello.
Tourist Attractions In Montebello
The tourist attractions will certainly please your family heading out to an outing in Montebello.
1. ChocoMotive
Chocomotive in Montebello
ChocoMotive is an artisanal chocolate store that offers a traditional array of pralines, and an assortment of organic and fair-trade chocolates all made with local products. Learn how the company uses authentic techniques and provide a unique interpretation of the chocolate-maker trade. As you shop through the store, you can peek through a window and see how they make their mouth-watering chocolates!
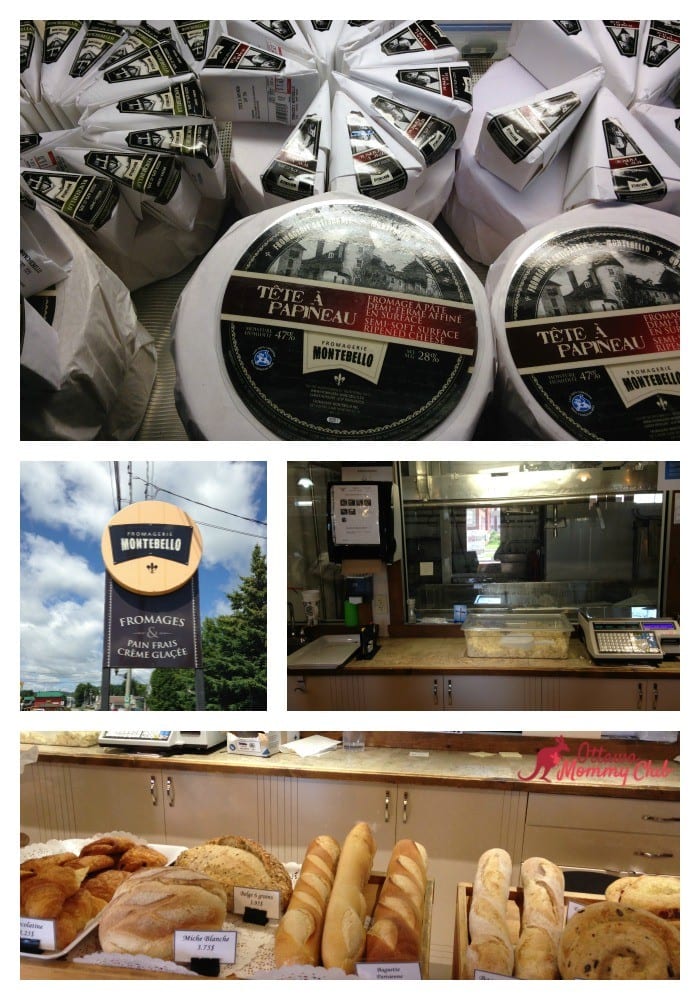
2. Fromagerie Montebello
Fromagerie Montebello produces fresh and delicious cheese in three formats: curds, block, and twists. Three fine cheeses are also produced, two with cow’s milk: the “Tête à Papineau” and the “Rebellion 1837”. They also make a sheep’s cheese called “Manchebello”. They also sell a selection of cheeses from across Quebec and homemade fresh breads. “Rebellion 1837” was recently crowned the winner for the category of « veined Blue cheese » at the 16 edition of Selection Caseus and this only after 3 years of opening their cheese factory.
3. Parc Omega
Parc Omega is an adventure in the heart of nature, a place to re-energize yourself, and to see the wildlife at its best! You can observe the wild animals on the 15 kilometre marked road in your vehicle. They have over 21 km of trails that can be traveled by foot, karts, or tractor rides offering each their own beautiful surroundings and wildlife animals including the White Tail Deer, the First Nations Trail, and the Bear and Timber Wolves Boardwalk. It’s open all year-long and don’t forget to bring some carrots. You can read our review for additional information.
4. Manoir Papineau National Historic Site
The Manoir Papineau was home to the Papineau family from 1850 to 1929. The house along with outbuildings, landscaped gardens and grounds are now open to the public and managed by Parks Canada. It was designed primarily to commemorate Louis-Joseph Papineau, the man who was to, the grand estate of Louis-Joseph Papineau, the man who was to become a leading figure in Canadian politics.
Fairmont Le Château Montebello Lobby Bar
Fairmont Le Château Montebello Lobby Bar is located in the main lobby of the resort beside the six-sided fireplace. The view is majestic and the seating is fantastic on 2 mezzanine floors. You can also walk around the lobby and view many paintings and display cases. The bar offers specialty cocktails and coffees. If you are staying in Montebello for a few hours and would like to wind down, or for a relaxing night on the town with friends, I recommend stopping by the Fairmont Le Chateau Montebello Lobby Bar. For a full review of Le Château Montebello, please read this article.
Hope you liked these tourist attractions in Montebello to visit with your family and that you will support these local businesses in the Outaouais! For more information on Montebello, you can visit Bureau D’information Touristique De Montebello.
My kids can be, well, a bit rambunctious. They like to get outside and run around, exploring the world in front of them. They are also captivated by all of the sights and sounds around them when they are out and about at school or when running errands with me. Since they are 4 and 3 years old, they find it hard sometimes to calm themselves down. We use colouring or reading as methods to help relax themselves when they start to become a bit hard to handle, but we are always on the look-out for new ways to have our kids learn to calm down. When asked to review The Bodhi Tree and Stacey, I was excited to see how my kids would take to this kind of relaxation exercise.
The Bodhi Tree and Stacey aims to inspire, educate and bring out a sense of mindfulness in children. It is a way for children to breakaway from all of the stimulus they are facing in their lives and to help them relax their mind. Stacey created and narrated stories to teach children a life skill in an age appropriate and imaginative medium. She uses guided meditation in her audio files to encourage children to use their imagination to find their own inner calm and tranquility.
Stacey also uses the concept of metta, a loving kindness practice used to bring about a boundless warm-hearted feeling in the child, their loved ones and each of the creatures as they follow Stacey along on these journeys. They offer monthly subscription packages at different levels of involvement for children to have a meaningful experience while putting their mind at ease.
Here are my little ones.
It was a rainy and gloomy day when we first tried listening to The Bodhi Tree and Stacey. We listened to the Quiet Ocean story available on their website. Each story takes about five minutes to listen to, so it is a great way to have my kids break away from being cooped up inside all day. I had my kids make themselves comfortable on the floor in our living room. After Stacey introduced herself, she asked the kids to close their eyes and that they could either sit or lay down while being taken on their adventure.
Stacey then took my kids on a fun underwater adventure. They got to imagine that they were holding on to the fin of a dolphin as they greeted different kinds of animals and plant life. She also asked them to wish them well, which I thought was fantastic. I have my kids try to think about the feelings of others, and to have someone else reinforce this way of thinking is a breath of fresh air. They also liked trying to reach out to feel the animals and plants they were passing.
They had a lot of fun swimming under the sea and going along on this fun adventure. At the end of this tale, Stacey had the children breathe slowly to bring them back to our world. Once the story was over, my kids seemed more relaxed. They sat themselves on one of our couches and started to talk about the journey they just took, and talked about their favourite parts.
I had my kids listen to this story three other times. My son, who is three years-old had a harder time staying focused as he may not be fully ready to listen to the same story a fourth time through. My four year-old daughter loved this story! She loved trying to hold on to her dolphin friend and waving to the creatures she encountered each time we took a break away from the world with The Bodhi Tree and Stacey. I went through the list of other stories that are available on their website, and she cannot wait to follow Stacey on her adventures to the stars.
Overall, my kids enjoyed being guided on an adventure with The Bodhi Tree and Stacey. They liked being able to pretend to be under the sea and making new friends in their imagination. They were quiet and got to put their mind at ease for a few minutes, which gave me a bit of a break as well. It was fun without the noise and distraction that my kids need to have once in a while.
For more information about The Bodhi Tree and Stacey you can visit them on your website as well as on their Facebook, Instagram and Pinterest pages!
Disclaimer: I was compensated by The Bodhi Tree and Stacey for this review. The reviews expressed are my own.
Fashion. For some people, it can be a daunting subject because it is subjective and changes very rapidly. Some people feel as though they need to keep up every trend, and that is not the case. Not every trend will work for everyone. Sometimes, looking fabulous is not about having the designer labels, but is more about having confidence and feeling comfortable in what you are wearing. What you wear also does not have to be flashy to be fashionable. Sometimes, being a bit discreet with your ensemble can go a long way to making you look and feel good. Below are 4 Tips To Look Fabulous While Being Discreet!
Accessorize
You do not have to wear a bold print to stand out. One accessory can make your outfit go from average to amazing! It could be a belt to add to a longer blouse or sweater, a fun scarf that adds a bit of punch of colour to your outfit, or a piece of jewelry that shows off your personality. Any one of these touches can bring your normal outfit a breath of life and fun, making you look and feel great and add a bit of your own personals style without being showy about it.
For your eyes only
For some women, being discreet is not always about what people can see. Adult Incontinence, or AI, is not something they want the world to know they have. AI does have many different effects on the daily life of women who are afflicted by it. 15% of women who experience bladder leaks believe that it affects their work or daily activities, and 8 in 10 women experience bladder leakage when they cough or sneeze. Some of these issues will impact the types of clothing they wear since they are afraid of not being able to make it to a restroom on time, ruining their clothing
What can women wear to help protect themselves from spur of the moment bladder leaks? A good friend of mine suffers from AI, and is a fashionista. She depends on Always Discreet Very Light Regular Liners to catch light leaks. It has a unique DualLock Core™ that helps to lock away incontinent odours and wetness for hours. It also has a thin and flexible design to give protection from your overactive bladder discreetly. From skinny jeans to little black dresses, she wear whatever she wants, feeling confident she will be protected from little leaks that may occur.
Love your legs
Your legs need a bit of loving, too! Your legs can look different based on how you are dressing them. It all depends on the style and dress them. You can look sleek or casual in a pair of jeans, dress pants or a skirt. Finding the right fit and colour for these items is key. Once you have discovered your body type and how to dress for it, there are endless combinations of with these simple staples to any wardrobe. For example, a pair of dress pants with a bit of a pattern to it can be paired with a buttoned down top, a blazer and a sweet pair of kitten heels for a cute work look. This same pair of pants can be worn with a flouncy t-shit, a knitted sweater and a fun pair of sneakers or flats can also look chic, but give off more of a cozy vibe. The pattern on the dress pants is subtle, but there are so many looks you can get from them.
Put your best foot forward
Shoes really do help to pull an outfit together. Whether they are heeled or flat, your foot wear says a lot more than you realize. Let them help to show off who you really are. On those days you decide to wear a power suit into the office, wearing a pair of shoes that have a fun print or are textured breaks up the dreariness and shows a bit of your playful side. Wearing a lot of greys and browns this fall? Wearing a pair of colourful shoes of boots can brighten up even the darkest of outfits.
No matter what your fashion type is, fashion can have flair while being discreet. Simple pieces can make an outfit fabulous. These simple fashion tips can also help to bring out your personality so you look great and feel confident without being too obvious you are trying to do so. Finally, it is okay to try and play with pieces in your wardrobe to make new outfits and have fun doing it!
How do you like to be fashionable while being discreet?
I created this blog post as a paid ambassador Always Discreet. All opinions and advice are my own and I only work with companies I genuinely love/have used prior to being contacted.
The drop in temperature has really got me longing for the lazy summer days that passed us by only a few short weeks ago. This got me thinking about places my family and I could go where we could kick back and soak up the sun for a few days. I spoke with my sister-in-law who had vacationed in the Caribbean and asked her which countries she enjoyed visiting. One of her favourite countries she wants to go back to visit is The Bahamas. I just love my Bahamas Islands Bucket List to Escape Winter that I am sharing with you!
She really fell in love with Bimini, a gorgeous and historical island of The Bahamas only 50 miles away from South Florida. After researching, I came up with a bucket list of some of the attractions and activities my family and I would love to do and explore while vacationing in Bimini.
Bahamas Islands Bimini Bucket List
Fishing in Bimini
My other half is a huge angler, so we would have to try fishing while visiting Bimini. We would love to fish on the shoreline, and rent a boat to try our hand at fishing on the ocean offshore.
The Martin Luther King Jr. Memorial
I am a history buff, so visiting the Martin Luther King Jr. Memorial is a stop my family must make while visiting Bimini. The memorial at the Bimini Craft Centre in Alice Town honours this great man who had visited Bimini in 1968. He wrote part of his Nobel Peace Prize winning speech and significantly impacted the people during his time on the island.
Ernest Hemingway
Islands in the Stream was partly influenced by Ernest Hemingway’s time on this island, and Bimini was known as his summer home. It would be great to see where he would go to kick back, relax and to visit some of his favourite haunts while staying on the island.
Planning My Bahamas Islands Bucket List to Escape Winter!
The Bahamas Beach Life
What is a trip to the Bahamas without some leisure time on one of the beaches? Bimini boasts of miles of pristine beaches along its coastline. My family would love to sink their feet and play in their white sandy beaches, or do one of the numerous activities available in the beautiful blue ocean
Bimini Nature Trail
We love taking in the great outdoors, so we would love to take in the Bimini Nature Trail to learn more about the fauna and flora of the island. It would be so amazing to see the endangered Bimini Boa and find out why it is so important to Bimini.
The Healing Hole in Bimini
I am always intrigued by special places around the world that are supposed to change your state of being by visiting them. Bimini boasts of The Healing Hole in the mangroves of Bonefish Creek. The Healing hole is a natural fresh-water spring that pumps lithium and sulphur inside a salt water swamp that is only accessible by boat. It is said to have healing properties by those that swim in its waters. I would love to visit this spot to see if the reports are true.
Why Visit the Bahamas
Another great reason why The Bahamas is an excellent choice for our family to visit is its proximity. There are plenty of non-stop flights available to Nassau, Grand Bahama Island and Exuma from many Canadian cities. Many of these flights are only 3 hours away from Toronto! There are also easy, same-day connections to many of the other Bahamian islands from Nassau, so visiting any of the islands in The Bahamas would be ideal for vacationing.
If you are already thinking about escaping winter this year, like I am, consider visiting The Bahamas. You can discover everything the beautiful and inviting islands of The Bahamas has to offer visitors to start planning your winter getaway today.
The flu season is in full effect! Since this condition is highly contagious, prevention is key. Including Elderberries daily is an effective way to help boost the immune system in order to keep the flu bug out of your family household. Your family will love the make this elderberry gummies recipe and they taste great too! If symptoms arise, have the whole family double the dose of elderberry gummies or syrup and take Echinacea tincture every 2 hours.
Elderberry Benefits
Did you know that while the cold and flu season officially starts in the fall, it can last all the way to May?
These homemade elderberry gummies are a delicious way for you to prevent infections as well as shorten the duration of them. Elderberries have long been used as an ally against upper respiratory infections. They’ve been scientifically proven to be effective against at least 8 different influenza viruses, which as a parent, I find pretty amazing!
To get the best results from elderberries, take them to prevent infection or at the very onset, and during an infection to lessen the symptoms and shorten the duration of a cold or flu!
The flavonoids within elderberries prevent the virus from replicating. Last year, my family escaped getting either a cold or flu, but with life’s events, mommy forgot to replenish the container with new gummies and we all ended with a cold. This proved to me how effective our daily consumption of delicious elderberry flavoured gummies were helping us.
Elderberry Syrup Dosage
The dose I recommend for a child is 1-2 teaspoons a day. Adults can take 1-3 tablespoons per day. If you feel like you are getting sick you can drink up to a cup per day.
Elderberry Gummies Dosage
I recommend 1-2 small gummies a day for a child and 1-3 gummies a day for the adults.
How to store gummies
Store the gummies in a closed container in the fridge. They should last several weeks, but if your family is anything like mine, they won’t last that long!
Elderberry Gummies Ingredients
Supporting herbs are added to the recipe for an extra “oomph“. You can purchase your herbs at different locations in the Ottawa region or order them online. Just make sure they are organic and from a trusted source.
Here’s a quick look into why these herbs used in this elderberry gummies recipe are also important:
Rosehips (Rosa spp.)
Rosehips are high in nutrients and potentially a great source of vitamin C, which is important for immune system function.
Cinnamon (Cinnamomum spp.)
Cinnamon is an aromatic and pungent herb that is highly antimicrobial. It is included in this recipe to “warm up” the recipe. It also is great tasting!
Licorice (Glycyrrhiza glabra)
Licorice is another powerful antiviral herb and is a wonderful synergistic herb that can be added in small amounts to formulas. Licorice should not be used as a single herb and is better used in small amounts as part of a larger formula. It should not be used for people with hypertension or during pregnancy. Licorice is known for its antiviral properties.
Oastraw (Avena sativa)
Oatstraw is very nutritive and a very good source of calcium. It nourishes the liver and strengthens the adrenals. It also provides a deep, restorative sleep.
Nettle Leaf (Urtica dioica)
Nettle leaf is a valuable nourishing and tonic herb. It nourishes and energizes endocrine glands and strengthens the nervous system. It is also known as the best herb to provide iron.
Pepper (Piper nigrum)
Pepper may seem like a strange addition to this recipe. There’s no need to worry, since the end taste isn’t noticeable. Pepper is a wonderful activator herb that helps other herbs be more effective.
Gelatin
The second part of this recipe is turning your elderberry juice (or syrup) into fun shaped elderberry gummies. I can’t claim credit for this fun idea, but I knew I wanted to try it for my boys (okay, and myself) when I first started seeing recipes for it popping up.
It’s a good idea to get good quality gelatin with collagen peptides. You can find great brands sold on Amazon. Collagen is the most abundant protein in the body and is a key constituent of all connective tissues. Collagen provides the infrastructure of the musculoskeletal system, essential for mobility ensures the cohesion, elasticity and regeneration of skin, hair, tendon, cartilage, bones, and joints. Since gelatin is pasture raised bovine, vegetarians and vegans may want to stick with the elderberry syrup recipe.
Sweetness
Since my eldest is Hypoglycemic, I wanted something that didn’t have a lot of added honey or sugar. The apple cider and the natural sweetness of the herbs makes this recipe a winner in my household. But, if you find the taste not sweet enough, you can add a teaspoon or two of raw honey.
Elderberry Gummies Recipe
Kitchen tools
1 silicone mold
1 Sauce pan
1 cheesecloth
Gummies ingredients
50 grams of dried elderberries about a 1/2 cup
30 grams of dried rose hips about 1/3 cup
15 grams of cinnamon chips about a 1/4 cup
7 grams of licorice root about 2 tablespoons
7 grams of nettle leaf about 2 tablespoons
7 grams of oatstraw about 2 tablespoons
0.5 grams of freshly ground pepper about 1 teaspoon
3 cups of apple cider
3 tablespoons of gelatin for the second step
how to make elderberry gummies
Elderberry Syrup
Place all the ingredients in a medium sized sauce pan.Bring to a simmer and continue to simmer for 20 minutes. Remove from heat and let cool a bit. Strain through cheesecloth and squeeze well to extract the juice.
If you want to make the gummies, go to step 2.
If you want to simply make elderberry syrup, you can now add honey to your taste preference and keep it stored in the fridge.
The amount of honey you add will be the determining factor in how long it lasts. The more you add the longer it will last.
Step 2: Make the Gummies
Measure out 2 cups of the above juice (without the added honey). Add more apple cider if necessary so you have the full two cups. Reserve 1/2 cup of the juice in a measuring glass. Put it in the fridge until it is cold.
Once it is cold, sprinkle the gelatin over the juice and let sit for one minute. Bring the rest of the juice to a simmer. Pour the hot juice over the cooled juice and gelatin, stirring briskly with a whisk. Continue to whisk for about 2 minutes or until the gelatin is completely dissolved. If desired, add honey. You might find it is sweet enough already.
Pour the mixture into silicon molds OR pour into a glass pan. Put them in the fridge to harden. Once they are hardened they should remain hard. Remove them from the molds. If using a glass pan, cut them into cubes.
Elderberry Gummies Recipe
Julie
In this recipe, we first make a juice from dried elderberries and other herbs then we use gelatin to make gummy shapes. You will enjoy them just as much as your kids! Trust me!
Place all the ingredients in a medium sized sauce pan.
Bring to a simmer and continue to simmer for 20 minutes.
Remove from heat and let cool a bit.
Strain through cheesecloth and squeeze well to extract the juice.
If you want to make the gummies, go to step 2.
If you want to simply make elderberry syrup, you can now add honey to your taste preference and keep it stored in the fridge.
The amount of honey you add will be the determining factor in how long it lasts. The more you add the longer it will last.
The dose I recommend for a child is 1-2 teaspoons a day. Adults can take 1-3 tablespoons per day. If you feel like you are getting sick you can drink up to a cup per day.
Step 2: Make the Gummies
Measure out 2 cups of the above juice (without the added honey).
Add more apple cider if necessary so you have the full two cups.
Reserve 1/2 cup of the juice in a measuring glass.
Put it in the fridge until it is cold.
Once it is cold, sprinkle the gelatin over the juice and let sit for one minute.
Bring the rest of the juice to a simmer.
Pour the hot juice over the cooled juice and gelatin, stirring briskly with a whisk.
Continue to whisk for about 2 minutes or until the gelatin is completely dissolved.
If desired, add honey. You might find it is sweet enough already.
Pour the mixture into silicon molds OR pour into a glass pan.
Put them in the fridge to harden.
Once they are hardened they should remain hard.
Remove them from the molds.If using a glass pan, cut them into cubes.
Notes
Store in a closed container in the fridge. They should last several weeks, but if your family is anything like mine, they won’t last that long!Gummies dosageI recommend 1-2 small gummies a day for a child and 1-3 gummies for the adults.Syrup dosageThe dose I recommend for a child is 1-2 teaspoons a day. Adults can take 1-3 tablespoons per day. If you feel like you are getting sick you can drink up to a cup per day.
Gifts. I love giving them, but I always wonder if I have found just the right gift for that special someone. Some people are really hard to gift shop for, and it can be a challenge. There are times that the perfect gift may not be found in a wrapped package. This is why I was excited that Breakaway Experiences asked me to review an experience from their directory of businesses that provide amazing experiences anyone would enjoy!
How Breakaway Experiences Work
After registering with Breakaway Experience, it was really hard for me to choose from the numerous adventures Breakaway Experiences had to offer on their directory, but the service was really easy to use! Users of this site can choose from the following drop-down options to find an experience they would enjoy: • Location • (Type of) Experience • Occasion (ex. Wedding, Father’s Day) • Recipient (ex. For Him, For Couples)
I chose Location, selected my province, and from there, I browsed through all of the experiences listed to choose from. Since I have always wanted to do a cooking class, I decided to try the Hands-On Cooking Class with The Urban Element. I added it to “My Cart” and went to the Checkout to finalize payment. I was sent an email with the details of my experience, as well as instructions how to contact The Urban Element to select the cooking class of my choice.
Chose My Experience
Once I visited website for The Urban Element for the classes they offered, I thought I would enjoy trying out their Summer Harvest class. When I called to book my class, they were able to answer all of the questions I had about the class as well as any concerns I had. I was even sent an email to confirm my class and to ask about any food allergies I may have to make sure I could fully participate in the class. The Urban Element is located in a gorgeous refurbished firehouse in the Wellington West area of Ottawa. They provide various types of events such as cooking classes, corporate team building events, private events, weddings, culinary consulting and UE on campus sessions, and catering services.
The Whole Experience
I sat down at one of the place settings as the class go under way. Chef Tara Rajan introduced herself as the chef that was running that evening’s class. She then went through the Summer Harvest menu and what was involved in each of the stations to prep each part of our meal. This was what was on the menu for the class:
• Grilled Pear Salad with Walnut Vinaigrette • Mussels with Roasted Tomatoes and Chorizo with Fresh Baked Focaccia • Chernoula-Marniated Grilled Cornish Hen topped with Swiss Chard with Apples and Pine Nuts, on a bed of Green Beans with Pancetta and a Corn Salsa • Mixed Berry Shortcake with Limoncello Mascarpone Cream
The class then separated themselves and got to work. I chose to roll up my sleeves and help to prepare the Cornish hens and swiss chard. My partner for the evening, Ophelia, and I had a fun time navigating ourselves through the menu set out at our station. I loved that each menu was only a page long, and that there was a list of equipment provided so that if you were to try and duplicate your efforts at home, you would know what you needed before you started cooking. Luckily, the cooking instructors had previously prepared each station with what we needed.
One of the best parts of prepping the Cornish hens was separating them so that they were in quarters. I picked up a lot of handy tips to take along with me on future cooking adventures in my own kitchen. Chef Rajan and the cooking instructors were also on hand to give any further instruction and to answer questions we had about our part of the menu. From prep to the end of your meal, each class is three hours long, and boy, did time fly while Ophelia and I had our adventures in this gorgeous kitchen.
Once we finished preparing our part of the meal, Chef Rajan and the cooking instructors then put all of the pieces of our meal together and served us 4 amazing courses! We were also given our choice of a wine (white, red or rosé) to sip on while we enjoyed each course. Though I helped prepare the Cornish hen, my favourite course was dessert. The Mixed Berry Shortcake with Limoncello Mascarpone Cream was divine! I could have had seconds (or thirds), it was THAT good!
If I had one criticism about this experience, it would be that I did not get to try and make all of the courses for that particular class. I understand that the class is structured to have students make a part of the meal for time constraints, but it would have been fun to try my hand at some of the other courses.
Loving The Experience
As I left for the night, I was so happy and excited by this cooking class at The Urban Element. Chef Rajan and the cooking instructors were really helpful and helped us with whatever questions we had about our portion of the class. The atmosphere was fun and laid back even though the kitchen was crammed with people cooking, and the space was gorgeous to cook and enjoy your meal after the class. Oh, and the food everyone made was scrumptious! It was a great experience! I want to go back for another class with a different theme to try preparing a new dish.
If cooking is not your thing, there are so many other experiences to be had with Breakaway experiences! Here are some adventures I will be thinking about choosing to do myself or gifting for loved ones: • Brewery Tour – Ottawa • Biplane Flight Over the Gatineau Hills for 2 • Camp Explora Electric ATV Scavenger Hunt Adventure • Maple Luscious Spa Experience at Hotlz Spa • Ottawa Bicycle Tour – Full Day
Gifting an experience is a great present to give to a parent, sibling, friend, or couple, and they make fabulous Christmas, birthday, anniversary, or wedding presents!
For more information about The Urban Element, you can visit their website, Facebook and Instagram pages!
Mama mia! These mouthwatering fettuccine Alfredo recipes are perfect for a family dinner or gathering. I just love fettuccine with shrimps or grilled chicken.
What is your favourite meat to add with your fettuccine Alfredo?
We use cookies to ensure that we give you the best experience on our website. If you continue to use this site we will assume that you are happy with it.