Home Blog Page 62

New Year = New Perspective + New Goals

3

Happy New Year!  The New Year has arrived and like many, you are motivated in making certain changes in your life and get a new perspective on life. Some call it resolutions, I choose to call them goals.

What is the difference between a resolution and a goal?

What is the difference between a resolution and a goal? I find that most people are focused on what they want to get rid of as a resolution; extra turkey weight, too much time spent on social media or letting go off that caffeine addiction. It keeps us focused on what we don’t want whereas goals keep us focused on what we do want. With goals, you can create a plan so you can achieve it and that is entirely different than an intention.

When you set an intention of what you want to create, a goal gives you a plan to get there. You are then able to get in alignment with what your goal is, feel yourself creating it, and then take the action steps to move towards it.

New Year...New Perspective
Letters spelling GOAL

New Year…New Perspective

Here are steps you can take to create the goal you want to achieve:

1. Set a “specific” goal

What do you want? Get really clear on this goal. If it is to attract a certain job, what does that position look like, feel like? If it is to attract your ideal partner, what are the qualities and characteristics? Get specific.

2. Why do you want it?

What is the purpose of this goal? What is the purpose for you achieving it? When you contemplate this, it activates the vibration of what you desire.

3. List other people that can help you

How can you help them as well? (Network) We are all here to support and help one another. Those that achieve their goals rely on others to support and help them. If you feel you have to do things alone, look at your beliefs about beings supported or being able to trust others. I couldn’t have created the majority of what I have if I had to do it all alone. To support and be supported by others is one of the secrets to having an abundant mentality.

4. Create your plan

What do you have to do? What steps do you need to take? Think with the end in mind. In order to create your goal, think about it from already achieving it and then work your way backward. For example, if you want to build a new house, imagine living in it as we speak. What was the last step you took before living in your new home? 

woman standing looking at the beach

5. Think about obstacles that could come up and then find solutions.

Most people don’t think about goals in this way or even want to consider the possible obstacles, because then they would activate that vibration. I do not want you to stay focused on the obstacles, I just want you to be aware of them and then think about a possible solution. For example, when I wanted to kick my coffee habit, one of the obstacles was that I always stopped at Tim Hortons on the way to driving my sons to school. So my solution was to take an alternative route which had no Tim Hortons (not an easy feat, since they are at every street corner). 

I also knew that if I had coffee lying around in the house, I would cave in, so I stopped buying some. I replaced the hot cup of coffee with herbal tea. When you focus on the solution, that vibration is activated. When obstacles come up, you can then shift really quickly into what the solution is so that you don’t stay stuck on the problem.

6. Take action right now!

What do I need to do right now to get started? Build momentum. We are in a physical universe, so even though you are applying universal principles, we still need to take action in this world. Think of 6 things you can do per day to move toward your goals and do them. This will help you gain momentum and before you know it, you will have achieved your goal.

New Year...New Perspective
New Year…New Perspective

7. Evaluate your progress and then adjust when needed

Focus on the progress; not perfection. When something happens, correct and continue. No one and no path is perfect. But a true creator adjusts and continues moving in the direction he or she wants to go.

Let’s stay connected!

@JulieCloutier6 & Facebook

Photo credit: Julie Cloutier

Valentine’s Day Candy Bark Recipe

8

Who would ever dare say that candy bark is only meant for Christmas time? Ah, I certainly wouldn’t! Valentine’s Day is the perfect season to gift a homemade treat to your loved ones, or even a delightful opportunity to create memories on Valentine’s Day with them that will surely last a lifetime! And what better way to spend this upcoming Valentine’s Day than by preparing some easy to make Valentine’s Day Candy Bark!

Decorating The Candy Bark

This recipe allows you to spend more time decorating than preparing, which is easily the best part of baking in my book! I find the best time I have whilst baking is throughout the entire decorating process. Picking the colours for the icing, personalizing your piece, sprinkling with endless amounts of sprinkles. It’s a nod to creativity and a tasty reward at the end. Not to mention licking the icing off the spoon! Mmmmm!

Invite Valentine’s Day Candy Bark into your home this upcoming Valentine’s Day and enjoy a simple but delectable treat that is bound to please your loved ones!

Valentine’s Day Candy Bark Recipe

You will only need a few simple ingredients to get these going:

Bark Ingredients

  • 7 whole graham cracker + 1/4 cracker
  • 1 bag white candy melts
  • 1 bag pink candy melts
  • 1 container red and pink sprinkles
  • 1 container jumbo sprinkle hearts

Material Needed:

  • large baking sheet
  • double boiler

They are very simple, but follow these directions closely:

How To Make The Valentine’s Day Candy Bark

  • Line a large baking sheet with graham crackers.
  • Using a double boiler, melt the white chocolate and continue to stir until smooth and creamy.
  • Pour the melted chocolate over the graham crackers. Use a spatula to spread the chocolate evenly over the crackers.
  • Sprinkle the red and pink sprinkles onto the white chocolate covered graham crackers.
  • Pour the pink wafers into a microwave safe bowl. Microwave until melted. Follow package directions.
  • Using a large spoon drizzle the melted pink wafers over the top of the bark.
  • Next, add the sprinkle hearts on top.
  • Allow to set for in the refrigerator for 30 minutes.
  • Break into pieces.

I hope you enjoyed my Valentine’s Day Candy Bark recipe! If you make it, make sure to share with us on Facebook or Twitter! Also, check out all of our other Recipes.

Valentine’s Day Candy Bark

Lyne Proulx
What better way to spend this upcoming Valentine's Day than by preparing some easy to make Valentine's Day Candy Bark!
No ratings yet
Prep Time 25 minutes
Cook Time 10 minutes
Total Time 35 minutes
Course Salad
Cuisine American, Canadian
Servings 8 pieces

Equipment

  • large baking sheet
  • double boiler

Ingredients
  

  • 7 whole graham cracker + 1/4 cracker
  • 1 bag Wilton white candy melts
  • 1 bag Wilton pink candy melts
  • 1 container Wilton red and pink sprinkles
  • 1 container Wilton jumbo sprinkle hearts

Instructions
 

  • Line a large baking sheet with graham crackers.
  • Using a double boiler, melt the white chocolate and continue to stir until smooth and creamy.
  • Pour the melted chocolate over the graham crackers. Use a spatula to spread the chocolate evenly over the crackers.
  • Sprinkle the red and pink sprinkles onto the white chocolate covered graham crackers.
  • Pour the pink wafers into a microwave safe bowl. Microwave until melted. Follow package directions.
  • Using a large spoon drizzle the melted pink wafers over the top of the bark.
  • Next, add the sprinkle hearts on top.
  • Allow to set for in the refrigerator for 30 minutes.
  • Break into pieces.
Keyword bark, candy bark, Valentine’s Day
Tried this recipe?Let us know how it was!

Modern Moms Seek Contemporary Education and Lasting Connections

1


Modern moms seek contemporary education and lasting connections

Mommy Connections program is now available in the Ottawa area!

Ottawa area moms…There is a new Mom specific program in town, geared toward current trends and hot topics. Mommy Connections has arrived in the Ottawa area and is changing the face of pre-natal and post-natal education. The next sessions begin January 11th (Mom and Baby) and January 13th (Mom and Tot) and the cost to register is $110. Classes are held in Orleans, but moms outside of the area are welcome to join!

“Women like that Mommy Connections isn’t just about the typical post-natal topics, but also incorporates new research, natural parenting and being environmentally conscious,” says Alex McDonald, Director of the Orleans Mommy Connections program. The new Mommy Connections Orleans Mom and Baby sessions focus on issues like postnatal fitness and health, sleep for the family, Mom’s skeletal system after baby, returning to work, baby wearing, baby safety, post-natal yoga, and music for babies. At the end of the 8-week program, moms are encouraged to continue meeting and providing mutual support. The 6-week Mom and Tot program is designed to expose Moms and their toddlers (walking to 4 years) to the best activities for young children in Orleans. The January session includes martial arts, dance and gymnastics, something new each week with the same group of moms!

Mommy Connections started in November 2008 in Edmonton, Alberta with the sole purpose of connecting moms in their communities. “I was finding that a lot of families were unable to get into public programs because of a baby boom in Edmonton,” says Carol McBee, President of Mommy Connections, “and the more I talked to parents, the more I realized there was a need for something different–something that spoke more to modern families.”

Mommy Connections is now available in 30 communities in Alberta, British Columbia, Saskatchewan, Newfoundland and Ontario, and new locations are in the works. For more information on Mommy Connections, visit their website!

For more information, you can contact Alex McDonald Director of Mommy Connections Orleans,

P: 613-402-5671

E: alexm@mommyconnections.ca


A Bathroom Renovation Resolution

7

A Bathroom Renovation Resolution

With the New Year upon us, many of us try to come up with goals or resolutions to help improve ourselves. My other half and I have a different set of goals in mind to jump start 2017. One of our goals for the New Year is to renovate to our bathroom. 

Our bathroom is a high-traffic area in our home since we only have one to share between five people ranging from two toddlers, a teenager, and two adults. We want to make this room lighter and brighter as well. With this in mind, not only do we have to think not only about the aesthetics of the room, but also its functionality so all of us can easily enjoy this space.


The look we want to achieve in our bathroom has a light and airy feel to it using Mediterranean beach-themed colours. We want to be able to step into this room and feel as though we are escaping the outside world to relax by the ocean.

One of the biggest concerns we have with making changes to our bathroom is the type of tub to choose. What features are we looking for in the fine tub? It would allow for us to do the following things:

  • fit both kids into it with room to spare
  • be easy for us to put them in and take them out with ease
  • run away for some private “Me Time” to soak away the troubles of a long day
  • look modern and stylish

I went shopping online for a Canadian company that provided shoppers with products to make a house feel more like a home and found a store called Decoraport. It aims to provide quality products from all over the world and to offer it to their customers at a reasonable price. They offer products for consumers in categories such as:

  • Home decoration materials
  • Home and garden
  • Furniture
  • Appliances
  • Sports and outdoor

Once we pinpointed the features we needed, the next thing we had to find the perfect tub. After looking at the wide selection of bathtubs available on their website, we really became interested in having a freestanding soaker tub installed as part of our new bathroom. The options available really impressed us!

Photo Credit: Decoraport.ca

Why would we want to have a freestanding bathtub? Well, look at them! They are tall, deep and come in many different styles that would fit our space. There are various faucet attachments that allow for different looks and functions that would suit your needs. These tubs would also make our bathroom seem larger since they would not connect to the wall. Finally, a freestanding tub would all us to rearrange all of the components in our bathroom to maximize the look and feel of the room.

Once we have chosen which freestanding bathtub would fit our space best, we would then give the rest of the bathroom an upgrade. The floors would have a sand coloured tile to give the room more of a beach feel. The back wall of the bathroom would become a feature wall using a Santorini Blue colour to take us away for a while in the room. This colour would also be used on the trim around the room. An Alabaster White would be used to cover the rest of the walls.

The other pieces in our bathroom would get a touch-up to add to the comfort and function of this space. Our vanity would be refinished to be a light Stone Gray colour to reflect the look we are trying to achieve. The faucets on the sink would be changed to those that match those of the bathtub.

New accent pieces would also be added to finish the room. A glass shelf would be brought in to hold our bathroom essentials and baubles. Silver –coloured towel rods and hooks would be used for hanging our towels and bathrobes. To cover our window, a white sheer curtain would hang to finish off this space.

We have been sitting on our bathroom renovation resolution for a while, but 2017 is the year to get this project done. We have been squirreling away our loonies and toonies and planning how we want this room to look once all of the pieces are put together. New Year’s resolutions can be whatever you want it to be. When we accomplish this goal for the New Year, it will make our home and our spirits brighter!  


Photo Credit: Decoraport.ca


There were so many more ideas I found from Decoraport Canada when I took a peek at their Facebook page! Check it out to see what you will find to add to your renovations this year!


Save

Save

Save

Save

Save

Save

Save

Save

Save

Save

Save

Save

Caprese Chicken Cast Iron Meal Recipe

22

Caprese Chicken Cast Iron Meal Recipe

Caprese Chicken Cast Iron Meal

When dinner time comes around, the last thing any parent wants to be doing is standing over a hot stove. We would rather get dinner done and spend quality time with the children. A few nights ago, listening to the pitter-patter of the kids playing in the other room, I had four different pots on the stove and a dish in the oven. Two hours later, it was time for dinner and time to catch up with the children’s day. Sadly, that lasted a whole five minutes and I had to look forward to cleaning up the dishes. Enough was enough!

I am a huge fan of one pot meals because they are so simple and easy. Plus the clean up literally takes only a few minutes compared to countless hours. We all have that one pan, that, at one point, was our favorite but it has been shoved back to no man’s land. Well, mine ended up being a trusty cast iron skillet that I have had since forever. It is the perfect pan to create a one dish meal in. In case you did not know, cast iron skillets are non sticking and actually healthy to cook in. Why did I not think of this sooner?

To make my Caprese Chicken Cast Iron Meal, you will only need the following ingredients:

Ingredients

  • 4 Boneless skinless chicken breasts
  • 4 Slices of fresh mozzarella
  • 2 Large tomatoes
  • 2 Avocados – seed removed and quartered
  • 1 Bunch of fresh basil – julienned
  • 4 tbsp. Olive Oil
  • Balsamic Vinegar
  • Italian Seasonings
  • Salt and pepper
The directions are really simple and easy! Let’s make this meal:

 Caprese Chicken Cast Iron Meal Recipe


Directions 

  • Season your chicken breast with Italian seasonings on both sides 
  • Place your cast iron on the burner set to high 
  • Add your Olive oil and allow to bubble and pop 
  • Now add your chicken to your pan and cook for 14 minutes rotating every 7 minutes 
  • Remove the chicken and set to the side 
  • Place your thick sliced tomatoes in the pan and cook for 2 minutes on each side on medium heat 
  • Remove your tomatoes and set to the side 
  • Place your chicken back in your cast iron 
  • Top each chicken breast with fresh mozzarella then your tomato 
  • Drizzle balsamic vinegar on top of all chicken 
  • Heat your oven to 350 degrees 
  • Place your cast iron in the oven and cook until cheese begins to melt 
  • Remove from the oven 
  • Top your chicken with fresh basil and quartered avocado


I hope you enjoyed my Caprese Chicken Cast Iron Meal as much as my family does. If you make it, make sure to share with us on Facebook or Twitter! Also, check out all of our other Main Dish Recipes.


Caprese Chicken Cast Iron Meal Recipe


Caprese Chicken Cast Iron Meal

5 from 1 vote

Ingredients
  

  • 4 Boneless skinless chicken breasts
  • 4 Slices of fresh mozzarella
  • 2 Large tomatoes
  • 2 Avocados – seed removed and quartered
  • 1 Bunch of fresh basil – julienned
  • 4 tbsp. Olive Oil
  • Balsamic Vinegar
  • Italian Seasonings
  • Salt and pepper

Instructions
 

  • Season your chicken breast with Italian seasonings on both sides
  • Place your cast iron on the burner set to high
  • Add your Olive oil and allow to bubble and pop
  • Now add your chicken to your pan and cook for 14 minutes rotating every 7 minutes
  • Remove the chicken and set to the side
  • Place your thick sliced tomatoes in the pan and cook for 2 minutes on each side on medium heat
  • Remove your tomatoes and set to the side
  • Place your chicken back in your cast iron
  • Top each chicken breast with fresh mozzarella then your tomato
  • Drizzle balsamic vinegar on top of all chicken
  • Heat your oven to 350 degrees
  • Place your cast iron in the oven and cook until cheese begins to melt
  • Remove from the oven
  • Top your chicken with fresh basil and quartered avocado
Tried this recipe?Let us know how it was!

Spirit of Giving at Christmas

4

It’s a snowy day and I sit in front of our large breakfast nook window with my two children, watching the snowflakes stick to the trees like thick vanilla icing. It’s one of those cozy days where it feels good to not have to go anywhere, to just stay put and be present in the beautiful muffled silence of large, slowing falling snow. Inside, our table is alive with glitter and a rainbow of coloured popsicle sticks. Small hands slowly maneuver glue sticks and excitedly sprinkle silver and gold sparkles. We are talking about the spirit of giving at Christmas!

Sharing the Spirit of Giving

Both of my girls hold expressions of great concentration as they create and build. They excitedly raise their completed masterpieces above their heads – wooden Christmas trees and reindeers to hang on our art wall. They ask if I think Santa’s reindeer would like their work and discuss how perhaps they should gift one of the wooden Christmas trees to our next-door neighbour and her friendly cat. My oldest adds, “then we would be practicing the spirit of giving right, mamma”? I kiss her sweet round cheek and nod. “That’s right” I say. “The spirit of giving is what Christmas is all about”.

Family Holiday Traditions

As they arrange their creations for display, I rise and get my grandmother’s rolling pin from the pantry. At the same time, I tuck under my arm the binder of long-held family recipes my parents gifted to me. Inside are the Christmas cookie recipes made for me as a child. Today we start with sugar cookies. My girls grab their stepping stools and take their positions on opposite sides of me at the countertop.

Together we roll our buttery dough with the same heavy rolling pin my grandmother used to roll her own, perhaps as she too looked out over softly falling snow in her backyard. I let them lick their finger and dip it into the sugar bowl, and plop in front of them their own small mound of dough. I show them how to work the dough and roll it out. Just like my family holiday traditions as my grandmother showed my mom and my mom showed me.

Sharing the Spirit of Giving

Spirit of Christmas Gift Giving

With Christmas music in the background and the glow of white lights from our Christmas tree casting shadows, I watch them work. In every fiber of my being I feel a pull to pass along to them what Christmas was and still is, to me. Christmas and all its beautiful nostalgia is so woven into me I can’t imagine not giving my children the same gift of tradition and love and connection to carry with them.

In my family, my grandmother was Christmas. I can still close my eyes and feel, as if it was only yesterday, the heat of her kitchen on Christmas eve and see the flush of her cheeks as she joyously moved from basting turkeys to kissing cheeks. She was the centre of an evening that our entire family, young and old alike, anticipated all year. The gifts under the tree, the mint green leaf candies in the candy bowl, the radio turned to the report of where Santa’s sleigh might be.

She was the thread of Christmas that held us tight from the beginning of December until the end. She taught us all that despite what is under the tree, the season is about connection, tradition, strength of family, love of your community, and lending a hand to anyone who needs one. It is about giving one’s self, having faith, breaking bread together, being completely present and soaking in all that is good and kind and gentle about ourselves, each other, and the path in which we all walk. I had 27 Christmases with her. Her message never wavered.

Sharing the Spirit of Giving

Each year when it was time to head home from my grandmother’s house on Christmas Eve, I would follow my dad into the strong smell of snow and chimney smoke, but pausing to look over my shoulder. Her house would be alive with warm light and the glow of her love. If I could time travel I would take my girls back to those moments.

I would sit them in the centre of it all. But I can’t and that is ok. But what I can do is thoughtfully and intentionally pass along, through my action and words, how Christmas was taught to me, so they too can come to know Christmas, not as a time to simply received, but to give and connect, to become still, to honour tradition, to cherish family, and to learn the spirit of giving.

With our Christmas cookies cooling on the counter top and my girls proud of their efforts, their conversation returns to their wooden Christmas trees and reindeer. They discuss which ones should be gifted to who, and how they can’t wait to share their cookies with grandpa. “He’ll like them the best, right momma”? I smile as I see their own connection to Christmas and to the concept of giving begin to take root and grow.

I know in these moments the spirit of my grandmother and her love of Christmas is close, and I also realize that I have what it take to plant small seeds of her Christmas spirit in the heart of my children, nourish those seeds lovingly within my own family and watch them grow.

Sharing the Spirit of Giving

Whatever your reason for celebrating this season, I wish you love, connection, stillness, and peace. From my family to yours – Merry Christmas and Happy New Year!

Julianne Durand

Cranberry Coconut Oatmeal White Chocolate Cookies

23

Cranberry Coconut Oatmeal White Chocolate Cookies recipe


Cranberry Coconut Oatmeal White Chocolate Cookies

The first time I mentioned making this cookie to my kids, they were not all that enthusiastic about me baking them. After making all the basic cookies that I could possibly find, it was time to venture out of my comfort zone and try something new out. Never would I have thought, to mix oatmeal and coconut with white chocolate. That just sounds like the weirdest combination I have ever even heard of. After some thoughtful consideration, my oldest looked at me and said “Mom, don’t knock it until you try it”. So that’s what I did. I made up a batch of Cranberry Coconut Oatmeal White Chocolate Cookies. Whew, that’s a mouthful.

When I think of a cookie, I think of something that is soft and chewy, with chocolate oozing out of every bite and it fits perfectly in a cold cup of milk. I will also be the first to tell you, that when I think of a cookie, it does not include coconut or oatmeal. After baking this mix, I tell you, I am seeing coconut and oatmeal in a whole new perspective now. Who would have thought that all of these flavors would mingle together and create a cookie that is not only soft and chewy but dunks perfectly into a cup of milk?! Are you ready to try them out?

These are the ingredients you will need for my Cranberry Coconut Oatmeal White Chocolate Cookies:

INGREDIENTS

2/3 cup butter, room temperature

2/3 cup light brown sugar

2 large eggs

1 1/2 cups old-fashioned oats

1 1/2 cups flour

1 tsp. baking soda

1/2 tsp. salt

1/2 cup sweetened dried cranberries

1/2 cup white chocolate chips or chunks

1/2 Coconut
They are really easy to make! Here is how to bake them:

DIRECTIONS

1. Preheat oven to 350 F. Lightly grease or line a cookie sheet.

2. In a large bowl, cream butter and sugar with an electric mixer until light and fluffy.

3. Begin to add eggs, mixing well


Oatmeal cookie inprocess 2 (Small)


4. In a separate bowl, lightly stir the oats, flour, baking soda, and salt

5. Now slowly add the dry ingredients to wet ingredients, mixing well


Oatmeal cookie inprocess 1 (Small)


6. Once the batter is mixed stir in cranberries, coconut and white chocolate chips


Oatmeal cookie inprocess 3 (Small)


7. I then use a tablespoon to scoop out the dough onto the prepared baking sheet lightly rounded the cookie dough into a ball shape pat to flatten slightly


Oatmeal cookie inprocess 4 (Small)


8. Bake in the oven for 8-10 minutes, until lightly browned on the edges

9. Let cool for a couple minutes on the pan, then remove cookies to a wire rack to cool


I hope you enjoyed my Cranberry Coconut Oatmeal White Chocolate Cookies as much as my family and I did. If you make it, make sure to share with us on Facebook or Twitter! Also, check out all of our other Recipes.


Cranberry Coconut Oatmeal White Chocolate Cookies

Cranberry Coconut Oatmeal White Chocolate Cookies

3 from 3 votes

Ingredients
  

  • 2/3 cup butter room temperature
  • 2/3 cup light brown sugar
  • 2 large eggs
  • 1 1/2 cups old-fashioned oats
  • 1 1/2 cups flour
  • 1 tsp. baking soda
  • 1/2 tsp. salt
  • 1/2 cup sweetened dried cranberries
  • 1/2 cup white chocolate chips or chunks
  • 1/2 Coconut

Instructions
 

  • Preheat oven to 350 F. Lightly grease or line a cookie sheet.
  • In a large bowl, cream butter and sugar with an electric mixer until light and fluffy.
  • Begin to add eggs, mixing well
  • In a separate bowl, lightly stir the oats, flour, baking soda, and salt
  • Now slowly add the dry ingredients to wet ingredients, mixing well
  • Once the batter is mixed stir in cranberries, coconut and white chocolate chips
  • I then use a tablespoon to scoop out the dough onto the prepared baking sheet lightly rounded the cookie dough into a ball shape pat to flatten slightly
  • Bake in the oven for 8-10 minutes, until lightly browned on the edges
  • Let cool for a couple minutes on the pan, then remove cookies to a wire rack to cool
Tried this recipe?Let us know how it was!
 

Fun Times at Kids And Company Birthday Party

8

I can’t quite believe my son is already turning 3 years old, the time has just gone by so very quickly and the old adage that when it comes to raising children “the days are long but the years are short” is so true and just a touch bittersweet. When I asked my little boy how he wanted to celebrate his birthday he answered “balloons, fun and friends” and on that front Kids and Company in Westboro had us more than covered.

We invited 8 of his little friends to share the special day and requested a Paw Patrol theme, as he is obsessed with Ryder and his gang of pups.


Good friends


But apart from sending out the invites and picking a party theme, I didn’t have to lift a finger, the party planners at Kids and Company took care of everything, games, toys, food and drink, decorations, even the cake, every aspect was organised and the result was a room full of very happy kids.

They also had loot bags, colouring and craft stations and gave out little bracelets that my son collected and wore up to his elbow!


crafts


It was so reassuring to know that Kids and Company offer a variety of nut-free snacks and are able to look after a range of dietary requirements, intolerances and allergies.

All the staff are also trained in CPR and first aid which offers such peace of mind when you have a bunch of little daredevils careening all around the room at high speed.


Party food


We had our party at the Westboro location but Kids and Company actually has venues all across Canada and specifically in Ottawa at these locations: Eagleson, Kanata, and on Albert.


Playtime


The space on McRae in Westboro is large, clean and colourful, with wooden cubbies for the children’s belongings and spacious rooms filled with everything a pint-sized party-goer could dream of!

My son was so excited to see all the Paw Patrol decorations and balloons and kept double checking with me “this is my party, right mommy?”

One of the highlights that proved popular with our preschool age kids was a roadway, complete with stop signs and traffic lights that the children could drive their ride on toys around. My son took to just knocking them all down as he yelled “timber” but he still had fun!


Roadway


There were also things for younger siblings to climb on and discover and some more sophisticated smaller toys available for older siblings.

The party room space is really open and large which allowed all the children to run around like loons burning off their excitement and giggles.

The staff were incredibly friendly, great with the kids and encouraged play and games allowing the parents to have a chat and catch up.

When it was time for our party lunch the children were treated to sandwiches and cookies and then it was time for the birthday cake to come out, the cake was really beautiful and my son loved it, although he didn’t quite understand the concept of blowing out his candles despite his little friend’s instructions.


Birthday cake


The party lasted just over 90 minutes which was the perfect length, resulting in worn out kids ready for bed.

My favourite part about hosting our son’s birthday party at Kids and Company is that it was a totally hands off, no hassle occasion for me. I seem to be chief organiser of everything in my little world, like most moms and it was really refreshing to have someone else take care of all the details so that I could just enjoy the party for once.


Birthday party fun


My son had an amazing birthday party and really enjoyed himself, he even asked the next day if he could return to his party, sorry kid, you’ll have to wait until next year!

You can find more information about Kids and Company birthday parties on their website!

The Best Chocolate Eggnog Cupcakes Recipe

14

Spread some holiday cheer with a special treat like these Chocolate Eggnog cupcakes. Enjoy them with a cup of homemade eggnog or a cup of hot chocolate.

Chocolate Eggnog Cupcakes Recipe

It’s mid-November and all the stores have the Christmas decorations out and ready to purchase. Decorating is one of my favourite parts of the holiday which is the perfect time to have snacks and drinks with the family. Now is the time to start your holiday baking so you are prepared for the season that is upon us.

What is in Eggnog

Eggnog is a mixture of beaten egg yolks, cream, and, often, whiskey or rum to make it boozy. It’s served chilled with a few ice cubes. Just make sure to make 2 batches so you have one with no alcohol so the kids can have a taste. While most people purchase eggnog at the store, (I recently saw Candy Cane Eggnog at No Frills) or you can make it yourself, however, it is better to use pasteurized egg yolks from a carton since the recipe calls for raw eggs. Burnbrae Eggs have a few available. Make your own using these Eggnog recipes for Any Occasions.

Easy Eggnog Cupcakes

When it comes to holiday baking, many start early because they become busy with parties, work functions or house guests. Baking can take time if you have a few recipes you want to make. If you are like us, we love chocolate and making desserts from scratch. If you are an avid baker then you will have all the ingredients already on hand to make these easy chocolate eggnog cupcakes.

Chocolate Eggnog Cupcakes

Decorations for Christmas Cupcakes

It’s always fun to add some extras to your cupcakes instead of just the frosting. You can add red or green candies, edible glitter and there are also many fun cupcake liners or cake toppers. No matter how you decorate your eggnog cupcakes make them special and from the heart for those you love and care about.

Best Eggnog Cupcakes

Are you ready for the holiday season baking? It’s my favourite time to bake Christmas cookiesmeat piesmeatballs stew, and Stewed Pig’s Feet. Can you ever tell that we are a French Canadian family! We also like to drink eggnog, so why not bake my favourite chocolate cupcakes with eggnog for a deliciously sweet Christmas dessert!

For this recipe for eggnog cupcakes, you will need the following ingredients:

Cupcake Ingredients

Makes 24 cupcakes 

  • 1/2 cup unsalted butter, softened
  • 2 cups sugar
  • 4 oz chocolate chips
  • 4 eggs
  • 1 cup oil
  • 1 tsp vanilla
  • 2 cups flour
  • 1/2 tsp sea salt
  • 1 cup cocoa
  • 1 cup Eggnog
  • Cinnamon to sprinkle
The best Chocolate Eggnog Cupcakes

How to make eggnog cupcakes

Melt the chocolate in a double boiler and remove as soon as it’s melted or in the microwave in a microwavable safe bowl 30 seconds at a time, set aside until it’s cool to touch.

Preheat oven to 350 degrees. Line pan with cupcake liners.

In a standing mixer, beat the butter and sugar until fluffy.

Add in the melted chocolate. Add in the eggs, one at a time until fully mixed. After, add in the oil and vanilla. Sift the flour, salt and cocoa in another and then add to the wet ingredients. Mix in the eggnog until combined.

Fill liners half way and bake 21 minutes.   

Eggnog cupcake frosting

  • 1 cup unsalted butter
  •  3 cup powder sugar
  •  1 tsp cinnamon 
  •  1 tsp nutmeg
  •  3-5 TBSP heavy whipping cream 

 Frosting Directions 

  • Combine all ingredients into a standing mixer and mix until stiff peaks form
  • Pipe onto cooled cupcakes and sprinkle cinnamon on top. 
The Best Chocolate Eggnog Cupcakes Recipe

I hope you enjoyed these Chocolate Eggnog Cupcakes Recipe! If you make it, make sure to share with us on Facebook or Twitter! Also, check out all of our other Recipes.

The best Chocolate Eggnog Cupcakes

Chocolate Eggnog Cupcakes

Lyne Proulx
Spread some holiday cheer with a special treat like these Chocolate Eggnog cupcakes. Enjoy them with a cup of homemade eggnog.
3 from 1 vote
Prep Time 10 minutes
Cook Time 22 minutes
Frosting and Decoration 10 minutes
Total Time 42 minutes
Course Dessert
Cuisine American, Canadian
Servings 24 cupcakes
Calories 408 kcal

Equipment

  • 1 line pan with cupcake liners
  • 1 Standing mixer
  • 1 Piping bag with star tip

Ingredients
  

Cupcake Ingredients

  • 1/2 cup unsalted butter softened
  • 2 cups sugar
  • 4 oz chocolate chips
  • 4 eggs
  • 1 cup oil
  • 1 tsp vanilla
  • 2 cups flour
  • 1/2 tsp sea salt
  • 1 cup cocoa
  • 1 cup Eggnog
  •  cinnamon to sprinkle

Frosting

  • 1 cup unsalted butter
  • 3 cup powder sugar
  • 1 tsp cinnamon
  • 1 tsp nutmeg
  • 3-5 TBSP heavy whipping cream

Instructions
 

Cupcake Directions

  • Preheat oven to 350
  • Melt the chocolate in a double boiler and remove as soon as it's melted or in the microwave in a microwavable safe bowl 30 seconds at a time, set aside until it's cool to touch.
  • Line pan with cupcake liners
  • In a standing mixer, beat the butter and sugar until fluffy
  • Add in the melted chocolate.
  • Add in the eggs, one at a time until fully mixed.
  • Add in the oil and vanilla.
  • Sift the flour, salt and cocoa in another and then add to the wet ingredients.
  • Mix in the eggnog until combined.
  • Fill liners half way and bake 21 minutes.

Frosting Directions

  • Combine all ingredients into a standing mixer and mix until stiff peaks form.
  • Pipe the frosting with your favourite star tip (I recommend Wilton 2D or Wilton 1M tip) and swirl the frosting onto cooled cupcakes and sprinkle cinnamon on top.

Notes

Frosting Tip

Twist the open end of the pastry bag and squeeze the frosting to the tip. Start at the outer edge of each cupcake moving in a circle inward to the centre of the cupcake.

Nutrition

Calories: 408kcalCarbohydrates: 45gProtein: 4gFat: 25gSaturated Fat: 10gPolyunsaturated Fat: 3gMonounsaturated Fat: 10gTrans Fat: 1gCholesterol: 67mgSodium: 69mgPotassium: 126mgFiber: 2gSugar: 34gVitamin A: 446IUVitamin C: 1mgCalcium: 33mgIron: 1mg
Keyword chocolate cupcakes, chocolate eggnog cupcakes, christmas cupcakes, eggnog cupcakes, eggnog cupcakes recipe, holiday cupcakes
Tried this recipe?Let us know how it was!

Raising Independent Learners

7

fast-forward-french-children3-small

Raising Independent Learners

As parents, we all want our kids to succeed. Sometimes that means helping with their homework – but too much help may do more harm than good.

It can be a nightly struggle to get our kids to buckle down and complete their homework, so helping them get it done seems only reasonable. If they are in Immersion and are finding French homework especially challenging you may find their motivation and confidence are particularly low. However, offering too much help can backfire: kids who cannot complete their homework independently will only suffer as schoolwork gets tougher. So how can we help them become independent learners without a fight?

Help Them Help Themselves

As a parent, you might have an idea of the best way to get things done. After all, you’re used to managing multiple projects and deadlines at work. But as tempting as it may be to dictate the homework schedule, instead let them create their own plan. Sit down with them, and ask them how they want to tackle their assignments. Creating a plan helps kids take ownership of their responsibilities – and a plan set on their terms is far more likely to be followed. You might consider making suggestions if you think your child’s plan is way off base, but try to let them work that out on their own.

Create a Homework Space

Not all kids thrive in the same environment. Some kids need a quiet study spot away from the hustle and bustle, and some much prefer to be right in the middle of the action. Resist the temptation to impose your own work preferences on your child – let them choose their study space.


fastforwardfrench-children4-small


Make it Fun

Concentrating intensely for hours on end is tough. But it’s all too easy to “take a break” that turns into hours of mindless web surfing. Instead, schedule in fifteen-minute “game breaks” every forty-five minutes. Set a timer, and as long as your child has been diligently focusing on their work for the allotted time, do something fun when the timer goes off! Toss a ball around, play a quick game: whatever activity you chose, try to make sure it gets your child moving. You can also use this time to gently ask how they are progressing with their French, if that’s a challenge for them. You don’t have to be fluent in the language yourself. Ask them to summarise a story they’ve been reading, a fact they’ve learnt or to translate something into French for you to copy out loud. Be prepared for them to laugh at your accent!

Make Yourself Scarce

If your child has a habit of asking you for help the nano-second they have a question, try making yourself scarce. Move to a different section of the house during homework time, and insist that your child come to you with any questions. Climbing a flight of stairs just to ask a question might inspire your child to work it out on their own. If you do speak French it can be tempting to be their own living & breathing dictionary. However, encourage them to learn to use a dictionary independently You could offer to sit with them the first few times they need one, then challenge them to consult it themselves the next time.


fastforwardfrench_children1-small


Answer Questions with Questions

If your child comes to you with a question, ask a question in return. Asking something as simple as “What do YOU think you have to do to figure this out?” can often motivate children to think out loud. Talking things through helps clarify their existing knowledge, and it is likely that your child will come to the answer on their own! This is also an effective strategy with French reading comprehension. Ask them to give you the gist of a story they’ve been reading or to tell you how that story made them feel.

Using these techniques to help your child do their homework independently can ease the homework struggle, and set your child up for future success in school.

What tricks do you employ at homework time?


By Marie-Claire Thauvette

Marie-Claire is the founder and owner of Fast Forward French, one of Ottawa’s largest French tutoring centres. She has nearly 30 years’ experience teaching French. Visit fastforwardfrench.com to sign up for tutoring classes.

40 Easy Christmas Crafts for Kids

16

I have rounded up 40 easy Christmas crafts for kids to share with you. This collection has something for everyone on it. From yarn trees to salt dough ornaments, and everything in between! I can’t wait to hear which of these Christmas crafts is your favourite!

Homemade Holiday Crafts

There is something really special about DIY holiday crafts for kids. They only grow more special with the years that pass. Any relative or friend that receives one will treasure it for years to come. This list of craft ideas has so many cute options that are perfect for displaying or sharing! Most of these ideas require supplies you probably have on hand or can find at your local dollar store.

40 Easy Christmas Crafts for Kids

Christmas Crafts For All Skill Levels

This collection of kid crafts has something for all skill levels including easy Christmas crafts for preschool aged children like the candy cane crafts to an elegant looking centrepiece that older kids will be incredibly proud to display. Picking a favourite idea to try first might prove to be a challenge as they are all so much fun! I love the idea of making the hand print cards from this collection yearly with the kids to display long after their hands are no longer so small. 

Kids Christmas Ideas

If you are looking for more holiday inspiration for kids check out these Mickey Mouse Holiday Gift Box Pretzel Treats, Wood Slice Ornaments with Acrylic Paint or Paper Plate Snow Globes Craft With Template. They are perfect to make with kids. You might also like these brownie snowflake sugar cookies.

Easy Christmas Crafts for Kids

It isn’t the holiday season without a good crafting session with the kids!

  1. Yarn Tree
  2. Holiday Centerpiece Christmas Craft
  3. Kids Chalkboard Ornament
  4. Snowman Thumbprint Gift Tags
  5. Christmas Wreath Craft
  6. Accordion Tree Ornaments
  7. Bottle Cap Reindeer
  8. Glitter Pen Stars
  9. Angel Christmas Ornaments
  10. Olaf Sock Snowman
  11. Snowman Mason Jar Lids
  12. Reindeer Cardboard Tube Craft
  13. Handprint Snowman Christmas Ornament
  14. Sudsy Snowman Kids Craft
  15. Reindeer Footprint Ornament
  16. Scented Marble Candy Cane Craft
  17. Mix n Match Stone Snowmen
  18. Paper Angel Christmas Craft
  19. Printable Snowman Craft
  20. Easy Ripped Paper Tree
  21. Egg Carton Penguins
  22. Christmas Light Chalk Stencil Art
  23. Paper Plate Santa Claus
  24. Noodle Christmas Tree
  25. Paper Plate Grinch Craft For Kids [Free Template]
  26. DIY Sleigh Bells
  27. Puffy Paint Window Clings
  28. Egg Carton Snowman Craft
  29. Shivery Snow Paint
  30. Toilet Roll Angel
  31. Paint Chip Christmas Garland
  32. Handprint Christmas Tree Cards
  33. Candy Cane Toddler Craft
  34. Easy Christmas Tree Ornaments
  35. Popsicle Stick Reindeer
  36. Santa Hat Christmas Cards
  37. 5 Minute Christmas Luminaries
  38. Twig Christmas Tree Ornaments
  39. Candy Cane Name Craft
  40. Salt Dough Ornament

Hope you enjoyed this round-up of easy Christmas crafts for kids to make this holiday season! If you make one of these ideas for Christmas crafts, be sure to leave a comment and let me know how it went!

Chocolate Christmas Cupcakes with Peppermint Frosting

27

My favourite treat for the holidays is chocolate with peppermint, so this Chocolate Christmas Cupcakes with peppermint frosting hits the spot! It’s also easy to make and adds a festive dessert on the table for Christmas dinner. Your family will want seconds!

peppermint-hot-cocoa-chocolate-cupcake

Chocolate Peppermint Cupcakes

It wouldn’t be Christmas without having at least one candy cane during the holiday season. One of the main flavours during the holiday season is peppermint. It started with candy canes and other candies then people began adding it to desserts, drinks and anything chocolate. The main colours of candy canes are red and white, however, they do come in different colours and flavours. If you want a delicious Christmas dessert, then you will want to make this recipe for Chocolate Peppermint Cupcakes.

Peppermint Candy Sticks

Did you know candy canes weren’t always shaped like a cane? They used to be just a plain white stick with the flavour of peppermint. I remember watching Little House on the Prairie and during a Christmas episode, inside the stockings was a white peppermint stick. The candy cane is symbolic of the Shepherds crook making it a Christmas favourite.

In the mid-1600s candy canes were created which wasn’t an easy task. It took hours of heating and twisting and pulling the ingredients to get a peppermint stick. It was not an easy candy to find because of the long process of creating them. In the 1950s the candy cane machine was invented and manufacturers were able to mass-produce.

Christmas Cupcakes

Chocolate and peppermint go so well together it makes for a yummy flavoured hot chocolate cupcake for Christmas time. Not only are they sprinkled with crushed candy canes but you can stick the candy cane in the cupcake to make it look so pretty and of course an added bonus. It’s like two treats in one.

If you are a fan of peppermint and hot chocolate then these Christmas cupcakes are just what you need. You will also want to whip up a batch of my Peppermint Meringue cookies. If you are looking for a last minute gift idea, try one of these 10 Peppermint DIY Body recipes.

Chocolate Christmas Cupcakes with Peppermint Frosting Recipe

Cupcake Ingredients

  • 1 cup all-purpose flour
  • 1 tsp cinnamon
  • 3/4 tsp baking soda
  • 1/2 tsp salt
  • 1/2 cup hot water
  • 1/2 cup cocoa powder
  • 6 TBSP butter, room temp
  • 3/4 cup sugar
  • 1 large egg
  • 1/4 cup vegetable oil
  • 1 tsp vanilla extract

Cupcake Directions

  1. Preheat oven to 350 degrees. Line a cupcake tin with cupcake paper liners.
  2. Whisk flour, cinnamon, baking soda, salt in a medium bowl. Set aside.
  3. Whisk hot water and cocoa powder in a small bowl.  Set aside.
  4. Using a stand mixer, cream together butter and sugar until light and fluffy.
  5. Mix the egg, vegetable oil, and vanilla until well combined.
  6. Add in the flour mixture, alternate with hot cocoa mix until there are no lumps.
  7. Using a large ice cream scoop the batter into the lined cupcake tins until they are 3/4’s filled.
  8. Bake at 350 degrees for 20-25 minutes or until an inserted toothpick comes out clean.
  9. Remove from oven allowing cupcakes to cool in cupcake pan for 10 minutes.
  10. Take out of cupcake pan and place individual cupcakes on a wire rack to cool completely.
peppermint-hot-cocoa-chocolate-cupcake-recipe

Peppermint Frosting

Frosting Ingredients

  • 1 cup butter, softened
  • 2 cup powdered sugar
  • 1 – 2 TBSP heavy cream
  • 2 tsp peppermint extract
  • crushed candy canes
  • candy canes to stick on top

Frosting Directions

  1. Beat butter and sugar till combined. 
  2. Mix in heavy cream and extract and mix until blended. 
  3. Spoon into a pastry bag with a large tip.
  4. Frost cupcakes from the outside working the tip toward the centre of the cupcake.
  5. Sprinkle crushed candy canes and top of the chocolate cupcakes with candy canes.

I hope you enjoyed my Christmas Chocolate Cupcakes with peppermint frosting as much as my family and I did. If you make this recipe, make sure to share with us on Facebook or Twitter! Also, check out all of our other Recipes.

Peppermint Hot Cocoa Chocolate cupcakes

Chocolate Christmas Cupcakes with Peppermint Frosting

Lyne Proulx
My favourite treat for the holidays is chocolate with peppermint, so these Chocolate Christmas Cupcakes with Peppermint Frosting hit the spot!
5 from 1 vote
Prep Time 30 minutes
Cook Time 25 minutes
Total Time 55 minutes
Course Dessert, Snack
Cuisine American, Canadian
Servings 12 cupcakes
Calories 411 kcal

Equipment

  • cupcake tin with cupcake paper liners
  • medium bowls
  • Stand mixer
  • pastry bag with a large tip

Ingredients
  

Cupcakes Ingredients

  • 1 cup all-purpose flour
  • 1 tsp cinnamon
  • 3/4 tsp baking soda
  • 1/2 tsp salt
  • 1/2 cup hot water
  • 1/2 cup cocoa powder
  • 6 TBSP butter room temp
  • 3/4 cup sugar
  • 1 large egg
  • 1/4 cup vegetable oil
  • 1 tsp vanilla extract

PEPPERMINT FROSTING

  • 1 cup butter softened
  • 2 cup powdered sugar
  • 1 tbsp heavy cream 1 or 2
  • 2 tsp peppermint extract
  • 4 candy canes crushed
  • 24 candy canes to stick on top small

Instructions
 

CUPCAKE DIRECTIONS:

  • Preheat oven to 350 degrees. Line a cupcake tin with cupcake paper liners.
  • Whisk flour, cinnamon, baking soda, salt in a medium bowl. Set aside.
  • Whisk hot water and cocoa powder in a small bowl. Set aside.
  • Using a stand mixer, cream together butter and sugar until light and fluffy.
  • Mix the egg, vegetable oil, and vanilla until well combined.
  • Add in the flour mixture, alternate with hot cocoa mix until there are no lumps.
  • Using a large ice cream scoop the batter into the lined cupcake tins until they are 3/4’s filled.
  • Bake at 350 degrees for 20-25 minutes or until an inserted toothpick comes out clean.
  • Remove from oven allowing cupcakes to cool in cupcake pan for 10 minutes.
  • Take out of cupcake pan and place individual cupcakes on a wire rack to cool completely.

FROSTING DIRECTIONS

  • Beat butter and sugar till combined
  • Mix in heavy cream and extract and mix until blended.
  • Spoon into a pastry bag with a large tip.
  • Frost cupcakes from the outside working the tip toward the center of the cupcake.
  • Sprinkle crushed candy canes and top with candy canes

Notes

Nutritional values: Candy canes were not added in the nutrition facts.

Nutrition

Calories: 411kcalCarbohydrates: 43gProtein: 3gFat: 27gSaturated Fat: 15gPolyunsaturated Fat: 4gMonounsaturated Fat: 7gTrans Fat: 1gCholesterol: 71mgSodium: 340mgPotassium: 81mgFiber: 2gSugar: 32gVitamin A: 686IUVitamin C: 0.01mgCalcium: 18mgIron: 1mg
Keyword Chocolate Christmas cupcakes, chocolate cupcakes, christmas cupcakes, cupcakes, peppermint, peppermint frosting
Tried this recipe?Let us know how it was!

How to Start a Successful Health Blog

3

pexels-photo-laptop-cell-phone-notebook-small

How to Start a Successful Health Blog 

There are plenty of reasons to start a health blog. For one, maybe you have a unique experience that you want to share with the world.

Perhaps you feel passionate about your health and want to educate others on its vast benefits. Or maybe you have an awesome product or service but need help attracting customers to your online store.

Whatever the case, starting a blog doesn’t have to be a chore. Follow the steps below and you’ll be well on your way to running your own health blog. 

Choose the Right Niche 

When it comes to health, there are certainly plenty of topics to cover: diet, nutrition, fitness, running, biking, and many others. Choosing the right niche is less about finding a profitable one (there are tons) and more about choosing one that’s right for you.

Ask yourself, “what’s a specific area that I’m knowledgeable in and can provide in-depth content?”

If that doesn’t work, what gets you excited just thinking about it?

There are lots of ways to add your own twist into an already existing niche. Don’t worry too much about picking a bad one, and instead focus on something you would enjoy blogging about. 


healthy-people-woman-girl-pexel-small


Create Interesting and Helpful Content

As with any blog, content is what’s going to drive the vast majority of your traffic. It’s the lifeblood of your website, so you need to make sure it’s:

  • High quality
  • On a topic people actually want to read about

Creating high quality content is hard. It takes a lot of time and effort.

Unfortunately, the quality of your writing isn’t something you can improve overnight. It takes practice and habitual writing. If you don’t have the time to create truly great content, there’s always the option of hiring a freelancer do this for you; though it tends to take the “personal” out of personal blog, assuming that’s what it is.

As for content that people enjoy reading, you simply have to write about what people are interested in. A simple trick to do this is by using a free SEO analysis tool on other websites in your niche.

You can find what content performs the best for them, then improve upon it and publish something similar on yours. Most topics have already been written about in some form or fashion, so don’t sweat it if you feel like you’re cheating.

Treat It Like Your Own Health 

If you want your new blog to thrive, you’ve got to treat it like one.

What happens when you neglect your own health? If you’re like me, it doesn’t operate so well. Joints and muscles start getting achy. Energy levels go down dramatically.

Your blog is the same way. You can’t expect to have a successful blog without a little tender, loving care.

Update the site design every now and then. Consistently push out great content. Do your market research so that you’re always staying one step ahead of the pack.

Closing Thoughts

Health blogs can be a fun and rewarding way to make the world a better place.

Make sure you choose a niche you’re knowledgeable in, publish interesting content, and then nurture it for growth.

If you’re thinking about starting one, take the three steps above into consideration so that yours becomes successful.


You Don’t Have To Be a Grinch to Control Your Holiday Spending

10

With Christmas fast approaching it’s easy to lose control of your holiday spending. Gifts for the kids, family, co-workers, teachers, neighbours, more for your kids and the extra costs that winter time brings. It’s also easy to start thinking of yourself as the Grinch when deciding how much money to spend and what gifts to give. Your finances are one thing that determines the way you and your family live. Controlling your finances during the holiday season is a very important part of your family’s financial future and you shouldn’t sacrifice that by overspending.

You Don't Have To Be a Grinch to Control Your Holiday Spending
The Grinch! Photo credit: pareeerica via Foter.com / CC BY-NC-SA

Control Your Holiday Spending

Where to Start

First step is reviewing your family’s monthly budget . With winter there are additional costs you need to watch out for like snow removal, winter tires for the car, snowsuits for the kids and higher heating costs. You don’t want to spend all your money on gifts and then get a big hydro bill in January.  

Once you have your budget sorted out make a gift giving list, then check it twice. List all the people you would like to get gifts for and then write down the total amount you have to spend. Divide the money you have among the people on your list, some you will want to spend more on so begin with those first. When all the money is divided, do not add anymore people or money!

Shopping

Start early so you are calm and relaxed. Leaving it to the last minute, stressed and rushing around in panic will cause you to lose control and end up spending more, plus it’s not fun.  Bring your list with you and stick to it! Don’t put any extra gifts in your cart or add people to the list. 

When you go shopping have the total amount you have to spend on the person in mind and not what gift you want to get them. This will help you stay within your budget because if you see the gift you want to get and its more than you have budgeted you will likely spend more to get it. 

You Don't Have To Be a Grinch to Control Your Holiday Spending
Christmas Gifts in a shopping cart

What happens when thing get out of control?

Since just about everyone has a checking account it is important to know how to keep that account balanced properly. If you do not keep a close eye on your account then it could end up costing you a lot of extra money. If you write one check that you do not have enough to cover then it could spiral way out of control.

The fee for the insufficient funds (typically $45) which may cause another check to bounce, which causes more fees to be added on. This is one reason for keeping a close eye on your checking account. It really isn’t as hard as it may seem you just need to remember to keep a record of everything you spend no matter how small. Review your statements each month and compare them to your records.

Credit Cards

The next big problem that most people have is with credit cards. It’s nice to be able to purchase items on credit, but you still have to pay for that with an added interest fee. You need to be careful how you use your cards. This is very important when it comes to controlling your finances. Try to limit them to purchases that can be paid off within the thirty day period to avoid high interest rates. If you do owe a large balance then try to pay extra each month, not just the minimum payment. The more you pay the more money actually goes towards the balance saving you on interest. 

You Don't Have To Be a Grinch to Control Your Holiday Spending
You Don’t Have To Be a Grinch to Control Your Holiday Spending

Other things to watch out for

There are also a lot of smaller ways that you can keep control of your finances. For example, be careful and control any extravagant gifts you may be thinking about, even if it is on your list. Phone bills can sometime be quite a shock so if you are making long distance calls keep a record so you will know how long you talk and how often. The same thing goes for cell phones, so be careful not to go over your minutes and data limits as this can add up very quickly.

It’s important to remember, it’s not how much you spend on the Christmas gifts that matter, and if it is important to the person receiving it then that’s their problem. Don’t feel bad or stressed if you can’t give expensive Christmas gifts or a gift to everyone, give what you can. It doesn’t have to be a physical items – a smile, a hug, volunteering or saying “Merry Christmas” is O.K. too. The holidays are about spending time with friends and family and you don’t have to go into debt by buying gifts.

Happy Holidays!

Four Common Roofing Mistakes To Avoid

11

Four Common Roofing Mistakes To Avoid


pexels-photo-186077-small


Toronto is a beautiful city filled with history and culture. With a history stretching hundreds of years, Toronto has many buildings in need of renovation or repair. It’s tempting for many homeowners to try to fix our houses all by ourselves. Watching home renovation shows on television gives us the impression that such work is easily handled and experts are simply unnecessary middlemen getting in the way of an easily fixed problem.

The reality of roof renovation; however, is that you will almost always need the help of experts like Professional Roofers in Toronto to get a professional level of quality. When it comes to something as important as your roof, mistakes are not only inevitable in a DIY job, but they could be incredibly costly in the long run, leading to significant household damage. Professional services for these issues exist for a reason, but ensure you choose a qualified, reputable roofer like Professionalroofers.com when you have your roof renovated – or you could end up in exactly the same boat. Here are just a few of the biggest mistakes to avoid when you need to repair a damaged roof.

Installing Shingles Incorrectly

A major source of headache for repairmen is caused by shingles that were installed incorrectly. Oftentimes DIY enthusiasts will place the starter shingles in the incorrect position, which allows water to invade the sheathing around the shingle cutouts. A major factor contributing to this problem is placing shingles on a low slope roof. The poor angling makes it difficult for shingles to function properly and allow water to shed off of them. Shingles are not intrinsically waterproof and will not serve their purpose if the roof’s slope is below 2:12.

Poor Nailing

One of the biggest roofing mistakes you can make is with improper nailing techniques. Shingles are generally made of fiberglass with a layer of asphalt applied to the top of the fiberglass. When you drive a nail through a shingle it literally tears the shingle and if you the drive the nail in with too much force, the shingle will become compromised. This is why it’s important to simply throw away any damaged shingles instead of reusing them – shingles are not meant to withstand extreme force.

Poor Attic Ventilation

In America, 9 out of 10 attics are not properly ventilated. This creates a major health problem for many children who are prone to catching asthma. In fact, 58% of all asthma cases are related to improperly ventilated roofs. Hot, humid roofs provide the perfect backdrop for infectious bacteria to grow rapidly and can therefore lead to other health problems as well. There are also financial issues associated with poor attic ventilation leading to higher air conditioning and heating bills and damage to shingles as well.

Use Of Asphalt Cement In Repairs

A major misconception is that because shingles are covered in a layer of asphalt, it is ideal to use asphalt to repair damaged roofs. This results in an improper mix of materials and further promotes damage to the roof. Damaged shingles should always be replaced with new shingles.


Looking To Shed Holiday Pounds? Eggs Are A Quick And Healthy Solution!

19

Everyone looks forward to the holiday season — and the delicious food that comes with it. But every mom knows that after dinner with the in-laws, holiday brunch with the kids, and all that turkey and gravy, soon enough you’ve packed on a few too many holiday pounds. Are you now looking to shed holiday pounds?

Looking To Shed Holiday Pounds? Eggs Are A Quick And Healthy Solution!

While it’s definitely safe to indulge a little over the holidays, it pays to have a few recipe options in mind for the new year. If you’re looking to shed holiday pounds, visit getcracking.ca to find plenty of post-holiday recipe ideas to help you get back in shape — after all, cooking or baking with eggs is one of the best and easiest ways to get back to a healthy routine.

Eggs contain a high amount of protein, which allows the body to burn fat at a higher rate, since your body’s metabolic rate is increased as it digests protein. When your body uses more energy to break down the healthy protein in eggs, it also burns away more holiday fat you have stored away.

According to the Egg Nutrition Center, eggs contain nine vitamins, eight minerals, two amino acids and many other vital macronutrients. A few of the most notable nutrients include calcium, iron, thiamine, and vitamin B12. These components create a food rich in nutrients that is powerful for fat burning.

Slimming Breakfast Taco

A smaller cousin of the breakfast burrito, the breakfast taco made with reduced-fat Cheddar and the goodness of eggs is a satisfying and healthy breakfast option. Add fresh bell peppers, onion, or avocado to the dish for more flair and even more healthy vitamins.

cooking with eggs


Veggie Frittata

A frittata is any mom’s best friend. Not only is it super nutritious (as eggs plus veggies equals a massive infusion of protein and vitamins), but you can also put just about anything in the pan, and it will still taste great. As a great way to rid the fridge of many holiday leftovers, a healthy frittata can be made with ham, cheese, almost any veggie left over from those holiday trays, and of course the key ingredient — eggs. What’s more, frittatas leave practically no mess in the wake of their prep, which means less time in the kitchen!

Maple Syrup and Flaxseed Muffins

If you’re baking over the holiday season, consider adding whole wheat and some omega-3 eggs into the mix. Maple syrup with flaxseed muffins are a delicious way to jump start your healthy routine this winter. Whole-wheat flour and flaxseeds give maple syrup-sweetened blueberry muffins a delicious, nutty flavour. Compared to more traditional versions of the recipe, they have four times the dietary fiber and substitute healthful monounsaturated fat (canola oil) for saturated fat (butter), while replacing standard eggs with healthy Omega-3 eggs.

Looking To Shed Holiday Pounds?

While they have received a bad reputation in the past, eggs are actually nutritious and beneficial to your health. They help the body fight fat and help to create a slim physique. With so many ways to prepare an egg, it is a great way to jump start your metabolism and recover from holiday season indulgence and shed those holiday pounds.

What are you favourite recipes using eggs? Comment below!

Take Your World with You with Beside-U Canada – Totes Review

127

The holidays are here! This time of year means that I am on the move more than at any other time of the year. There are days I need to take a lot with me to accomplish my “Holiday To-Do List” yet I do not have enough room in my tote to hold it all. Beside-U Canada asked me if I would review a bag from their chic lines of purses, bags, back packs and totes to see if I could take my world with me while on-the-go! I chose to test their Zamora tote in Stone Blue from their Endeavor collection.

Take Your World with You with Beside-U Canada - Totes Review

Beside-U Canada Totes Review

The Zamora tote boasts many features users love to have in a bag. It has a locking main compartment so important items will only be able to be accessed by you while wearing it. The RFID guarded zippered pocket can hold credit and debit cards to help avoid identity theft. There are also plenty of roomy pockets that allow for users to bring all sorts of items along with them.

Take Your World with You with Beside-U Canada - Totes Review

My favourite feature of the Zamora tote had to be its size. It is a bag I can take with me on when I need to take a lot of things with me for a day away from home. I was able to bring everything I needed to set up a mobile office with me in this bag with room to spare! This makes working while on the road or in between meetings at a coffee shop more manageable.

Take Your World with You with Beside-U Canada - Totes Review

The handles and straps are also fantastic! I was not worried when having to carry heavy items around all day. The handles felt sturdy and were great to use if I had a lighter load to bring with me. The adjustable strap helped carry my laptop and other heavy objects on my shoulders with ease.

ottawa-mommy-club-beside-u-handle-photo

Another feature I love about this bag is that I can also use it for more than just a laptop bag. It would be great to use as a chic overnight or carry-on bag! It could carry all of the clothes I need for a one-night stay away from home, to bring another outfit with me if I have a function to attend when a stop at home is not an option or to bring what I need to work and be comfortable while on the road!

I was really happy with the Zamora tote from Beside-U Canada! It allowed me to take whatever I needed to take on a hectic day or to get away and have fun. The colour is fabulous, it has quite a few security features, and the strength of the straps and handles made it easy for me to carry heavier items. This bag will be great to tote for the holidays and a fabulous gift idea to give this year!

For more details about Beside-U Canada, you can connect with them on their Facebook, Twitter, Instagram, Pinterest, and YouTube pages!

Disclaimer: I received a Zamora bag from Beside-U Canada in order to conduct this review. The views I shared are my own.

Save

Save

Save

Save

Save

NHL Advent Calendar from Playmobil Canada – Review

103

NHL Advent Calendar from Playmobil Canada – Review

December is almost here, and you know what that means: Advent calendar time! It is one of the reasons why my kids love this time of the year. They love seeing what is hidden on the other side of each door. Playmobil Canada asked my family to review one of their themed NHL Advent Calendar to see if it would get my kids excited about what was behind each door. Hockey fans will cheer at the theme we received: an NHL® Advent Calendar – Rivalry on the Pond set!

ottawa-mommy-club-playmobil-feature-photo


NHL® Advent Calendar – Rivalry on the Pond set!

This set comes with an easy to assemble rink and advent calendar for the family to open for each day in December leading up to Christmas Day. Since I could not wait until Christmas Eve to fully conduct this review, we opened all of the doors to put the set together and get playing.

ottawa-mommy-club-playmobil-calendar-collage-photo

The numbers were spread out well and my kids made light work of opening each of the doors. They took turns finding out what piece of the set they were going to discover. As we found each treasure, the kids and I assembled each member and object to complete this winter scene. I was so happy that the stickers were very forgiving as there were times that we did not place them on properly.

ottawa-mommy-club-playmobil-open-calendar-photo-2


Excitement every day

Once we finished opening every door, the set was complete! We were all excited to see how much fun we could have pretending to have a classic shoot-out moment on our dining room table. All three of us had fun trying to score goals on each other and having the spectators cheer the players on!

ottawa-mommy-club-playmobil-rink-complete-photo-2

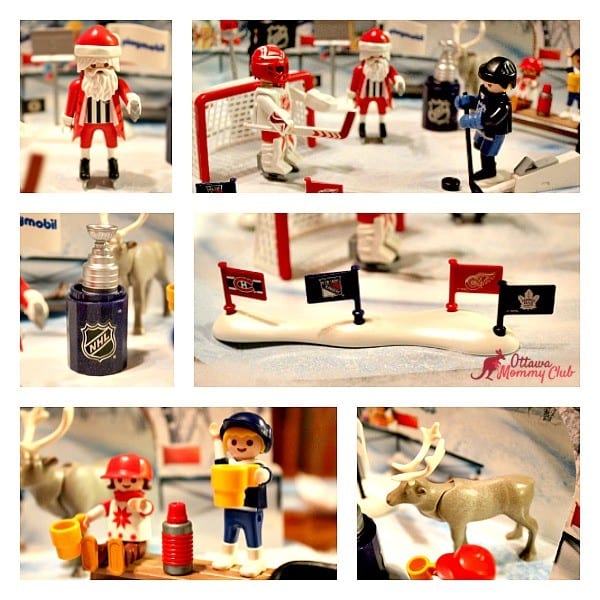
I loved the added little touches Playmobil Canada added to this set such as the mugs for hot drinks, the caribou to take in the match and the ever-impartial Santa officiating this showdown! It was fun to be able to control the sticks of the players so we can shoot on and defend the goal. Having the flags of the Original Six NHL teams and the Stanley Cup on hand made us want to score more goals so we can hoist the Cup if we won.

ottawa-mommy-club-playmobil-rink-complete-collage-photo-2

One issue we had with this set was that some of the pieces of the players are behind different doors. We would have to wait to fully play with them. This made it a bit difficult to have a match.

Conclusion

My family had a blast setting up and playing with the pieces of this playset. The set was simple to put together, the characters were fun to play with, and the added touches made the scene come to life. My kids may have found it hard to wait to open each door, but it was well worth the wait to see the surprise that laid behind them!

For more information about Playmobil Canada, you can connect with them on their Facebook, Twitter, Instagram, and YouTube pages!

Disclaimer: I received an NHL Advent Calendar from Playmobil Canada in order to write this review. The views I shared are my own.

Save

Save

Save

Save

The Real ROI of a One Year Master of Business Administration (MBA)

4

You’ve crunched the numbers a million different ways; you know better than anyone that across North America, a graduate of a Master of Business Administration degree program sees on average a 75% increase to their pre-program salary. You know that it takes 4 years for the difference in salary to pay back the initial tuition investment, and that over a 10-year period, you will have earned $500,000 more than you otherwise would have. If you have a clear vision of where you want to take your career and you know that earning a Master of Business Administration degree is the way to get there, it’s a sound financial decision that will pay you dividends.

Even when you take into account the lost income of taking a year or two out of your career (and this is where a single year program can really help), the investment makes sense, but are there intangible assets that you gain from earning your MBA? These are the insights you gain into business practices and methodologies, the contacts you make from networking through your school, and an integrated perspective on business challenges.

calculator-scientific-pixel-small

Should you enrol in a Master of Business Administration program?

If you’re debating a 1 year MBA program, especially with a specialization in Entrepreneurship, you may have fallen into the pro- and anti-graduate school debate. There are vocal opponents on either side: some claim you can’t teach innovation while others think an MBA is your best weapon in the world. You can find plenty of reasons that support furthering your business education before jumping into your career on Lazaridismba.ca and there many successful business leaders who encourage young people to pursue the MBA route.

On the HBR, scrap metal tycoon Stephen Greer tells the story of how he went straight into building his own company rather than taking the time to learn more about best practices and methodologies. His company was a $250 million success, but he claims he missed out on a lot of money and opportunities because he didn’t know how to manage human resources, control his inventory and prevent fraud, or expand at a strategic pace. Ultimately, he says that while you can’t teach someone to get excited by risk taking, an invaluable quality in an entrepreneur, you can teach them a lot of valuable lessons about how they strategize and manage those risks.

pen-writing-notes-studying-pixel-small

Why you should enrol in a Master of Business Administration Program

When you take your fledgling business plan to university, you essentially get a lab for trying your idea and probing for mistakes. University institutions can give students with great ideas access to startup incubators and even funding opportunities. Entrepreneur-focused courses concentrate on practical, hands-on approaches to business management so that you can learn invaluable skills like how to scale and attract talent. No one can teach you a great idea, but they can teach you what to do with it and how to turn it into a viable, competitive company.

One year MBA degree programs offered by business schools provide great financial returns, but whether you want to be an entrepreneur or an executive, a higher degree puts you in a position to achieve independence and control over your career. The real ROI of this degree is the education it gives you allowing you to embark on the career you’ve always envisioned for yourself – it’s time to stop crunching the numbers and apply today.

5 Tips to Save on Kids Room Décor

10

Children grow up so quickly, it can seem like one moment you have a baby’s nursery, and the next, a teenager’s fortress. It just doesn’t make sense to spend large amounts of money on interior design throughout their childhood, but luckily, there are ways to save on kids room décor. Here are 5 Tips to Save on Kids Room Décor and ideas to help you transform a child’s room without breaking the bank.

Tips to Save on Kids Room Décor

5 Tips to Save on Kids Room Decor

1. Painting

Paint is a cheap and easy way to make a huge change very quickly. Whether you are painting the walls of the bedroom, or some of the furniture, or the floor itself, it is a small investment and a big color payoff. Many parents try to stick to more neutral shades on the walls to avoid frequent re-paints as the child grows up, but it can be fun to completely alter the base of the room’s color scheme. Try a statement wall or even just a backsplash behind the crib, bed or dresser, for less effort and a great new look.

painting-black-paint-roller-small

2. Consignment Shops

If you aren’t interested in buying all-new furniture every time a child ages out of a crib, for example, consignment shops can be a fantastic way to acquire replacement pieces at a low cost. Often, these shops will have high-quality, if well-used, furniture at very reasonable prices, though you may need to give them a bit of elbow grease or even refinish items before they are usable.

3. Online Promos

Some people and kids especially would prefer not to buy pre-used furniture. For those times, try your favourite kids furniture store, like IKEA, but keep an eye out for voucher codes, which work like coupons to give you an extra discount. A little web search for promos for your web shop of choice can save big! Keep in mind, some assembly may be required with newly-purchased kids furniture. 

Tips to Save on Kids Room Décor

4. Accessories

Accessories can make or break a room’s overall look, as any interior designer will know, so look for inexpensive pieces that can be placed on bookshelves and dressers using a simple process of reasoning. Does the item match the overall décor? For example, is it a nautical piece to coordinate with a nautical-themed room? Secondly, does it match the color scheme or can it be repainted to match? If the child in question loves elephants, but a silver metallic finish won’t work in the room, you can always spray-paint it to blend better with the room’s look. (Always use non-toxic paint, and if the child is very young, it may be safer to avoid painting anything they could fit into their mouth.)

pexels-photo-115747-small

5. Wall Gallery

And for a trendy look at a very low price, try creating your own gallery-style wall art. Simply look for old frames at garage sales or thrift stores, then spray-paint them all bright white or a series of coordinating colors, arrange on the wall and you’ve got personalized wall art! Leave the frames empty, fill with family photos, pieces of fabric, or scrapbook paper as you desire – it’s quick and easy to customize to your own tastes.

May Your Days Be Merry and Bright And a Macaccino Recipe

23

Merry Christmas


It is all too easy to truly miss enjoying the magic of Christmas. Everything leads up to that one special day, and within the blink of an eye, it is vanished until next year.

All the stress over shopping, cooking, receiving guests, card sending, fending off a seasonal cold, can propel us into a chaotic whirl wind of emotional stress.

Instead of really enjoying Christmas, we end up living outside of the moment, thinking about all the things the New Year will bring: will the economy get better, will my career be secure, will the kids make their grades, will I be able to lose this extra ”Christmas goodies” weight…and the list goes on.

It seems as though the older we get, the more difficult it becomes to rekindle that child-like magic that was so enjoyable many years ago. With “Silver Bells,” “White Christmas,” and “Rudolph The Red Nose Reindeer” playing on the radio nearby, my grandmother and I would make her famous meat pies and delicious donuts. Do you remember your Christmas childhood experiences?

As we lead up to this festive time, I invite you to take time to rekindle that magic.

  • Lose yourself in the smiles of children;
  • Play and sing along to Christmas carols;
  • Kiss your partner under the mistletoe; ( I really like this one!)
  • Buy yourself something you’ve always wanted;
  • Snuggle up with a warm drink by the fire. (try out the recipe below!)


Mocaccino recipe

Macaccino

A delicious energizing drink. Maca root is an adaptogen plant and helps improve energy, fertility, memory and learning. Raw cocoa powder offers beneficial antioxidant ands anti-inflammatory properties.
No ratings yet
Servings 2

Ingredients
  

  • 2 cups whole milk or your favourite milk alternative
  • 2 Tbsp raw cocoa powder
  • 1 tsp maca powder
  • 2 Tbsp maple syrup

Instructions
 

  • In a small sauce pan, warm milk over medium heat.
  • Add raw cocoa powder, maca and maple syrup.
  • Whisk to combine and heat to desired temperature.
  • Alternatively, steam milk with an espresso machine.
  • Pour over cocoa, maca and maple syrup that has been whisked in a mug, using a spoon to hold back the foam.
  • Spoon a dollop of foam on top.
Tried this recipe?Let us know how it was!
 

This could be viewed as a selfish mindfulness exercise, yet it is one of huge awareness, because once you step back and get off that train that drags you through Christmas at 100 miles per hour with little control over your level of enjoyment, a snowball effect will happen and you will start to enjoy Christmas through love and laughter.

Christmas isn’t just the 25th of December, the day you assure everyone else’s happiness. It is a month’s worth of bringing the mind home from all the year’s stresses, ups and downs, fears, uncertainties and doubts.


Merry Christmas


Take a deep breath and enjoy Christmas to its fullest potential, and know this; everything will have a natural way of working itself out in the New Year, no matter how much you worry about it.

So let it all go, be in the moment and….
 

May all of your Christmases be white…

 Julie


Photo credits: Julie Clouthier

Super Easy M&M’s Monkey Bread Recipe

47


Super Easy M&M’s Monkey Bread 

Monkey bread is a fun addition to any dessert table, regardless of the time of year. This recipe features everyone’s favourite… M&M’s. But, you can easily replace them with another type of your favourite candy.

How did the bread get its name? Have you ever watched monkeys at the zoo? They typically pick apart their food before they eat it. And, before that, the bread was commonly referred to as aranygaluska. I dare you to say that, three times fast!

Translated, it means “golden dumpling.” This dish was extremely popular with Hungarian immigrants, during the 1800s, who brought the recipe with them to the United States. The original version omitted rolling the dough balls and cinnamon and sugar. Butter was used in its place, giving it more of a pastry feel.


Youtube video


Other names for monkey bread include “Hungarian coffee cake,” “puzzle bread,” “sticky bread” and “bubble loaf.” Whatever you happen to call it; it’s a yummy treat that will have everyone asking for more.

The ease of preparing this recipe can be attributed to using refrigerated biscuit dough. Simply cut each biscuit into quarters and you’re good to go. 

This recipe instructs you to bake the bread in a Bundt pan. However, if you don’t have one available, you can probably just as easily use individual ramekins to make mini breads. Adjust the baking time accordingly, until the dough is golden brown.

Drizzling caramel sauce over your M&M’s monkey bread kicks the recipe up a notch. If you’re not all that fond of caramel, chocolate is a suitable replacement. Better yet, live a little and use both.

One of the most enjoyable things about baking is that you’re the boss! If you want to get creative in the kitchen, there’s absolutely nothing stopping you. So, why not make some yummy monkey bread today?


M&M's Monkey Bread Recipe
M&M’s Monkey Bread


For this recipe, you will need the following ingredients:

Ingredients

  • 2 – 7.5 oz cans refrigerated biscuits dough
  • 1 bag of M&Ms
  • 1 Cup sugar
  • 1 Tablespoon cinnamon
  • 1 Cup butter
  • 1 1/4 Cup brown sugar
  • Ziplock bag
  • rolling-pin
  • caramel sauce


M&M's Monkey Bread Recipe
M&M’s Monkey Bread


The M&M’s Monkey Bread Recipe is so easy to make! This is how you do it:

Directions

  • Preheat oven to 375º.
  • Spray your bundt pan with non-stick cooking spray heavily, and set aside. 
  • Open the cans of biscuit dough.
  • Cut your biscuits into quarters.
  • Place 2 pieces of M&Ms into the centre of one quarter and add another quarter on top. Press the edges.
  • In a small sauce pan, combine the butter and brown sugar. Mix until melted and combined.
  • Combine sugar and cinnamon into a ziplock bag.
  • Place the M&M filled biscuits inside of the bag and shake until coated.
  • Now begin place the dough balls in the bundt pan evenly spreading them out.
  • Pour the brown sugar and butter mixture over the dough balls in the bundt pan.
  • Bake for 20-25 minutes, until dough appears to be a golden brown.
  • Let for 5 minutes then place on your serving dish
  • Drizzle caramel sauce and sprinkle M&M on top. 

Note: The sauce should be thick, but can pour. You might have to add more brown sugar. The sauce is the binding agent.  Pour the sauce evenly over the bundt pan filled with the monkey bread. Sometimes parts don’t stick the bottom layer, but just placed them right on top again. Let the bread set for 5-10 minutes. Flip it over onto the cake pan or plate. Let it sit again for the pieces to settle down into place.

I hope you enjoyed my M&M’s Monkey Bread recipe! If you make it, make sure to share with us on Facebook or Twitter! Also, check out all of our other Recipes.


M&M's Monkey Bread Recipe
M&M’s Monkey Bread

Super Easy M&M’s Monkey Bread

4.80 from 5 votes

Ingredients
  

  • 2 – 7.5 oz cans refrigerated biscuit dough
  • 1 bag of M&Ms
  • 1 Cup sugar
  • 1 Tablespoon cinnamon
  • 1 Cup butter melted
  • 1 1/4 Cup brown sugar
  • Ziplock bag
  • rolling pin
  • caramel sauce

Instructions
 

  • Preheat oven to 375º.
  • Spray your bundt pan with non-stick cooking spray heavily, and set aside.
  • Open the cans of biscuit dough.
  • Cut your biscuits into quarters.
  • Place 2 pieces of M&Ms into the centre of one quarter and add another quarter on top. Press the edges.
  • In a small sauce pan, combine the butter and brown sugar. Mix until melted and combined.
  • Combine sugar and cinnamon into a ziplock bag.
  • Place the M&M filled biscuits inside of the bag and shake until coated.
  • Now begin place the dough balls in the bundt pan evenly spreading them out.
  • Pour the brown sugar and butter mixture over the dough balls in the bundt pan.
  • Bake for 20-25 minutes, until dough appears to be a golden brown.
  • Let for 5 minutes then place on your serving dish
  • Drizzle caramel sauce and sprinkle M&M on top.

Notes

The sauce should be thick, but can pour. You might have to add more brown sugar. The sauce is the binding agent.  Pour the sauce evenly over the bundt pan filled with the monkey bread. Sometimes parts don't stick the bottom layer, but just placed them right on top again. Let the bread set for 5-10 minutes. Flip it over onto the cake pan or plate. Let it sit again for the pieces to settle down into place.
Tried this recipe?Let us know how it was!


Manage Your Weight with These Pancake Recipes

12

13916488814_4fcb209d07_z 

Manage Your Weight with These Pancake Recipes

I love pancakes. I am sure you all do but restrain yourselves because you consider them high-calorie sweet treats. This is not necessarily true. A few simple changes in the pancake base will reduce their calorie content. Plus, pancake recipes allow experimenting with other ingredients that will make them even healthier without spoiling their deliciousness. Like those rich in chromium.

Chromium is a mineral needed by the body in small amounts for healthy functioning. It has been associated with less weight gain, reduction in the risk for obesity, and may positively affect food intake. Studies have shown that increased intake of chromium supplements resulted in reduced hunger levels, fewer fat cravings and a decrease in body weight. Other benefits of chromium are:

  • regulation of blood sugar
  • diabetes control
  • heart health and control of cholesterol
  • brain health, including concentration, memory and mood regulation
  • skin health
  • eyes health

Find out which ingredients are rich in chromium and choose an easy pancake recipe to incorporate them into.

How to Reduce the Calorie Content in Pancakes

As I said, you need to make a few important changes in the pancake batter to make it healthier and reduce its calorie content. You can’t expect to lose weight by eating sugary sweet treats based on white refined flour, can you?

  • Replace regular flour with whole wheat, oatmeal, coconut flour, almond flour or soy flour;
  • Replace regular refined sugar with honey, pure maple syrup, molasses, agave syrup or stevia;
  • Replace regular milk with non-dairy milk, like almond, soy, rice or coconut milk. If you are using yogurt for fluffiness (I highly recommend that you do), choose a low-fat or nonfat variation or soy yogurt;
  • Use healthier vegetable oil alternatives both in the batter and for frying, like olive oil or coconut oil.

Chromium-Infused Pancakes

6116171380_435a2e5526_z


Here are some suggestions on how to incorporate chromium-infused ingredients into your pancake recipes.

Ambitious amateur cooks know very well that pancakes don’t have to be sweet. I usually prepare savory pancake recipes whenever I have “tired” vegetables in my fridge or when I am not in the mood for serious cooking. I usually make the Korean pancake version that usually combines different vegetables, with meat/seafood or without it. I have prepared the variation that combines broccoli, chili peppers and soybean paste. It is usually served with a dipping sauce consisting of soy sauce, vinegar, and sugar.

If you decide to include meat, choose grass-fed beef or turkey that are especially rich in chromium. Serve with a glass of red wine (also chromium-rich).

Another delicious food that is full of chromium is potatoes. If you haven’t made potato pancakes now is the right time to do it. Mix them with onions, garlic (also rich in chromium), peppers, eggs, a little flour, and cheese (choose low-fat variation to maintain control of the calories intake) and prepare the fastest and tastiest lunch ever!

Choose another chromium-infused ingredient for spicing – basil. Note: Basil can be also added to sweet pancakes. Idea: add 1/3 cup fresh minced basil to lemon pancake recipe and cover in a blueberry compote.


12725773684_a9dbbf3e0f_z


Back to sweet pancakes. Fruits that are rich in chromium include:

  • Banana is a perfect ingredient for pancakes. It can replace both flour and sugar at the same time because of its thick texture and natural sweetness. Serve with banana slices on top, together with pure maple syrup and cinnamon;
  • The Orange Buttermilk Pancake recipe recommends zest of one orange in the batter and blueberry syrup on top;
  • Add a cup of diced apples in the batter and spice with cinnamon, ginger, and nutmeg;
  • There is an amazing recipe that calls for 1 ½ cup of blue grapes in one big pancake that is oven-baked.


Photo credit: kalyan02 via Foter.com / CC BY

Photo credit: Jamie McCaffrey via Foter.com / CC BY-NC

Photo credit: KFoodaddict via Foter.com / CC BY

Quick Tips Before Choosing Your Child’s Next Set of Toys

7

Many parents often seem to forget what kid’s educational toys are for, only buying as little as possible for their children or even relying on tablets to do the job. Playing is actually the “work” of childhood – it’s their way of acquiring skills, learning how things work, and interacting with their environment. The toys we buy for our children tells us so much about ourselves as well as our children. The thing is, this is a great opportunity to reach out and provide our kids with the best possible learning materials and toys that will shape their personality and worldview in the future – all the while having fun.

There are always colourful and new toys for the choosing and many have good play value. Here are some of the most important toys that you may provide your children.

Quick Tips Before Choosing Your Child’s Next Set of Toys

Quick Tips Before Choosing Your Child’s Next Set of Toys

Play toolbox and play kitchen stuff. For both genders. Kids just love imitating their parents and other adults around them. These types of toys help them get more comfortable with doing different things and even learning how to do certain tasks.

Legos. Lego blocks have been around for decades, and its popularity isn’t just about the new shiny and cool updates. Along with other manipulative toys, Lego encourages the development of the fine motor skills and creativity.

Unit blocks. Lots of plain wooden blocks in diverse sizes encourages hours of construction, alone or with others.

Baby dolls and accessories. We suggest getting dolls with different skin tones in the playroom. When children play and care for their dolls, they actually practice loving people who look different from themselves.

Dress-ups. Hats, scarves, leotards, animal masks. Hunt your closet or the local thrift shop and collect stuff in a box for hours of creative and interactive play.

Finger paint. Let them play and get messy once in a while. You might also add an inexpensive plastic tablecloth to spread on the floor when finger paint time’s about to start.

Quick Tips Before Choosing Your Child’s Next Set of Toys
Arts and crafts materials

Art stuff. Get as much as possible! Cookie cutters, playdough, paper, and chunky crayons for little kids. Older kids prefer glitter, glue, scissors, and lots of coloured paper.

Sturdy plastic or rubber animals. This includes zoo animals, farm animals, and of course, dinosaurs, and a few vehicles scaled to work with the blocks. I’m telling you, your kid will spend hours making zoos, arms and dramatic scenes. Have them watch Jurassic World first, and watch their imagination grow.

Musical instruments. Prepare your kids for the real one by purchasing toy guitars, pianos, harmonicas, xylophones, flutes, etc.

Quick Tips Before Choosing Your Child’s Next Set of Toys

Dollhouse. Coupled with a lot of accessories, some basic furniture and durable dolls that represent everyone in the family. The house should be big enough for the kids to get in and play. Also, don’t be surprised to see a dinosaur or other zoo animals in there.

Toys that encourage physical activities. Balls, jump ropes, basic sports equipment, skates, age-appropriate toys, etc. Too many of today’s kids lack physical competence and confidence. These toys will help bridge that gap and bring the action into play.

Quick Tips Before Choosing Your Child’s Next Set of Toys

Board games. Board games help to encourage cooperative play and problem solving.

That’s it. Now you understand that play is the “work” of childhood, kid’s educational toys will help your child learn new skills as well as practice relationship with others and their world. Time to go shopping.

What is your child’s favourite toy or activity?